Garmin FORERUNNER 405 WRIST STRAP Omistajan opas

Tyyppi
Omistajan opas

Tämä käsikirja sopii myös

Forerunner
®
405 Wrist Strap
instructions
instructions
istruzioni
anweisungen
instrucciones
instruções
instructies
instruktioner
ohjeet
instruksjoner
instruktioner
February 2009 190-01066-91 Rev. A Printed in Taiwan
©2009 Garmin Ltd. or its subsidiaries
EN-2 Forerunner 405 Wrist Strap Instructions
See the Important Safety and
Product Information guide in
the product box for product
warnings and other important
information.
Step 1: Removing the
Forerunner Bands
Use the pin tool to compress the pins
in order to release the bands.
Pin tool
Pin-access
holes
1. Insert the pin tool into a pin-
access hole, and t it onto the end
of the pin.
2. Compress the pin while using
your free hand to gently pull the
band. One side of the band should
release.
3. Insert the pin tool into the other
pin-access hole on the band and
compress the pin to release the
other side.
4. Repeat steps 1 through 3 to
remove the other band.
Step 2: Installing the
Connectors
Loop with
pin
Connector B
Connector A
Tooth
Hole
Exposed
tooth
Exposed
tooth
Forerunner 405 Wrist Strap Instructions EN-3
1. Slide the
pin to the
side with
your
nger.
2. Push one side of
connector A onto
the exposed
Forerunner tooth.
(See the image
above.)
3. Use the
pin tool to
compress
the pin
while
pushing down on the connector.
The connector will snap into
place.
4. Slide the pin to the side on the
other side of the Forerunner.
5. Insert a tooth on
connector B into
the hole on the
Forerunner body.
See the image on
the previous page.
6. Use the pin tool to compress the
pin while pushing down on the
connector. The connector will
snap into place.
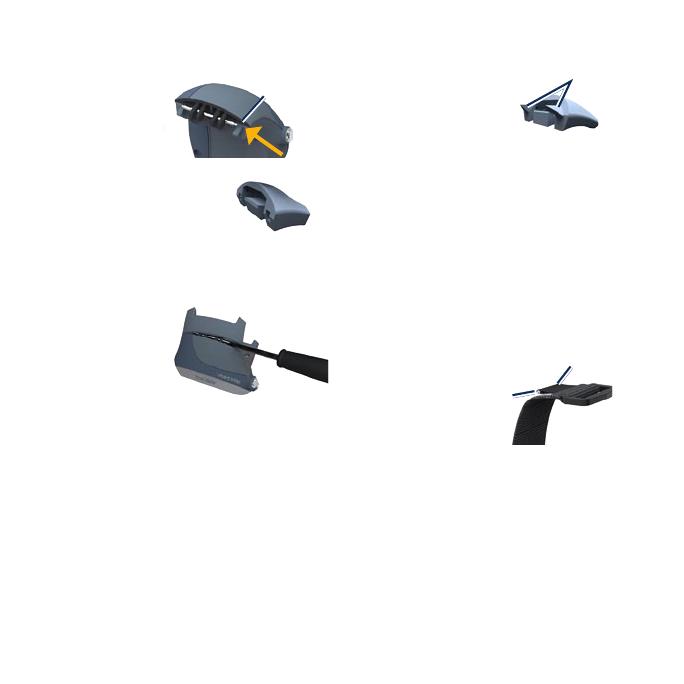
Step 3: Attaching the
Wrist Strap
1. Place the pin
in a loop of the
wrist strap.
2. Use the pin
tool to insert
the pin into both indentations on
the connector. Release the pin
when it is in place.
3. Repeat steps 1 and 2 to attach
the other side of the strap.
Connector AConnector A
Connector B
Teeth
Connector B
Teeth
Pin
Loop
Pin
Loop
See the Important Safety and
Product Information guide in
the product box for product
warnings and other important
information.
Step 1: Removing the
Forerunner Bands
Use the pin tool to compress the pins
in order to release the bands.
Pin tool
Pin-access
holes
1. Insert the pin tool into a pin-
access hole, and t it onto the end
of the pin.
2. Compress the pin while using
your free hand to gently pull the
band. One side of the band should
release.
3. Insert the pin tool into the other
pin-access hole on the band and
compress the pin to release the
other side.
4. Repeat steps 1 through 3 to
remove the other band.
Step 2: Installing the
Connectors
Loop with
pin
Connector B
Connector A
Tooth
Hole
Exposed
tooth
Exposed
tooth
Forerunner 405 -rannehihnan ohjeet FI-19
Lue lisätietoja varoituksista
ja muista tärkeistä seikoista
laitteen mukana toimitetusta
Tärkeitä turvallisuus- ja
tuotetietoja -oppaasta.
Vaihe 1: Forerunnerin
hihnojenirrottaminen
Purista tappeja tappityökalulla,
jotta hihnat irtoavat.
Tappityökalu
Tappien reiät
1. Työnnä tappityökalu tapin reikään
ja aseta se tapin päähän.
2. Purista tappia ja vedä hihnaa
toisella kädellä varovasti. Hihnan
toisen reunan pitäisi irrota.
3. Aseta tappityökalu hihnan toiseen
tapin reikään ja vapauta toinen
reuna puristamalla tappia.
4. Irrota toinen hihna toistamalla
vaiheet 1 - 3.
Vaihe 2: Liittimien
asentaminen
Lenkki
ja tappi
Liitin B
Liitin A
Sakara
Reikä
Paljas
sakara
Paljas
sakara
1. Siirrä
tappi
sivuun
sormella.
2. Työnnä liittimen
A toinen reuna
Forerunnerin
paljaaseen
sakaraan.
(Katso kuvaa yllä.)
3. Purista
tappia tap-
pityökalulla
ja paina
liitintä
alaspäin. Liitin napsahtaa
paikalleen.
4. Työnnä tappi Forerunnerin
toiseen reunaan.
5. Aseta liittimen B
sakara Forerunnerin
rungon aukkoon.
Katso kuvaa
edellisellä sivulla.
6. Purista tappia tappityökalulla
ja paina liitintä alaspäin. Liitin
napsahtaa paikalleen.
Vaihe 3: Rannehihnan
kiinnittäminen
1. Aseta tappi
rannehihnan
lenkkiin.
2. Aseta tappi
tappityökalun
avulla molempiin liittimen
syvennyksiin. Vapauta tappi,
kun se on paikallaan.
3. Kiinnitä hihnan toinen reuna
toistamalla vaiheet 1 ja 2.
Liitin ALiitin A
Liitin B
Sakarat
Liitin B
Sakarat
Tappi
Lenkki
Tappi
Lenkki
NO-20 Instruksjoner til håndleddstropp for Forerunner 405
Se veiledningen Viktig
sikkerhets- og produktinfor-
masjon i produktesken for å lese
advarsler angående produktet og
annen viktig informasjon.
Trinn1:Fjerne
Forerunner-båndene
Bruk pinneverktøyet til å presse
sammen pinnene for å frigjøre
båndene.
Pinneverktøy
Pinnehull
1. Sett inn pinneverktøyet i et
pinnehull, og fest det til enden av
pinnen.
2. Press sammen pinnen mens du
bruker den ledige hånden til å
trekke forsiktig i båndet. Den ene
siden av båndet skal løsne.
3. Sett inn pinneverktøyet i det andre
pinnehullet på båndet, og press
sammen pinnen for å frigjøre den
andre siden.
4. Gjenta trinn 1 til 3 for å fjerne det
andre båndet.
Trinn 2: Installere
koblingene
Løkke med
pinne
Kobling B
Kobling A
Tapp
Hull
TannTann
Forerunner 405 - instruktioner för handrem SV-23
I guiden Viktig säkerhets- och
produktinformation, som med-
följer i produktförpackningen,
nns det viktig information och
produktvarningar.
Steg 1: Ta bort
Forerunner-remmarna
Tryck in stiften med hjälp av
stiftverktyget så att remmarna
lossnar.
Stiftverktyg
Stifthål
1. Sätt in stiftverktyget i ett stifthål
och se till att det fäster i änden
på stiftet.
2. Tryck in stiftet medan du försiktigt
drar i remmen med den lediga
handen. Ena sidan av remmen
lösgörs.
3. Sätt in stiftverktyget i det andra
stifthålet på remmen och tryck in
stiftet så att andra sidan lossnar.
4. Upprepa steg 1 till 3 för att lösgöra
den andra remmen.
Steg 2: Montera
kopplingarna
Hank
med stift
Koppling B
Koppling A
Tapp
Hål
Utskjutande
tapp
Utskjutande
tapp
1. Dra stiftet
åt sidan
med
hjälp av
ngret.
2. Dra ena sidan
av koppling
A över den
utskjutande
Forerunner-
tappen. (Se bilden ovan.)
3. Tryck in
stiftet med
hjälp av
stiftverk-
tyget och
tryck samtidigt ned kopplingen.
Kopplingen knäpps fast.
4. Dra stiftet åt sidan på andra sidan
av Forerunner.
5. Sätt in en tapp på
koppling B i hålet
på huvuddelen
av Forerunner.
Se bilden på
föregående sida.
6. Tryck in stiftet med hjälp av
stiftverktyget och tryck samtidigt
ned kopplingen. Kopplingen
knäpps fast.
Steg 3: Fästa
handremmen
1. Sätt stiften i
en hank av
handremmen.
2. Sätt in
stiftet i båda
fördjupningarna i kopplingen med
hjälp av stiftverktyget. Släpp stiftet
när det sitter på plats.
3. Upprepa steg 1 och 2 för att fästa
andra sidan av remmen.
Koppling AKoppling A
Koppling B
Tappar
Koppling B
Tappar
Stift
Hank
Stift
Hank
  • Page 1 1
  • Page 2 2
  • Page 3 3
  • Page 4 4
  • Page 5 5
  • Page 6 6
  • Page 7 7
  • Page 8 8
  • Page 9 9
  • Page 10 10
  • Page 11 11
  • Page 12 12
  • Page 13 13
  • Page 14 14
  • Page 15 15
  • Page 16 16
  • Page 17 17
  • Page 18 18
  • Page 19 19
  • Page 20 20
  • Page 21 21
  • Page 22 22
  • Page 23 23
  • Page 24 24

Garmin FORERUNNER 405 WRIST STRAP Omistajan opas

Tyyppi
Omistajan opas
Tämä käsikirja sopii myös