Yamaha SPM-K8 Omistajan opas
- Kategoria
- Projector mounts
- Tyyppi
- Omistajan opas

English Français Deutsch Svenska Italiano Español Nederlands
SPM-K8
WALL MOUNT BRACKET
SUPPORT MURAL
Installation Manual
Manuel d’installation
Installationsanleitung
Instllationsanvisningar
Manuale d’installazione
Manual de instalación
Installatiehandleiding

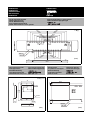
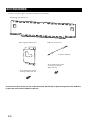
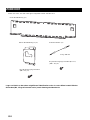
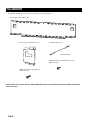
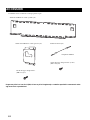
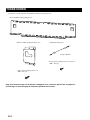
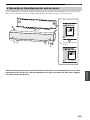
DIMENSIONS
DIMENSIONS
ABMESSUNGEN
MATTSKISSER
DIMENSIONI
DIMENSIONES
AFMETINGEN
Large wall mount bracket
Grand support mural
Große Wandhalterung
Stort väggmonteringsfäste
Staffa di installazione a muro grande
Soporte de montaje en pared grande
Grote wandbevestigingsbeugel
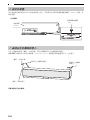
Small wall mount bracket
Petit support mural
Kleine Wandhalterung
Litet väggmonteringsfäste
Staffa di installazione a muro piccola
Soporte de montaje en pared pequeño
Kleine wandbevestigingsbeugel
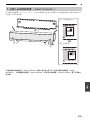
Unit with bracket
Le système avec son support
Einheit mit Halterung
Ljudprojektorn med fästet
Unità con staffa
Unidad con ménsula
Toestel met de beugel
YSP-800
SPM-K8
109.3
124.5
540.2
42.5 42.5
6- 524- 5x20
72.5
72.5
102.5
102.5
132.5
132.5
162.5
162.5
192.5
192.5
222.5
222.5
250
250
22.5 22.5
7
52.5
52.5
82.5
82.5
112.5
112.5
142.5
142.5
170
170
(mm)
1.0kg
78
M6TAP
2- 4.5x6.5
2- 4.5
22 26
102.9
116.9
30
15
16.9
129.9
YSP-800
SPM-K8
15.725.8
(mm)
(mm)
0.1kg × 2

English
SPM-K8
E-1
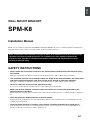
WALL MOUNT BRACKET
SPM-K8
Installation Manual
Thank you very much for purchasing the Wall Mount Bracket SPM-K8. Be sure to read this manual thoroughly before
using this bracket. After you have read this manual, retain it for future reference.
SAFETY INSTRUCTIONS
• Always follow the instructions set forth in this manual when installing the Sound Projector using
this bracket.
Improper or inadequate installation could cause the Sound Projector to fall, resulting in personal injury.
• The installation must be secure enough to bear the weight of the Sound Projector, the wall bracket
and other hardware indefinitely, and must also be secure enough to withstand vibrations.
Improper or inadequate installation could cause the Sound Projector to fall, resulting in personal injury.
• To ensure safety, all screws must be tightened securely.
Loose screws could cause the Sound Projector to fall, resulting in personal injury.
• Make sure to leave adequate ventilation space around the unit to allow heat generated by the
Sound Projector to dissipate.
Failure to provide adequate space around the unit could cause the Sound Projector to overheat internally, resulting in a
fire.
• Never hang from the Sound Projector or the wall bracket.
Hanging from the Sound Projector or the wall bracket could cause the Sound Projector or the wall bracket to fall,
resulting in personal injury.
• Once the Sound Projector is installed, safety checks should be conducted on a regular basis.
If the Sound Projector is used over an extended period of time, screws can become loose and the installation can
become weaker due to the passage of time, vibrations, etc.
When installing the Sound Projector using this bracket, all installation work must be performed by
a qualified contractor or dealer personnel. The customer must never attempt to perform this
installation work. Improper or inadequate installation could cause the Sound Projector to fall,
resulting in personal injury.

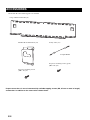
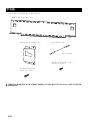
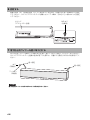
ACCESSORIES
E-2
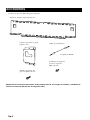
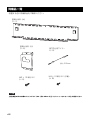
Check that all of the following parts are included.
Prepare more than six sets of commercially available tapping screws (M4, 25 mm or more in length)
and washers in addition to the accessories shown above.
ACCESSORIES
Small wall mount brackets (x2)
Projector mounting screws
(M6 x 16) (x2)
Safety wires (x2)
Length 300mm
Large wall mount bracket (x1)
Projector mounting screws (spare)
(M4 x 10) (x8)

English
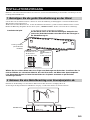
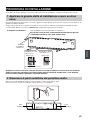
INSTALLATION PROCEDURE
E-3
Make sure to leave adequate ventilation space around the unit and follow the instructions below.
In order to secure the unit to the wall, you will need to attach the bracket to the wall first in a manner befitting the
structure and quality of the wall.
Choose a location where the wall can bear the weight of the whole unit.
Before installing the bracket, make sure of the size (see “DIMENSIONS” on the first page of this manual).
Choose a secure wall or beam to fasten the screws. Do not install them into walls made of weak
material that can easily come off, such as mortar or plywood wall panels. Loose screws could cause
the projector to fall, resulting in personal injury.
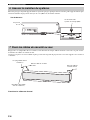
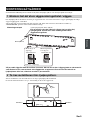
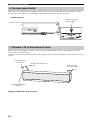
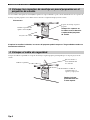
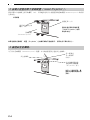
Detach the metal apparatuses from the rear left and right sides of the Sound Projector.
You need the detached screws in procedure 3. Be careful not to lose them.
INSTALLATION PROCEDURE
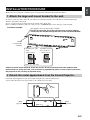
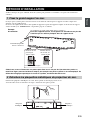
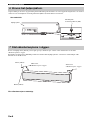
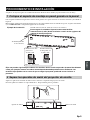
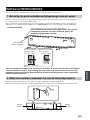
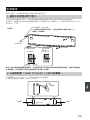
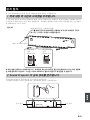
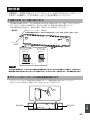
1 Attach the large wall mount bracket to the wall.
2 Detach the metal apparatuses from the Sound Projector.
Washer
(commercially
available)
4mm Tapping Screw (commercially available)
In order to secure the unit to the wall, drive four (or more) tapping
screws from the outside through the holes in the wall mount bracket.
Installing into a dry
wall
Installing directly
into a wall, etc.
25mm or more
25mm or more
Beam, etc. Dry wall
Metal
apparatus
Metal
apparatus
Installation example

INSTALLATION PROCEDURE
E-4
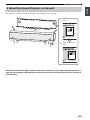
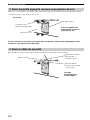
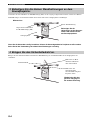
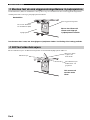
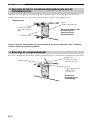
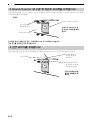
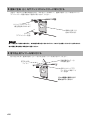
Use screws of the metal apparatus (M4) detached in procedure 2 to securely attach the two small wall mount brackets to
the rear left and right sides of the Sound Projector.
If you tighten the screws on the slant, the screw threads in the projector might be broken.
Be careful when using electric tools.
Attach the safety wire to the small wall mount bracket to prevent the Sound Projector from falling.
3 Attach the small wall mount brackets to the Sound Projector.
4 Attach the safety wire.
Detached screw of the
metal apparatus (M4)
Sound Projector
Small wall mount bracket
Rear View
Safety wire
Slip one end
through the loop
at the other end
Repeat the same
procedure for the
other bracket.
Slip the safety wire
between the bracket
and the projector
Attach the brackets to the
rear left and right sides of
the Sound Projector.

INSTALLATION PROCEDURE
E-5
English
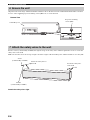
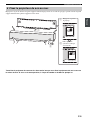
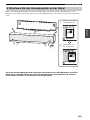
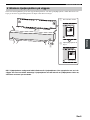
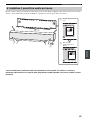
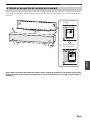
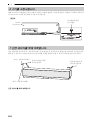
Fit the mounting guide hooks of the small wall mount brackets attached to the Sound Projector into the holes on the left
and right sides of the large wall mount bracket and then slide the unit to the right.
Hold the Sound Projector tight with both hands when attaching or removing the Sound Projector to or
from the wall. Holding the Sound projector loosely could cause the Sound projector to fall, resulting in
personal injury.
5 Mount the Sound Projector on the wall.
2
1
1
2
Slide the unit to the
right.
Fit the hook into the
hole.

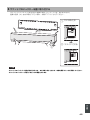
INSTALLATION PROCEDURE
E-6
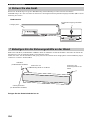
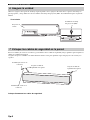
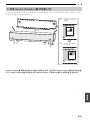
Align the holes in the large wall mount bracket with the holes in the bottom of the small wall mount brackets, and then
use two of the supplied projector mounting screws (M6 x 16) to secure the unit.
Pass the screws (commercially available) through the loops of the safety wires and then tighten the screws to secure the
safety wires to the wall.
Make sure that the screws are strong enough to bear the weight of the Sound Projector and the brackets in case they fall.
Attach the safety wires tight.
6 Secure the unit.
Bottom View
Sound Projector
Projector mounting
screws (M6)
7 Attach the safety wires to the wall.
Secure the safety wire to
the wall.
Washer
(commercially available)
Secure the safety wire
to the wall.
Screw
(commercially available)

SPM-K8
F-1
Français
SUPPORT MURAL
SPM-K8
Manuel d’installation
Nous vous remercions d’avoir porté votre choix sur le support mural SPM-K8. Veuillez prendre soin de lire attentivement
ce manuel avant d’installer ce support. Conservez-le pour référence ultérieure.
INSTRUCTIONS DE SÉCURITÉ
• Respectez les instructions que contient ce manuel et qui concernent l’installation du projecteur de
son au moyen de ce support mural.
Une erreur d’installation peut provoquer la chute du projecteur de son, entraînant des blessures.
• L’installation doit être en mesure de résister, sans limite de durée, au poids du projecteur de son,
du support mural et de la quincaillerie; elle doit également s’accommoder, le cas échéant, des
vibrations.
Une erreur d’installation peut provoquer la chute du projecteur de son, entraînant des blessures.
• Pour garantir la sécurité, toutes les vis doivent être soigneusement serrées.
Un défaut de serrage peut provoquer la chute du projecteur de son, entraînant des blessures.
• Veillez à ménager un espace suffisant autour le projecteur de son pour que la chaleur qu’il dégage
puisse se dissiper.
Faute de ménager un espace suffisant autour le projecteur de son, il pourrait surchauffer, ce qui est susceptible de
provoquer un incendie.
• Ne vous suspendez pas au projecteur de son, ni au support mural.
En vous suspendant au projecteur de son ou au support, vous pouvez provoquer la chute du projecteur de son ou du
support, entraînant des blessures.
• Après installation du projecteur de son, des vérifications de sécurité doivent être effectuées
périodiquement.
Lorsque le projecteur de son est utilisé pendant une période prolongée, les vis peuvent se desserrer, en raison de
vibrations, etc., rendant l’installation moins sûre.
L’installation du projecteur de son à l’aide de ce support doit être réalisé par un ouvrier compétent
ou un représentant du revendeur. En aucun cas, vous ne devez tenter d’effectuer l’installation par
vous-même. Une erreur d’installation peut provoquer la chute du projecteur de son, entraînant des
blessures.

ACCESSOIRES
F-2
Assurez-vous que les pièces suivantes font partie de la fourniture.
Procurez-vous plus de six jeux de vis du commerce (M4, 25 mm ou plus de longueur) et de rondelles,
en plus des accessoires indiqués ci-dessus.
ACCESSOIRES
Petits supports muraux (x2)
Vis de fixation du système
acoustique (M6 x 16) (x2)
Câbles de sécurité (x2)
Longueur 300 mm
Grands supports muraux (x1)
Vis de fixation du système
acoustique (rechange)
(M4 x 10) (x8)

MÉTHODE D’INSTALLATION
F-3
Français
Veillez à ménager un espace suffisant autour du système pour permettre sa ventilation, et respectez les instructions
suivantes.
De façon que le système puisse être fixé au mur, il vous faut tout d’abord poser le support en tenant compte de la
structure et de la qualité du mur.
Choisissez un emplacement dans le mur capable de supporter le poids de l'appareil complet. Avant de fixer le support,
vérifiez la taille (voir “DIMENSIONS” à la première page de ce manuel).
Choisissez un mur résistant ou une poutre pour fixer les vis. Ne pas les fixer dans des parois en
matériaux légers pouvant facilement rompre, par exemple une paroi en plâtre ou en contreplaqué. Un
défaut de serrage peut provoquer la chute du système, entraînant des blessures.
Détachez les plaquettes métalliques des côtés arrière gauche et droit du projecteur de son.
Vous aurez besoin des vis détachées à l’étape 3. Attention de ne pas les perdre.
MÉTHODE D’INSTALLATION
1 Fixez le grand support au mur.
2 Détachez les plaquettes métalliques du projecteur de son.
Rondelles(disponible
dans le commerce)
Vis taraudeuse de 4 mm (disponible dans le commerce)
Pour fixer l'appareil au mur, vissez quatre vis taraudeuses ou plus de
l’extérieur par les orifices pratiqués dans le support mural.
Fixation sur une
paroi légère
Fixation directe
sur un mur, etc.
25mm ou plus
25mm ou plus
Poutre, etc.
Paroi légère
Exemple
d’installation
Plaquettes
métalliques
Plaquettes
métalliques

MÉTHODE D’INSTALLATION
F-4
Utilisez les vis des plaquettes métalliques (M4) détachées à l’étape 2 pour fixer les deux petits supports muraux aux
côtés arrière gauche et droit du projecteur de son.
Si vous serrez les vis de travers, les filetages dans le projecteur risquent d’être endommagés. Faites
attention si vous utilisez un outil électrique.
Fixez le câble de sécurité au petit support mural pour empêcher le projecteur sonore de tomber.
3 Fixez les petits supports muraux au projecteur de son.
4 Fixez le câble de sécurité.
Vis détachée de la
plaquette métallique (M4)
Projecteur de son
Petit support mural
Vue arrière
Câble de sécurité
Engagez une extrémité
dans la boucle, à
l’extrémité opposée
Procédez
pareillement pour
l’autre support.
Insérez le câble de
sécurité entre le support
et le projecteur
Fixez les supports aux
côtés gauche et droit du
projecteur de son.

MÉTHODE D’INSTALLATION
F-5
Français
Engagez les ergots de fixation des petits supports muraux du projecteur de son dans les perçages gauche et droit du grand
support mural et faites glisser l'appareil vers la droite.
Tenez bien le projecteur de son avec les deux mains lorsque vous fixez le projecteur de son au mur ou
le retirez du mur. Si vous ne le tenez pas bien, il risque de tomber et de blesser quelqu’un.
5 Fixez le projecteur de son au mur.
2
1
1
2
Faites glisser le
système acoustique
vers la droite.
Engagez l’ergot dans
le perçage.

MÉTHODE D’INSTALLATION
F-6
Placez les perçages du grand support mural en regard des perçages pratiqués dans le fond des petits supports muraux puis
assurez le maintien du projecteur au moyen de 2 vis (M6 x 16) de fixation fournies.
Engagez une vis (disponible dans le commerce) dans la boucle de chaque câble de fixation et serrez les vis pour assurer
le maintien des câbles de sécurité au mur.
Assurez-vous que les vis ont la solidité requise pour résister au poids du projecteur de son et des supports s’ils venaient à
se détacher.
Fixez bien les câbles de sécurité.
6 Assurez le maintien du système.
Vue de dessous
Projecteur
de son
Vis de fixation du
système acoustique (M6)
7 Fixez les câbles de sécurité au mur.
Fixez le câble de sécurité
au mur.
Rondelles (disponible
dans le commerce)
Fixez le câble de
sécurité au mur.
Vis (disponible dans le
commerce)

SPM-K8
G-1
Deutsch
WANDHALTERUNG
SPM-K8
Installationsanleitung
Wir möchten uns bei dieser Gelegenheit dafür bedanken, dass Sie sich für die Wandhalterung SPM-K8 entschieden
haben. Bitte lesen Sie diese Anleitung aufmerksam durch, bevor Sie diese Halterung verwenden. Nachdem Sie diese
Anleitung gelesen haben, bewahren Sie diese für spätere Nachschlagzwecke sorgfältig auf.
SICHERHEITSANWEISUNGEN
• Befolgen Sie immer die in dieser Anleitung aufgeführten Instruktionen, wenn der Soundprojektor
unter Verwendung dieser Halterung eingebaut wird.
Fehlerhafte oder ungeeignete Installation kann zu einem Herunterfallen des Soundprojektors und damit zu persönlichen Verletzungen führen.
• Die Installation muss sicher ausgeführt werden, um das Gewicht des Soundprojektors, der
Wandhalterung und der anderen Hardware auf Dauer abstützen und Vibrationen widerstehen zu können.
Fehlerhafte oder ungeeignete Installation kann zu einem Herunterfallen des Soundprojektors und damit zu persönlichen Verletzungen führen.
• Für optimale Sicherheit ist es unbedingt erforderlich, dass alle Schrauben richtig festgezogen werden.
Lose Schrauben können zu einem Herunterfallen des Soundprojektors und damit zu persönlichen Verletzungen führen.
• Halten Sie ausreichenden Abstand für die Belüftung rund um das Gerät ein, damit die von dem
Soundprojektor erzeugte Wärme gut abgeführt werden kann.
Bei unzureichender Belüftung kann es zu einer internen Überhitzung des Soundprojektors kommen, was einen Brand verursachen kann.
• Hängen Sie niemals etwas auf dem Soundprojektor oder der Wandhalterung auf.
Falls Sie etwas auf dem Soundprojektor oder der Wandhalterung aufhängen, kann der Soundprojektor oder die
Wandhalterung herunterfallen, wodurch persönliche Verletzungen verursacht werden können.
• Sobald der Soundprojektor richtig installiert ist, sollten in regelmäßigen Abständen
Sicherheitskontrollen ausgeführt werden.
Wird der Soundprojektor für längere Zeit verwendet, dann können sich die Schrauben lösen bzw. die Installation kann
aufgrund von Zeitablauf, Vibrationen usw. geschwächt werden.
Bei der Installation des Soundprojektors unter Verwendung dieser Halterung müssen alle
Einbauarbeiten von einem qualifizierten Wartungs- oder Kundendiensttechniker ausgeführt werden.
Der Kunde sollte niemals versuchen, diese Einbauarbeiten selbst auszuführen. Fehlerhafte oder
ungeeignete Installation kann zu einem Herunterfallen des Soundprojektors und damit zu
persönlichen Verletzungen führen.

ZUBEHÖR
G-2
Stellen Sie sicher, dass alle nachfolgend aufgeführten Teile enthalten sind.
Legen zusätzlich zu den oben aufgeführten Zubehörteilen mehr als sechs Sätze handelsüblicher
Schrauben (M4, Länge 25 mm oder mehr) sowie Unterlegscheiben bereit.
ZUBEHÖR
Kleine Wandhalterungen (x2)
Projektorbefestigungsschrauben
(M6 x 16) (x2)
Sicherheitsdrähte (x2)
Länge 300 mm
Große Wandhalterung (x1)
Projektorbefestigungsschrauben (Reserve)
(M4 x 10) (x8)

INSTALLATIONSVORGANG
G-3
Deutsch
Halten Sie ausreichend Abstand rund um das Gerät ein, um ausreichende Belüftung sicherzustellen, und befolgen Sie die
nachfolgenden Instruktionen.
Um das Gerät an der Wand zu sichern, müssen Sie zuerst die Halterung in Abhängigkeit von der Beschaffenheit der
Wand richtig an dieser befestigen.
Wählen Sie einen Installationsort aus, an dem die Wand das Gewicht des gesamten Gerätes abstützen kann. Vor dem
Einbau der Halterung überprüfen Sie die Größe (siehe „ABMESSUNGEN“ auf der ersten Seite dieser Anleitung).
Wählen Sie eine sichere Wand oder einen Träger zum Befestigen der Schrauben. Installieren Sie sie
nicht an Wänden aus schwachem Material, das sich lösen kann, wie Mörtel oder Sperrholzplatten.
Lose Schrauben können zu einem Herunterfallen des Projektors und damit zu persönlichen
Verletzungen führen.
Nehmen Sie die Beschläge von den hinteren linken und rechten Seiten des Soundprojektors ab.
Sie benötigen die abgenommenen Schrauben in Vorgang 3. Achten Sie darauf, sie nicht zu verlieren.
INSTALLATIONSVORGANG
1 Befestigen Sie die große Wandhalterung an der Wand.
2 Nehmen Sie den Metallbeschlag vom Soundprojektor ab.
Unterlegescheiben
(im Fachhandel
erhältlich)
4 -mm-Schneidschraube (im Fachhandel erhältlich)
Um das Gerät sicher an der Wand zu befestigen, drehen Sie vier
(oder mehr) Schneidschrauben von außen durch die Öffnungen in
der Wandhalterung ein.
Installation an einer
Trockenwand
Direkte
Wandinstallation,
usw.
25 mm oder mehr 25 mm oder mehr
Träger usw.
Trockenwand
Installationsbeispiel
MetallbeschlagMetallbeschlag

INSTALLATIONSVORGANG
G-4
Verwenden Sie die Schrauben des Metallbeschlags (M4), der in Vorgang 2 abgenommen wurde, um die zwei kleinen
Wandhalterungen an den hinteren linken und rechten Seiten des Soundprojektors anzubringen.
Wenn Sie die Schrauben schräg festziehen, können die Schraubgewinde im Projektor zerstört werden.
Seien Sie bei der Verwendung von elektrischen Werkzeugen vorsichtig.
Bringen Sie den Sicherheitsdraht an der kleinen Wandhalterung an, um Herunterfallen des Soundprojektors zu
verhindern.
3 Befestigen Sie die kleinen Wandhalterungen an dem
Soundprojektor.
4 Bringen Sie den Sicherheitsdraht an.
Abgenommene Schrauben
des Metallbeschlags (M4)
Soundprojektor
Kleine Wandhalterung
Rückansicht
Befestigen Sie die
Halterungen an den hinteren
linken und rechten Seiten
des Soundprojektors.
Sicherheitsdraht
Führen Sie ein Ende
durch die Schlaufe an
dem anderen Ende
Wiederholen Sie den
gleichen Vorgang für
die andere Halterung.
Führen Sie den
Sicherheitsdraht
zwischen Halterung und
Projektor durch

INSTALLATIONSVORGANG
G-5
Deutsch
Führen Sie die Einbauführungshaken der an dem Soundprojektor angebrachten kleinen Wandhalterungen in die
Bohrungen an den linken und rechten Seiten der großen Wandhalterung ein, und schieben Sie danach das Gerät nach
rechts.
Halten Sie den Soundprojektor beim Anbringen oder Abnehmen des Soundprojektors an/von der
Wand sicher mit beiden Händen fest. Wenn der Soundprojektor locker gehalten wird, könnte er
herunterfallen und damit zu persönlichen Verletzungen führen.
5 Montieren Sie den Soundprojektor an der Wand.
2
1
1
2
Schieben Sie das
Gerät nach rechts.
Führen Sie den Haken
in die Bohrung ein.

INSTALLATIONSVORGANG
G-6
Richten Sie die Bohrungen der großen Wandhalterung mit den Bohrungen an der Unterseite der kleinen
Wandhalterungen aus, und verwenden Sie danach zwei der mitgelieferten Projektorbefestigungsschrauben (M6 x 16) zur
Sicherung des Gerätes.
Führen Sie Schrauben (im Fachhandel erhältlich) durch die Schlaufen der Sicherheitsdrähte, und ziehen Sie danach die
Schrauben fest, um die Sicherungsdrähte an der Wand zu sichern.
Stellen Sie sicher, dass die Schrauben stark genug sind, um das Gewicht des Soundprojektors und der Halterung tragen
zu können, wenn diese herunterfallen.
Bringen Sie den Sicherheitsdraht fest an.
6 Sichern Sie das Gerät.
Bodenansicht
Soundprojektor
Projektorbefestigungsschrauben
(M6)
7 Befestigen Sie die Sicherungsdrähte an der Wand.
Sichern Sie den
Sicherungsdraht an der Wand.
Unterlegescheiben
(im Fachhandel erhältlich)
Sichern Sie den
Sicherungsdraht an der
Wand.
Schrauben
(im Fachhandel erhältlich)
Sivu latautuu ...
Sivu latautuu ...
Sivu latautuu ...
Sivu latautuu ...
Sivu latautuu ...
Sivu latautuu ...
Sivu latautuu ...
Sivu latautuu ...
Sivu latautuu ...
Sivu latautuu ...
Sivu latautuu ...
Sivu latautuu ...
Sivu latautuu ...
Sivu latautuu ...
Sivu latautuu ...
Sivu latautuu ...
Sivu latautuu ...
Sivu latautuu ...
Sivu latautuu ...
Sivu latautuu ...
Sivu latautuu ...
Sivu latautuu ...
Sivu latautuu ...
Sivu latautuu ...
Sivu latautuu ...
Sivu latautuu ...
Sivu latautuu ...
Sivu latautuu ...
Sivu latautuu ...
Sivu latautuu ...
Sivu latautuu ...
Sivu latautuu ...
Sivu latautuu ...
Sivu latautuu ...
Sivu latautuu ...
Sivu latautuu ...
Sivu latautuu ...
Sivu latautuu ...
Sivu latautuu ...
Sivu latautuu ...
Sivu latautuu ...
Sivu latautuu ...
Sivu latautuu ...
Sivu latautuu ...
-
 1
1
-
 2
2
-
 3
3
-
 4
4
-
 5
5
-
 6
6
-
 7
7
-
 8
8
-
 9
9
-
 10
10
-
 11
11
-
 12
12
-
 13
13
-
 14
14
-
 15
15
-
 16
16
-
 17
17
-
 18
18
-
 19
19
-
 20
20
-
 21
21
-
 22
22
-
 23
23
-
 24
24
-
 25
25
-
 26
26
-
 27
27
-
 28
28
-
 29
29
-
 30
30
-
 31
31
-
 32
32
-
 33
33
-
 34
34
-
 35
35
-
 36
36
-
 37
37
-
 38
38
-
 39
39
-
 40
40
-
 41
41
-
 42
42
-
 43
43
-
 44
44
-
 45
45
-
 46
46
-
 47
47
-
 48
48
-
 49
49
-
 50
50
-
 51
51
-
 52
52
-
 53
53
-
 54
54
-
 55
55
-
 56
56
-
 57
57
-
 58
58
-
 59
59
-
 60
60
-
 61
61
-
 62
62
-
 63
63
-
 64
64


Yamaha SPM-K8 Omistajan opas
- Kategoria
- Projector mounts
- Tyyppi
- Omistajan opas
muilla kielillä
- 日本語: Yamaha SPM-K8 取扱説明書
- Türkçe: Yamaha SPM-K8 El kitabı
- English: Yamaha SPM-K8 Owner's manual
- svenska: Yamaha SPM-K8 Bruksanvisning
- italiano: Yamaha SPM-K8 Manuale del proprietario
- Deutsch: Yamaha SPM-K8 Bedienungsanleitung
- dansk: Yamaha SPM-K8 Brugervejledning
- français: Yamaha SPM-K8 Le manuel du propriétaire
- español: Yamaha SPM-K8 El manual del propietario
- Nederlands: Yamaha SPM-K8 de handleiding
- română: Yamaha SPM-K8 Manualul proprietarului
Liittyvät paperit
-
Yamaha SPM-K30 Ohjekirja
-
-
Yamaha YSP-4000 Omistajan opas
-
Yamaha YSP-3000 Omistajan opas
-
Yamaha YSP-600 Omistajan opas
-
-
-
-
Yamaha YRS-2000 Omistajan opas