Yamaha RX-V3900 Ohjekirja

Tyyppi
Ohjekirja
Firmware Update Procedure for RX-V3900
Page.1 of 6
February, 2010
Subject: RX-V3900 Firmware Update ver. 1.11
Yamaha is pleased to offer this firmware update to ensure the best possible
performance for your Yamaha RX-V3900 AV Receiver.
This firmware improves HDMI standby through function.
The following pages contain the firmware update instructions for the RX-V3900.
You can easily update the latest firmware either by using an USB thumb drive, or
by connecting the receiver to the Internet. In order to properly execute the update,
read all instructions carefully. The following links will also lead you directly to the
beginning of each individual section of the instructions.
9 Click here to confirm the current firmware version before the update.
9 Click here for the firmware update by USB thumb drive.
(Update by Network is recommended if your receiver is connected to the internet)
9 Click here for the firmware update by Network.
9 Click here for the firmware version confirmation after update.
9 Click here for troubleshooting.
< IMPORTANT NOTICE >
Do not attempt to update your Yamaha receiver using any other data file except those provided
directly from the Yamaha website or through your network connection.
Follow the instructions carefully and do not attempt any other procedures not specified in the
instructions provided by Yamaha.
Improperly updated products may cause improper operation, and any parts or service required
to restore proper operation will not be covered under the Yamaha Limited Warranty.
Firmware Update Procedure for RX-V3900
Page.2 of 6
Confirming the firmware version
Step1: Set the MASTER ON/OFF button on the front panel to OFF, and confirm that
the AC power cable is properly connected to an outlet.
Step2
While pressing the STRAIGHT button, press (and release) the MASTER
ON/OFF button and then keep pressing the STRAIGHT key until
ADVANCED SETUP” appears on the front panel display.
(Note: “ADVANCED SETUP” is only displayed for a few seconds.)
Step3
Rotate the PROGRAM selector counterclockwise to select “VERSION”.
Latest version would be
“VERSION 1.11”.
If your receiver’s version is lower than above, perform the update described in
the following pages. NETWORK UPDATE is recommended if your receiver
is connected to the internet. If not, perform USB UPDATE.
If “ERROR” appears, refer to the troubleshooting procedures on page 6 and
retry the update.
STEP1 STEP2
p
ress & hold
STEP3
Firmware Update Procedure for RX-V3900
Page.3 of 6
Instruction for USB Update
Step1:
Delete any existing files in the USB thumb drive.
Step2:
Copy the downloaded firmware “RXV3900-xxxx.bin” into the root directory of
the USB thumb drive.
Step3:
Set the MASTER ON/OFF button on the front panel to OFF, and confirm that
the AC power cable is properly connected to an outlet.
Step4:
Insert the USB thumb drive in the USB terminal located on the front panel.
While pressing the STRAIGHT button, press (and release) the MASTER
ON/OFF button and then keep depressing the STRAIGHT button until
ADVANCED SETUP” appears on the front panel display.
(Note: “ADVANCED SETUP” is only displayed for a few seconds.)
Requirement: (Formatting by FAT system is required in advance).
- USB thumb drive, with enough free space to store over 16 MB.
- Firmware file provided by YAMAHA,”RXV3900-xxxx.bin”.
Drag & Drop the file into USB drive.
STEP3 STEP4
press & hold
Insert USB thumb
drive with
RX-V3900.bin file
Firmware Update Procedure for RX-V3900
Page.4 of 6
Step5 Rotate the PROGRAM selector counterclockwise to select “FIRM UPDATE
USB”.
Step6
To start the firmware update, press the MENU button.
(Allow about 10 minutes for the update)
Firmware reprogramming in progress
Caution! Do not interrupt power or remove the USB thumb drive during the update.
In case the power is accidentally cut off, refer to troubleshooting
procedures on page 6 to recover.
Step7
When “UPDATE OK” appers on the display, firmware update is completed.
The receiver automatically powers off and on again in normal operation
mode.
Step8
Power OFF the unit by pressing MASTER ON/OFF button on the front panel.
Remove the USB thumb drive.
Step9
Check the updated firmware version.
STEP6
STEP8
STEP5
Firmware Update Procedure for RX-V3900
Page.5 of 6
Instruction for Network Update
Step1:
Set the MASTER ON/OFF button on the front panel to OFF, and confirm that
the AC power cable is properly connected to an outlet.
Step2:
While pressing the STRAIGHT button, press (and release) the MASTER
ON/OFF button and then keep depressing the STRAIGHT button until
ADVANCED SETUP” appears on the front panel display.
(Note: the “ADVANCED SETUP” is only displayed for a few seconds.)
Step3
Rotate the PROGRAM knob counterclockwise to select “FIRM UPDATE
USB”.
Press STRAIGHT button to change update mode to network.
Step4
To start the firmware update, press the MENU button. (allow about 10mins)
Firmware reprogramming in progress
Caution! Do to not interrupt power during the update.
Step5
When “UPDATE OK” appers on the display, firmware update is completed.
The receiver automatically powers off and on again in normal operation
mode.
Step6
Power OFF the unit by pressing MASTER ON/OFF button on the front panel.
Step7
Check the updated firmware version.
Requirement:
Network environment to be able to connect to the Internet via
RX-V3900. (For more information, refer to the owner’s manual.)
STEP1/STEP6
STEP3
STEP4
STEP2
press & hold
Firmware Update Procedure for RX-V3900
Page.6 of 6
Troubleshooting Firmware Update
Case #1: Instead of “UPDATE OK”, an error message appeared on the display during
updating or “ERROR” appeared when confirming the firmware version in
Advanced Setup.
To recover, retry the update procedure of USB/Network from first step again.
In case the update has failed with network method, perform USB update method
for recovery.
Case #2: “Thumb Data Err” / “Firm Update” appeared on the display.
To recover,
1. Press MENU button. “FirmUpdate, push MENU key” will appear on the display.
2. Unplug the USB thumb drive and copy the update file again.
3. Insert the USB thumb drive in the USB terminal on the front panel.
4. Start firmware update by pressing the MENU button.
5. When UPDATE OK” appears on the display, firmware update is completed.
System will reboot automatically.
6. Power OFF the unit by pressing MASTER ON/OFF button on the front panel.
7. Remove the USB thumb drive.
Case #3: Firmware update doesn’t start for other reasons.
For example, the unit does not power up after the MASTER ON/OFF
button is pressed. Or, DEVICE ERROR” appeared on the front
display.
To recover,
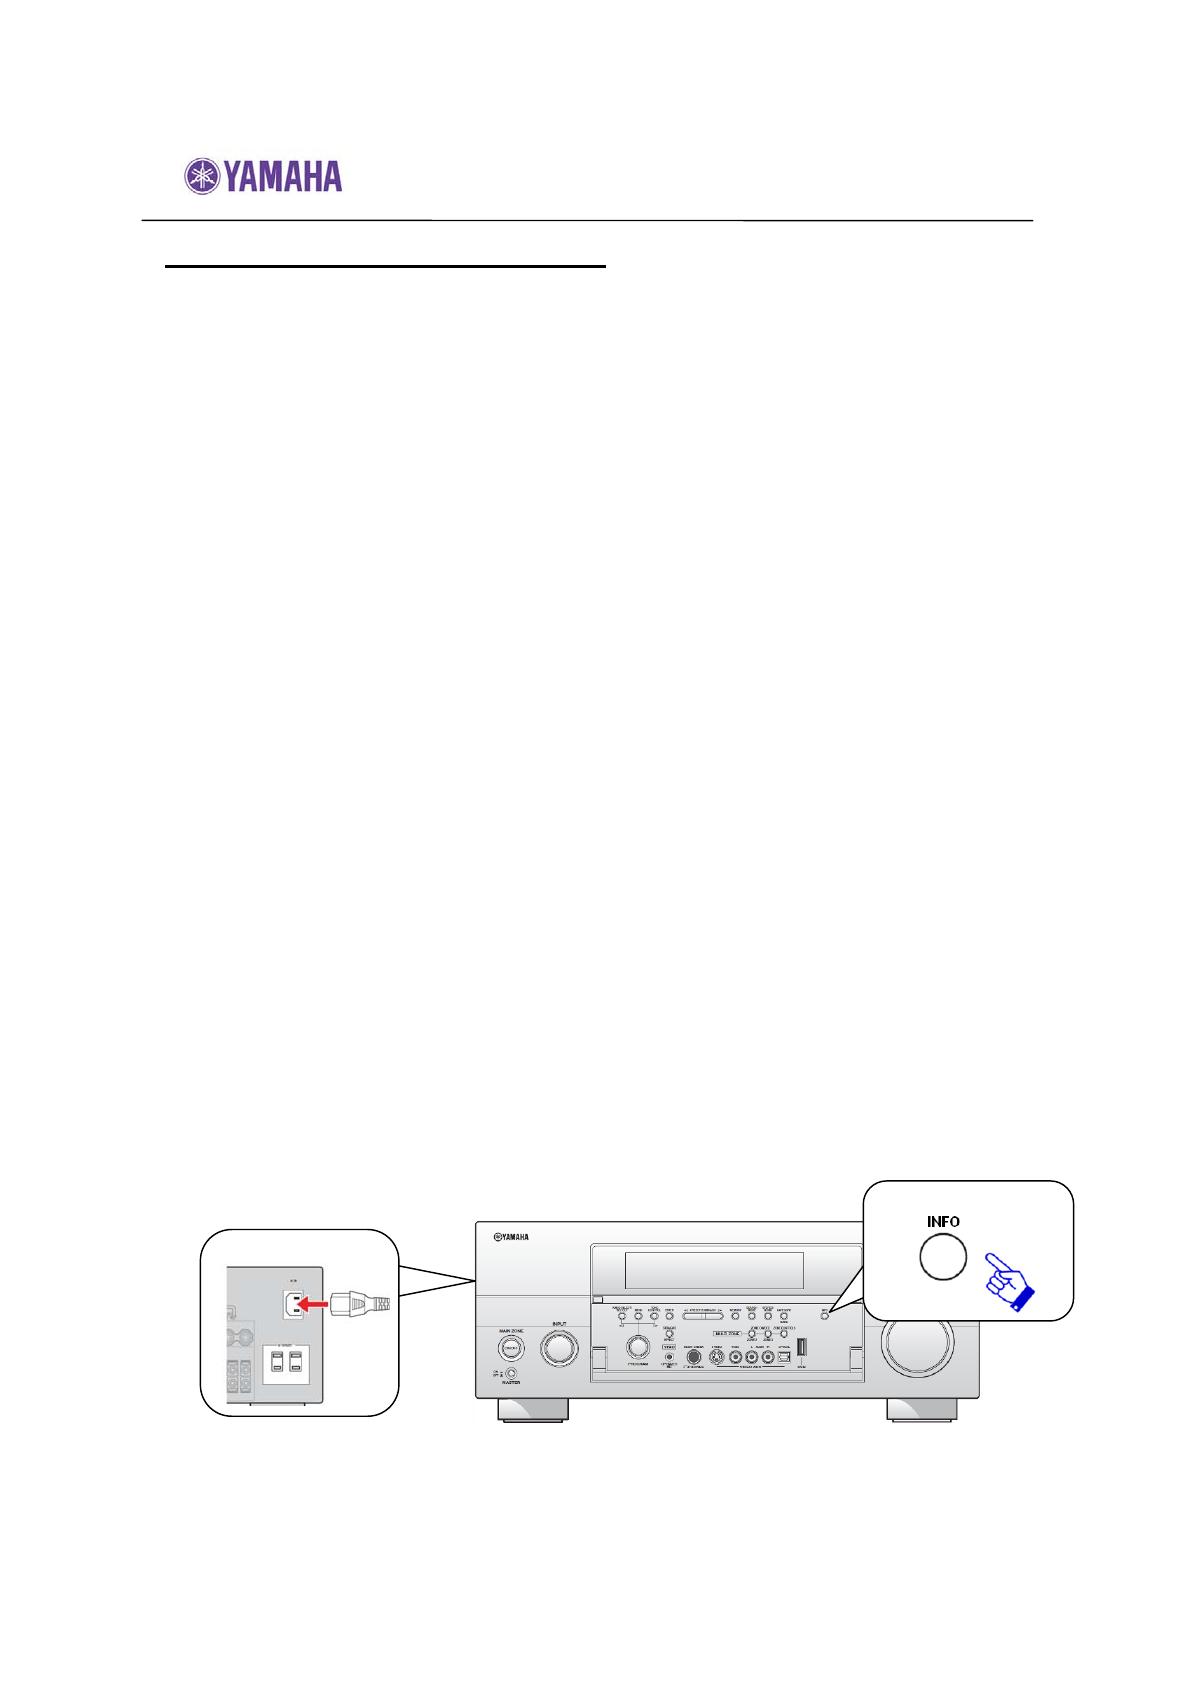
1. Unplug the AC power cable from the back of the receiver.
2. Set the MASTER ON/OFF button on the front panel to ON.
3. Insert the USB thumb drive in the USB terminal located on the front panel.
4. Press and hold the INFO key and keep it pressed while you plug the AC power
cable back into the receiver again. The front panel display shows
FirmwareUpdate
5. The update will start automatically.
6. When UPDATE OK” appears on the display, firmware update is completed.
System will turn off and on again automatically.
7. Power OFF the unit by pressing MASTER ON/OFF button on the front panel.
8. Remove the USB thumb drive.
STEP4
STEP4
press &
hold
  • Page 1 1
  • Page 2 2
  • Page 3 3
  • Page 4 4
  • Page 5 5
  • Page 6 6

Yamaha RX-V3900 Ohjekirja

Tyyppi
Ohjekirja