Microlife BP W1 Basic Ohjekirja

Kategoria
Blood pressure units
Tyyppi
Ohjekirja
IB BP W1 Basic N-V9 1621
Revision Date: 2021-03-30
Microlife AG
Espenstrasse 139
9443 Widnau / Switzerland
www.microlife.com
EC
REP
Microlife UAB
P. Lukšio g. 32,
08222 Vilnius / Lithuania
Microlife BP W1 Basic
EN 1
SV 12
FI 22
DA 32
NO 42
LV 52
LT 62
EE
7
2
RU 82
Microlife BP W1 Basic
18
2
5
6
1
15
11
14
17 16 13
12
10
7
8
9
3
4
BP W1 BasicGuarantee Card
Name of Purchaser / Inköparens namn / Ostajan nimi / Forhandlers
navn / Kjøpers navn / Pircēja vārds / Pirkėjo pavardė / Ostja nimi /
Ф.И.О. покупателя
Serial Number / Sarjanumero / Serienummer / Serienummer /
Sērijas numurs / Serijos numeris / Seerianumber / Серийный
номер
Date of Purchase / Inköpsdatum / Ostopäivämäärä / Købsdato /
Kjøpsdato / Iegādes datums / Pardavimo data / Ostukuupäev /
Дата покупки
Specialist Dealer / Återförsäljare / Alan kauppias / Special-
forhandler / Spesialist forhandler / Speciālists - pārstāvis /
Pardavusi įstaiga / Ametlik müügiesindaja / Специализированный
дилер
1BP W1 Basic
EN
Display
Read the instructions carefully before using this device.
Intended use:
This oscillometric blood pressure monitor is intended for measuring
non-invasive blood pressure in people aged 12 years or older.
Dear Customer,
Your new
Microlife
blood pressure monitor is a reliable medical device
for taking measurements on the wrist. It is simple to use, accurate and
comes highly recommended for blood pressure monitoring in your
home. This device was developed in collaboration with physicians and
clinical tests prove its measurement accuracy to be very high.*
If you have any questions, problems or want to order spare parts
please contact your local Microlife-Customer Service. Your dealer or
pharmacy will be able to give you the address of the Microlife dealer
in your country. Alternatively, visit the internet at www.microlife.com
where you will find a wealth of invaluable information on our products.
Stay healthy – Microlife AG!
* This device uses the same measuring algorithm as the award
winning BP W100 model tested according to the British and Irish
Hypertension Society (BIHS) protocol.
Microlife BP W1 Basic
EN
1
ON/OFF button
2
Display
3
Battery Compartment
4
Cuff
5
M-button (memory)
6
Time Button
7
Systolic Value
8
Diastolic Value
9
Pulse Rate
AT
Date/Time
AK
Traffic Light Indicator
AL
Stored Value
AM
Irregular Heartbeat (IHB) Symbol
AN
Pulse Indicator
AO
Battery Display
AP
Arm Movement Indicator
AQ
Cuff Check Indicator
AR
LED Positioning Indicator
2
Table of Contents
1. Important Facts about Blood Pressure and Self-Measure-
ment
How do I evaluate my blood pressure?
2. Using the Device for the First Time
Inserting the batteries
Setting the date and time
3. Taking a Blood Pressure Measurement
4. Appearance of the Irregular Heartbeat (IHB) Symbol
5. Traffic Light Indicator in the Display
6. Data Memory
Viewing the stored values
Memory full
Clearing all values
How not to store a reading
7. Battery Indicator and Battery change
Low battery
Flat battery – replacement
Which batteries and which procedure?
Using rechargeable batteries
8. Error Messages
9. Safety, Care, Accuracy Test and Disposal
Safety and protection
•Device care
Cleaning the cuff
Accuracy test
•Disposal
10. Guarantee
11. Technical Specifications
Guarantee Card (see Back Cover)
Type BF applied part
1. Important Facts about Blood Pressure and Self-
Measurement
Blood pressure
is the pressure of the blood flowing in the arteries
generated by the pumping of the heart. Two values, the
systolic
(upper) value and the
diastolic
(lower) value, are always measured.
The device indicates the pulse rate (the number of times the heart
beats in a minute).
Keep dry
3BP W1 Basic
EN
Permanently high blood pressure values can damage your
health and must be treated by your doctor!
Always discuss your values with your doctor and tell him/her if you
have noticed anything unusual or feel unsure. Never rely on
single blood pressure readings.
There are several causes of excessively high blood pressure
values. Your doctor will explain them in more detail and offer
treatment where appropriate. Besides medication, weight loss
and exercise can also lower your blood pressure.
Under no circumstances should you alter the dosages of
drugs or initiate a treatment without consulting your doctor.
Depending on physical exertion and condition, blood pressure is
subject to wide fluctuations as the day progresses. You should
therefore take your measurements in the same quiet condi-
tions and when you feel relaxed! Take at least two readings
every time (in the morning and in the evening) and average the
measurements.
It is quite normal for two measurements taken in quick succession
to produce significantly different results.
Deviations between measurements taken by your doctor or in the
pharmacy and those taken at home are quite normal, as these
situations are completely different.
Several measurements
provide much more reliable information
about your blood pressure than just one single measurement.
Leave a small break of at least 15 seconds between two
measurements.
If you suffer from a cardiac arrhythmia consult with your doctor
before using the device. See also chapter «Appearance of the
Irregular Heartbeat (IHB) Symbol» of this user manual.
The pulse display is not suitable for checking the frequency
of heart pacemakers!
If you are pregnant, you should monitor your blood pressure
regularly as it can change drastically during this time.
A number of factors can affect the accuracy of measure-
ments taken on the wrist. In some cases, the result may
differ from the measurement taken on the upper arm. We
therefore advise you to compare these values with those
produced by the upper arm measurement and discuss them
with your doctor.
4
How do I evaluate my blood pressure?
The higher value is the one that determines the evaluation. Example:
a blood pressure value of 140/80 mmHg or a value of 130/90 mmHg
indicates «blood pressure too high».
2. Using the Device for the First Time
Inserting the batteries
After you have unpacked your device, first insert the batteries. The
battery compartment
3
is at the top of the device. Insert the batteries
(
2
x 1.5 V, size
AAA
), thereby observing the indicated polarity.
Setting the date and time
1. After the new batteries are fitted, the year number flashes in the
display. You can set the year by pressing the M-button 5. To
confirm and then set the month, press the time button 6.
2. Press the M-button to set the month. Press the time button to
confirm and then set the day.
3. Follow the instructions above to set the day, hour and minutes.
4. Once you have set the minutes and pressed the time button, the
date and time are set and the time is displayed.
5. If you want to change the date and time, press and hold the time
button down for approx. 3 seconds until the year number starts to
flash. Now you can enter the new values as described above.
3. Taking a Blood Pressure Measurement
Checklist for taking a reliable measurement
1. Avoid activity, eating or smoking immediately before the measurement.
2. Sit down on a back-supported chair and relax for 5 minutes. Keep
the feet flat on the floor and do not cross your legs.
Table for classifying home blood pressure values in adults in accordance
with the international Guidelines (ESH, ESC, JSH). Data in mmHg.
Range Systolic Diastolic Recommendation
1. blood pressure
normal
< 120 < 74 Self-check
2. blood pressure
optimum
120 - 129 74 - 79 Self-check
3. blood pressure
elevated
130 - 134 80 - 84 Self-check
4. blood pressure too
high
135 - 159 85 - 99 Seek medical
advice
5. blood pressure
dangerously high
160 100 Urgently seek
medical advice!
5BP W1 Basic
EN
3. Always measure in a sitting position and on the same wrist. Use
the wrist which usually shows higher blood pressure values.
4. Remove any items of clothing and your watch, for example, so
that your wrist is free.
5. Always ensure that the cuff is positioned correctly, as shown in the
pictures illustrated on the short instruction card.
6. Fit the cuff comfortably but not too tight. The cuff will cover a wrist
circumference of 13.5 - 21.5 cm (5.25 - 8.5 inches).
7. Press the ON/OFF button 1 to start the measurement.
8. The LED Positioning Indicator AR is activated. Support your arm
in a relaxed position with the device at the same height as your
heart, move your arm until the LED light is at its brightest and
appears to be in the center of the indicator.
9. After 5 seconds, the cuff will pump up automatically. Relax, do not
move and do not tense your arm muscles until the measurement
result is displayed. Breathe normally and do not talk.
10.When the correct pressure is reached, the pumping stops and the
pressure falls gradually. If the required pressure was not reached,
the device will automatically pump some more air into the cuff.
11.During the measurement, the pulse indicator
AN
flashes in the display.
12.The result, comprising the systolic 7 and the diastolic 8 blood
pressure and the pulse rate 9 is displayed. Note also the expla-
nations on further display symbols in this booklet.
13.Remove and switch off the monitor and enter the result in the
enclosed blood pressure pass. (The monitor does switch off auto-
matically after approx. 1 min.).
You can stop the measurement at any time by pressing the
ON/OFF button (e.g. if you feel uneasy or an unpleasant pres-
sure sensation).
4. Appearance of the Irregular Heartbeat (IHB) Symbol
This symbol AM indicates that an irregular heartbeat was detected. In
this case, the measured blood pressure may deviate from your actual
blood pressure values. It is recommended to repeat the measure-
ment.
5. Traffic Light Indicator in the Display
The bars on the left-hand edge of the display AK show you the range
within which the indicated blood pressure value lies. Depending on
the height of the bar, the readout value is either within the optimum
(green), elevated (yellow), too high (orange) or dangerously high
Information for the doctor in case of repeated appearance of
the IHB symbol:
This device is an oscillometric blood pressure monitor that also
measures the pulse during blood pressure measurement and
indicates when the heart rate is irregular.
6
(red) range. The classification corresponds to the 4 ranges in the
table as defined by the international guidelines (ESH, ESC, JSH), as
described in «Section 1.».
6. Data Memory
At the end of each measurement, this device automatically stores the
result, including date and time.
Viewing the stored values
Press the M-button
5
briefly, when the device is switched off. The
display first shows «
M
»
AL
and then a value, e.g. «
M 17
». This means
that there are 17 values in the memory. The device then switches to the
last stored result.
Pressing the M-button again displays the previous value. Pressing the M-
button repeatedly enables you to move from one stored value to another.
Memory full
Pay attention that the maximum memory capacity of 60 memo-
ries is not exceeded.
When the 60 memory is full, the oldest
value is automatically overwritten with the 61st value.
Values should be evaluated by a doctor before the memory
capacity is reached – otherwise data will be lost.
Clearing all values
If you are sure that you want to permanently remove all stored
values, hold down the M-button (the device must have been switched
off beforehand) until «CL» appears and then release the button. To
permanently clear the memory, press the M-button while «CL» is
flashing. Individual values cannot be cleared.
How not to store a reading
As soon as the reading is displayed press and hold the ON/OFF
button 1 until «M» AL is flashing. Confirm to delete the reading by
pressing the M-button 5.
7. Battery Indicator and Battery change
Low battery
When the batteries are approximately ¾ empty the battery symbol AO
will flash as soon as the device is switched on (partly filled battery
displayed). Although the device will continue to measure reliably, you
should obtain replacement batteries.
Flat battery – replacement
When the batteries are flat, the battery symbol AO will flash as soon
as the device is switched on (flat battery displayed). You cannot take
any further measurements and must replace the batteries.
1. Open the battery compartment 3 by pulling off the cap.
2. Replace the batteries – ensure correct polarity as shown by the
symbols in the compartment.
3. To set date and time, follow the procedure described in «Section 2.».
The memory retains all values although date and time must be
reset – the year number therefore flashes automatically after
the batteries are replaced.
7BP W1 Basic
EN
Which batteries and which procedure?
Use 2 new, long-life 1.5 V, size AAA alkaline batteries.
Do not use batteries beyond their date of expiry.
Remove batteries if the device is not going to be used for a
prolonged period.
Using rechargeable batteries
You can also operate this device using rechargeable batteries.
Only use «NiMH» type reusable batteries.
Batteries must be removed and recharged when the flat
battery symbol appears. They should not remain inside the
device as they may become damaged (total discharge as a
result of low use of the device, even when switched off).
Always remove the rechargeable batteries if you do not intend
to use the device for a week or more.
Batteries cannot be charged in the blood pressure monitor.
Recharge batteries in an external charger and observe the
information regarding charging, care and durability.
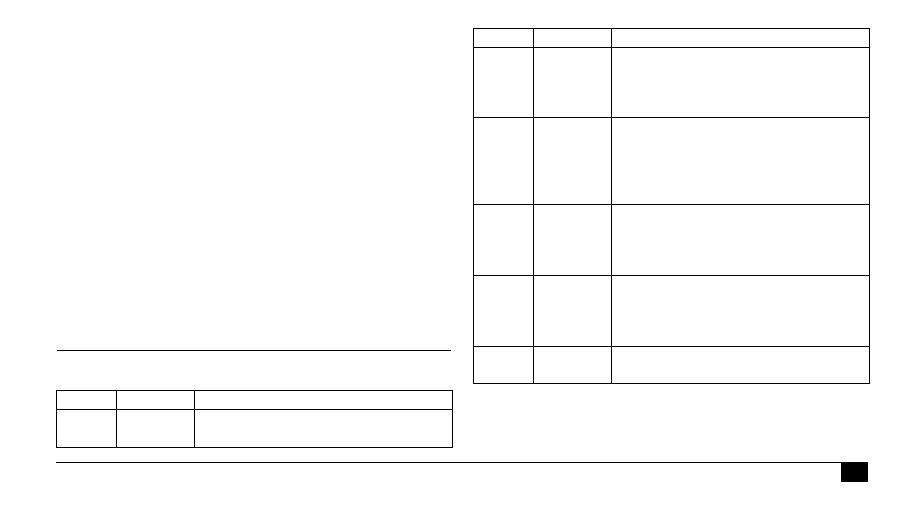
8. Error Messages
If an error occurs during the measurement, the measurement is inter-
rupted and an error message, e.g. «ERR 3», is displayed.
* Please immediately consult your doctor, if this or any other problem
occurs repeatedly.
If you think the results are unusual, please read through the
information in «Section 1.» carefully.
Error Description Potential cause and remedy
«
ERR 1
» Signal too
weak
The pulse signals on the cuff are too weak. Re-
position the cuff and repeat the measurement.*
«
ERR 2
»
AP
Error signal During the measurement, error signals were
detected by the cuff, caused for instance by
movement or muscle tension. Repeat the
measurement, keeping your arm still.
«
ERR 3
»
AQ
No pres-
sure in the
cuff
An adequate pressure cannot be generated
in the cuff. A leak may have occurred. Check
that the cuff is correctly connected and is not
too loose. Replace the batteries if necessary.
Repeat the measurement.
«
ERR 5
» Abnormal
result
The measuring signals are inaccurate and no
result can therefore be displayed. Read through
the checklist for performing reliable measure-
ments and then repeat the measurement.*
«
HI
» Pulse or cuff
pressure too
high
The pressure in the cuff is too high (over
299 mmHg) OR the pulse is too high (over
200 beats per minute). Relax for 5 minutes
and repeat the measurement.*
«
LO
» Pulse too
low
The pulse is too low (less than 40 beats per
minute). Repeat the measurement.*
Error Description Potential cause and remedy
8
9. Safety, Care, Accuracy Test and Disposal
Safety and protection
Follow instructions for use. This document provides important
product operation and safety information regarding this device.
Please read this document thoroughly before using the device and
keep for future reference.
This device may only be used for the purposes described in these
instructions. The manufacturer cannot be held liable for damage
caused by incorrect application.
This device comprises sensitive components and must be treated
with caution. Observe the storage and operating conditions
described in the «Technical Specifications» section.
Protect it from:
- water and moisture
- extreme temperatures
- impact and dropping
- contamination and dust
- direct sunlight
- heat and cold
The cuffs are sensitive and must be handled with care.
Only pump up the cuff once fitted.
Do not use this device close to strong electromagnetic fields such
as mobile telephones or radio installations. Keep a minimum
distance of 3.3 m from such devices when using this device.
Do not use this device if you think it is damaged or notice anything
unusual.
Never open this device.
If the device is not going to be used for a prolonged period the
batteries should be removed.
Read the additional safety information provided within the individual
sections of this instruction manual.
The measurement results given by this device is not a diagnosis.
It is not replacing the need for the consultation of a physician,
especially if not matching the patient’s symptoms. Do not rely on
the measurement result only, always consider other potentially
occurring symptoms and the patient’s feedback. Calling a doctor
or an ambulance is advised if needed.
Ensure that children do not use this device unsupervised; some
parts are small enough to be swallowed. Be aware of the risk of
strangulation in case this device is supplied with cables or tubes.
Device care
Clean the device only with a soft, dry cloth.
Cleaning the cuff
Carefully remove any marks on the cuff with a damp cloth and mild
detergent.
9BP W1 Basic
EN
Accuracy test
We recommend this device is tested for accuracy every 2 years or
after mechanical impact (e.g. being dropped). Please contact your
local Microlife-Service to arrange the test (see foreword).
Disposal
Batteries and electronic devices must be disposed of in accordance
with the locally applicable regulations, not with domestic waste.
10.Guarantee
This device is covered by a 5 year guarantee from the date of
purchase. During this guarantee period, at our discretion, Microlife
will repair or replace the defective product free of charge.
Opening or altering the device invalidates the guarantee.
The following items are excluded from the guarantee:
Transport costs and risks of transport.
Damage caused by incorrect application or non-compliance with
the instructions for use.
Damage caused by leaking batteries.
Damage caused by accident or misuse.
Packaging/storage material and instructions for use.
Regular checks and maintenance (calibration).
Accessories and wearing parts: Battery.
The cuff is covered by a functional guarantee (bladder tightness) for
2 years.
Should guarantee service be required, please contact the dealer
from where the product was purchased, or your local Microlife
service. You may contact your local Microlife service through our
website:
www.microlife.com/support
Compensation is limited to the value of the product. The guarantee
will be granted if the complete product is returned with the original
invoice. Repair or replacement within guarantee does not prolong or
renew the guarantee period. The legal claims and rights of
consumers are not limited by this guarantee.
11.Technical Specifications
Operating conditions: 10 - 40 °C / 50 - 104 °F
15 - 95 % relative maximum humidity
Storage conditions: -20 - +55 °C / -4 - +131 °F
15 - 95 % relative maximum humidity
Weight: 124
g (including batteries)
Dimensions: 73 x 66 x 38
mm
Cuff size: 13.5 - 21.5 cm (5.25 - 8.5 inches)
Measuring procedure:
oscillometric, corresponding to Korotkoff
method: Phase I systolic, Phase V diastolic
10
This device complies with the requirements of the Medical Device
Directive 93/42/EEC.
Technical alterations reserved.
Measurement range: 20 - 280 mmHg – blood pressure
40 - 200 beats per minute – pulse
Cuff pressure
display range: 0 - 299 mmHg
Resolution: 1 mmHg
Static accuracy: pressure within ± 3 mmHg
Pulse accuracy: ± 5 % of the readout value
Voltage source: 2 x 1.5 V alkaline batteries; size AAA
Battery lifetime: approx. 320 measurements
(using new batteries)
IP Class: IP20
Reference to
standards:
EN 1060-1 /-3 /-4; IEC 60601-1;
IEC 60601-1-2 (EMC); IEC 60601-1-11
Expected service life: Device: 5 years or 10000 measurements
Accessories: 2 years
11BP W1 Basic
EN
12
Display
Läs dessa instruktioner noga innan du använder instrumentet.
Bäste kund
Din nya
Microlife
blodtrycksmätare är ett säkert medicinskt instrument
för mätningar på handleden. Instrumentet är enkelt att använda,
noggrannt och rekommenderas för blodtrycksmätning hemma. Instru-
mentet är utvecklat i samarbete med läkare och kliniska tester bevisar
att dess mätnoggrannhet är mycket hög.*
Om du har frågor, problem eller vill beställa reservdelar ber vi dig
kontakta Microlifes lokala kundservice. Din återförsäljare eller ditt
apotek kan ge dig kontaktuppgifter till en Microlife-representant i ditt
land. Alternativt kan du besöka adressen www.microlife.com där du
finner värdefull information om våra produkter.
Med önskan om ett hälsosamt liv – Microlife AG!
* Detta instrument använder samma mätalgoritm som den prisvin-
nande blodtrycksmätaren BP W100 testad enligt British and Irish
Hypertension Society (BIHS) anvisningar.
Microlife BP W1 Basic
SV
1
PÅ/AV-knapp
2
Bildskärm (display)
3
Batterifack
4
Manschett
5
M-knapp (minne)
6
Tidsknapp
7
Systoliskt värde
8
Diastoliskt värde
9
Pulsslag
AT
Datum/Tid
AK
Trafikljusindikator
AL
Sparat värde
AM
Oregelbundna hjärtslag (IHB) symbol
AN
Puls indikator
AO
Batteridisplay
AP
Indikering av armrörelse under mätning
AQ
Kontroll indikator för manschett
AR
LED läges indikator
13BP W1 Basic
SV
Innehållsförteckning
1. Viktiga fakta om blodtryck och blodtrycksmätning hemma
Hur bedömer jag mitt blodtryck?
2. Användning av instrumentet första gången
Lägga i batterier
Inställning av tid och datum
3. Gör en blodtrycksmätning
4. Utseende på oregelbundna hjärtslag (IHB) symbol
5. Trafikljusindikering i displayen
6. Dataminne
Hämta sparade värden
Minnet fullt
Radering av alla värden
Att inte lagra ett mätvärde
7. Indikatorer på att batteriet håller på att ta slut och batteribyte
Då batteriet är nästan slut
Tomma batterier – utbyte
Hurudana batterier och hur skall de bytas ut?
Användning av laddningsbara batterier
8. Felmeddelanden
9. Säkerhet, underhåll, noggrannhetstest och avfallshantering
Säkerhet och skydd
Instrumentunderhåll
Rengöring av manschett
Nogrannhetstest
Avfallshantering
10. Garanti
11. Tekniska data
Garantikort (se baksida)
Tillämplighetsklass BF
1. Viktiga fakta om blodtryck och blodtrycksmätning
hemma
Blodtryck är trycket med vilket blodet passerar genom artärerna
när hjärtat pumpar. Två värden, det systoliska (övre) värdet och
det diastoliska (lägre) värdet mäts alltid.
Instrumentet visar även pulsslag (antalet hjärtslag per minut).
Ständigt höga blodtrycksvärden kan skada din hälsa och
måste behandlas av läkare.
Behåll torr
14
Diskutera alltid dina värden med din läkare och tala om för honom/
henne om du upptäcker något onormalt eller känner dig osäker.
Lita aldrig på enstaka blodtrycksmätningar.
Det finns många orsaker till mycket höga blodtrycksvärden. Din
läkare kan förklara ytterligare detaljer och erbjuda behandling om
nödvändigt. Förutom medicinering kan blodtrycket minskas
genom viktminskning och fysisk träning.
Under inga omständigheter skall Du ändra doseringen av
Dina mediciner eller påbörja behandling utan att konsultera
Din läkare.
Beroende på fysisk ansträngning och kondition, förändras blod-
trycket under dagen. Du bör därför alltid mäta blodtrycket vid
samma tidpunkt och under lugna förhållanden, när du är
avslappnad! Gör minst två mätningar vid varje mättillfälle och
notera snittvärdet. Mät gärna morgon och kväll.
Det är normalt att två mätningar som görs direkt efter varandra
kan ge olika resultat.
Det är normalt att det förekommer skillnader mellan mätningar
som utförts av din läkare eller på apoteket och dem du tar hemma,
eftersom mätningssituationen är annorlunda.
Flera mätningar ger säkrare information om Ditt blodtryck än
enstaka mätningar.
Vänta en stund, minst 15 sekunder mellan två mätningar.
Om Du ej har en hjärtspecialist, konsultera din doktor innan
användning av blodtrycksmätaren kapitel «Utseende på oregel-
bundna hjärtslag (IHB) symbol» i denna manual.
Pulsindikeringen är inte lämplig för att kontrollera frekvensen
hos en pacemaker.
Om Du är gravid skall Du mäta Ditt blodtryck regelbundet Då det
kan variera mycket under denna tid.
Ett antal faktorer kan påverka mätnoggrannheten vid
mätningar på handleden. I vissa fall, kan resultatet variera
från mätningar på överarmen. Vi rekommenderar därför att du
jämför de olika värdena från mätningar på handled och
överarm och diskuterar dem med din läkare.
15BP W1 Basic
SV
Hur bedömer jag mitt blodtryck?
Det högre värdet bestämmer bedömningen. T.ex.: ett blodtryck på
140/
80
mmHg eller ett värde på
130/90
mmHg anger «för högt blodtryck».
2. Användning av instrumentet första gången
Lägga i batterier
Packa upp instrumentet och lägg i batterierna. Batterifacket 3 finns
på toppen av instrumentet. Lägg i batterierna (2 x 1.5 V, storlek AAA),
se till att polerna placeras korrekt.
Inställning av tid och datum
1. Årssiffran blinkar i displayen när nya batterier är inlagda. Du kan
ställa in år genom att trycka på M-knappen 5. Tryck på
tidsknappen 6 för att bekräfta och sedan ställa in månad.
2. Du kan ställa in rätt månad genom att trycka på M-knappen. Tryck
in tidsknappen för att bekräfta och sedan ställa in rätt datum.
3. Följ ovanstående instruktioner för att ställa in dag, timme och minuter.
4. När du har ställt in minuterna, tryck in tidsknappen och håll den
intryckt, datum och tid sparas och tiden visas.
5. Om du vill ändra på datum och tid, tryck in tidsknappen och håll
den intryckt i ca. 3 sekunder till årssiffran börjar blinka. Du kan nu
ange nya värden enligt instruktionerna ovan.
3. Gör en blodtrycksmätning
Checklista för säker mätning
1. Undvik fysisk aktivitet, måltid eller rökning direkt före mätning.
2. Sitt ner på en stol med ryggstöd och slappna av i 5 minuter. Håll
fötterna platt på golvet och korsa ej benen.
3. Mät alltid på samma handled och sitt ner under mätningen. Använd
den handled som visar högst blodtrycksvärden flest gånger.
4. Ta av klädesplagg på handleden och din armbandsklocka så att
handleden är helt fri.
5. Kontrollera alltid att manschetten sitter rätt, så som visas på
bilderna på instruktionskortet.
Tabellen nedan visar en klassificering av blodtrycksvärden enligt
internationella rekommendationer (ESH, ESCJSH). Data i mmHg.
Intervall
Systo-
liskt
Diasto-
liskt
Rekommenda-
tion
1. Normalt blodtryck < 120 < 74 Självkontroll
2. Optimalt blodtryck 120 - 129 74 - 79 Självkontroll
3. Förhöjt blodtryck 130 - 134 80 - 84 Självkontroll
4. För högt blodtryck 135 - 159 85 - 99 Sök medicinsk
rådgivning
5. Mycket för högt
blodtryck
160 100 Sök läkarhjälp
omedelbart.
16
6. Sätt fast manschetten ordentligt, inte för hårt. Manschetten räcker
för handled med omkrets 13.5 - 21.5 cm (5.25 - 8.5 inch).
7. Tryck PÅ/AV-knappen 1 för att starta mätningen.
8. LED lägesindikatorn
AR
är aktiverad. Placera armen i ett avslappat
läge med instrumentet i samma höjd som ditt hjärta. Rör armen tills
läges indikatorn
AR
visar starkt ljus i mitten av indikatorn.
9. Efter 5 sekunder, manschetten pumpas upp automatiskt. Slappna
av, rör dig inte och spänn inte armmusklerna tills mätningsresultet
visas. Andas normalt och tala inte.
10.När korrekt tryck är uppnått, slutar instrumentet att pumpa och
trycket faller. Om önskat tryck inte uppnås, pumpar instrumentet
ytterligare luft till manschetten.
11.Under mätningen blinkar puls indikatorn AN i displayen.
12.Resultatet med systoliskt 7 och diastoliskt 8 blodtryck och puls-
slag 9 visas. Observera även förklaringarna för de övriga
displayerna i detta häfte.
13.Ta bort och stäng av instrumentet och notera resultatet i bifogad blod-
trycksjournal (Instrumentet stänger av automatiskt efter ca. 1 min.).
Du kan stoppa mätningen när som helst genom att trycka PÅ/
AV-knappen (om du t.ex. inte mår bra eller trycket känns
obekvämt).
4. Utseende på oregelbundna hjärtslag (IHB) symbol
Denna symbol AM indikera att ett oregelbundet hjärtslag upptäckts. I
detta fall kan det uppmätta blodtrycket avvika från ditt aktuella blod-
trycksvärdet. Repetera blodtrycks mätningen.
5. Trafikljusindikering i displayen
Staplarnas höjd och färg på vänster sida av displayen AK visar inom
vilket område blodtrycksvärdena ligger. Optimalt (grön), förhöjt (gul),
alltför högt (orange), mycket för högt (röd). Klassificeringen
motsvarar 4 nivå i tabellen som definieras av de internationella rikt-
linjerna (ESH, ESCJSH), som beskrivs i «avsnitt 1.»
6. Dataminne
Instrumentet sparar automatiskt varje resultat inkl. datum och tid
efter avslutad mätning.
Information till doktorn om IHB symbolen visas upprepade
gånger.
Denna utrustning är en oscllometrisk blodtrycksmätaresom
också mäter pulsen under blodtrycks mätningen ochindikera när
hjärtslagen är oregelbundna.
17BP W1 Basic
SV
Hämta sparade värden
Tryck M-knappen 5 kort med avstängt instrument. Displayen visar
först «M» AL och sedan ett värde, t.ex. «M 17». Detta betyder att 17
värden finns sparade i minnet. Sedan visar instrumentet senast
sparade resultat.
Tryck på M-knappen igen för att visa föregående värde. Tryck på M-
knappen flera gånger för att visa flera värden.
Minnet fullt
Var noga med att den maximala 60 minneskapaciteten inte
överskrids. När 60 minnet är fullt, ersätts det äldsta värdet
automatiskt med värdet 61. En läkare bör utvärdera värden
innan minneskapaciteten är fullt utnyttjad – annars kommer
data att förloras.
Radering av alla värden
Om du är säker på att du vill radera alla sparade värden, tryck ner M-
knappen (instrumentet måste vara avstängt) tills «CL» visas, släpp
sedan knappen. Tryck M-knappen när «CL» blinkar för att radera
minnet helt. Individuella värden kan inte raderas.
Att inte lagra ett mätvärde
När mätvärdet visas i (displayen)/fönstret tryck ned och håll PÅ/AV-
knappen 1 ned trycket tills «M» AL blinkar. Bekräfta raderingen av
mätvärdet genom att trycka ned M-knappen 5.
7. Indikatorer på att batteriet håller på att ta slut och
batteribyte
Då batteriet nästan är slut
När batterienergin är förbrukad till ca ¾ blinkar batterisymbolen AO
när instrumentet startas (ett delvis fyllt batteri visas). Även om instru-
mentet fortfarande kan mäta, bör du skaffa nya batterier.
Tomma batterier – utbyte
När batterierna är helt tomma blinkar batterisymbolen AO när instru-
mentet startas (tomt batteri visas). Du kan inte göra flera mätningar
utan att byta ut batterierna.
1. Öppna batterifacket 3 genom att dra bort locket.
2. Ersätt batterierna – kontrollera att polerna placeras åt rätt håll
enligt symbolerna i facket.
3. Upprepa stegen i «avsnitt 2.» för att ställa in datum och tid.
Minnet innehåller alla värden men datum och tid måste anges
igen – årssiffran blinkar därför automatiskt när batterierna har
byts ut.
Vilka batterier och hur skall de bytas ut?
Använd 2 nya, lång livslängd alkaliska batterier med 1.5V,
storlek AAA.
Använd inte batterier som passerat bäst före datum.
18
Avlägsna batterierna om instrumentet inte skall användas
under en längre tid.
Användning av laddningsbara batterier
Du kan även använda instrumentet med laddningsbara batterier.
Använd endast återladdningsbara batterier av typ «NiMH»
batterier.
Batterierna måste tas ut och laddas om batterisymbolen (tomt
batteri) visas. Batterierna får inte lämnas inne i instrumentet
eftersom de kan skadas av detta (urladdadas på grund av
oregelbunden användning även om instrumentet är avstängt).
Avlägsna de laddningsbara batterierna om du inte kommer att
använda instrumentet inom en vecka.
Batterierna kan inte laddas medan de sitter i blodtrycksmä-
taren. Ladda batterierna i en extern laddare och ta del av infor-
mation angående laddning, hantering och livslängd.
8. Felmeddelanden
Om ett fel uppstår under mätningen, avbryts denna och ett felmedde-
lande, t.ex. «ERR 3» visas.
* Var vänlig att omedelbart kontakta Din läkare om dessa eller andra
problem upprepas.
Fel Beskrivning Möjlig orsak och åtgärd
«
ERR 1
»
För svag
signal
Pulssignalerna i manschetten är för
svaga. Flytta på manschetten och
upprepa mätningen.*
«
ERR 2
»
AP
Fel signal Felsignaler har uppstått under
mätningen, antagligen till följd av rörelse
eller muskelspänning. Upprepa
mätningen och håll armen stilla.
«
ERR 3
»
AQ
Inget tryck i
manschetten
Trycket kan inte genereras i
manschetten. Möjlig läcka. Kontrollera
att manschetten är ordentligt ansluten
och inte är för lös. Ersätt batterierna vid
behov. Upprepa mätningen.
«
ERR 5
»
Onormalt
resultat
Mätsignalerna är inte tillräckligt
noggranna och kan inte ge resultat. Läs
igenom checklistan för säkra mätningar
och upprepa mätningen.*
«
HI
»
För hög puls
eller
manschettryck
Trycket i manschetten är för högt (över
299 mmHg) ELLER pulsen är för hög
(över 200 slag per minut). Slappna av i
5 minuter och upprepa mätningen.*
«
LO
»
För låg puls Pulsen är för låg (mindre än 40 slag per
minut). Upprepa mätningen.*
Fel Beskrivning Möjlig orsak och åtgärd
  • Page 1 1
  • Page 2 2
  • Page 3 3
  • Page 4 4
  • Page 5 5
  • Page 6 6
  • Page 7 7
  • Page 8 8
  • Page 9 9
  • Page 10 10
  • Page 11 11
  • Page 12 12
  • Page 13 13
  • Page 14 14
  • Page 15 15
  • Page 16 16
  • Page 17 17
  • Page 18 18
  • Page 19 19
  • Page 20 20
  • Page 21 21
  • Page 22 22
  • Page 23 23
  • Page 24 24
  • Page 25 25
  • Page 26 26
  • Page 27 27
  • Page 28 28
  • Page 29 29
  • Page 30 30
  • Page 31 31
  • Page 32 32
  • Page 33 33
  • Page 34 34
  • Page 35 35
  • Page 36 36
  • Page 37 37
  • Page 38 38
  • Page 39 39
  • Page 40 40
  • Page 41 41
  • Page 42 42
  • Page 43 43
  • Page 44 44
  • Page 45 45
  • Page 46 46
  • Page 47 47
  • Page 48 48
  • Page 49 49
  • Page 50 50
  • Page 51 51
  • Page 52 52
  • Page 53 53
  • Page 54 54
  • Page 55 55
  • Page 56 56
  • Page 57 57
  • Page 58 58
  • Page 59 59
  • Page 60 60
  • Page 61 61
  • Page 62 62
  • Page 63 63
  • Page 64 64
  • Page 65 65
  • Page 66 66
  • Page 67 67
  • Page 68 68
  • Page 69 69
  • Page 70 70
  • Page 71 71
  • Page 72 72
  • Page 73 73
  • Page 74 74
  • Page 75 75
  • Page 76 76
  • Page 77 77
  • Page 78 78
  • Page 79 79
  • Page 80 80
  • Page 81 81
  • Page 82 82
  • Page 83 83
  • Page 84 84
  • Page 85 85
  • Page 86 86
  • Page 87 87
  • Page 88 88
  • Page 89 89
  • Page 90 90
  • Page 91 91
  • Page 92 92
  • Page 93 93
  • Page 94 94
  • Page 95 95

Microlife BP W1 Basic Ohjekirja

Kategoria
Blood pressure units
Tyyppi
Ohjekirja