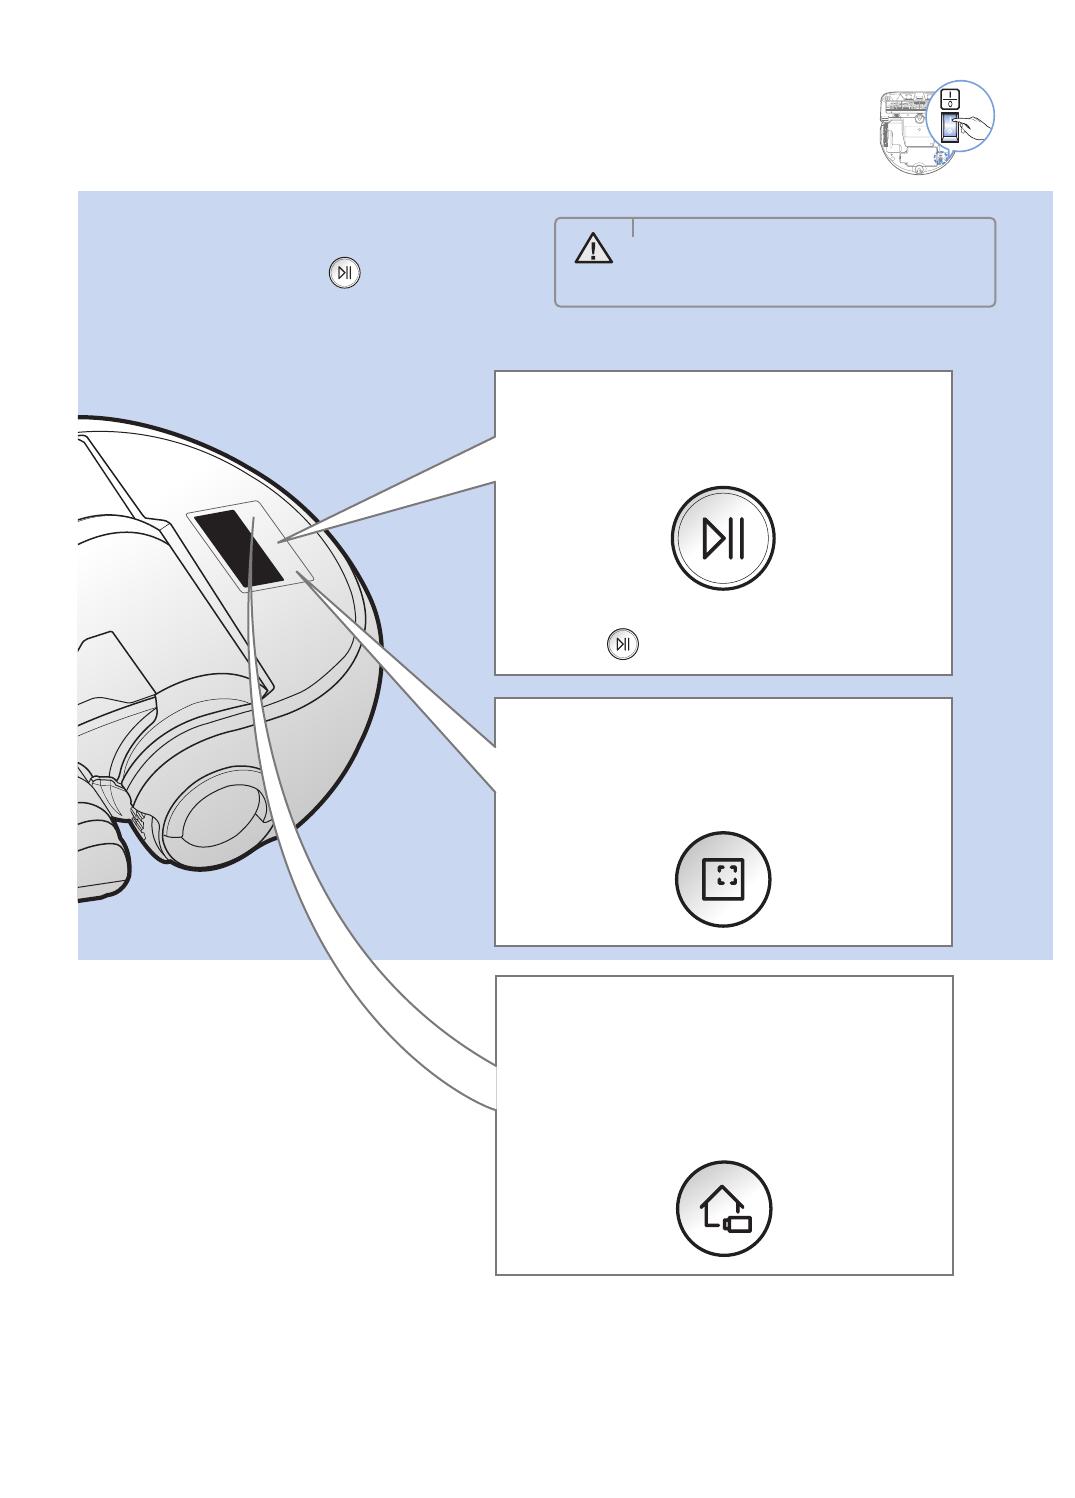
Samsung SR20J9020U Omistajan opas

Tyyppi
Omistajan opas

Tämä käsikirja sopii myös

SR20J90U Series
SR20J90W Series
POWERbot
user manual
imagine the possibilities
Thank you for purchasing a Samsung product.
English
Before operating this unit, please read the instructions carefully.
For indoor use only.
1_SR20J90@@U_EN_00740K-00_EE.indd 1 2016-03-23 오후 9:45:05
ENGLISH-03
Safety information
SAFETY INFORMATION
WARNING
• Before operating the appliance, please read this manual thoroughly and retain it
for your reference.
WARNING
• Because these following operating instructions cover various models, the
characteristics of your vacuum cleaner may differ slightly from those described in
this manual.
CAUTION/WARNING SYMBOLS USED
WARNING
Indicates that a danger of death or serious injury exists.
CAUTION
Indicates that a risk of personal injury or material damage exists.
OTHER SYMBOLS USED
NOTE
Indicates that the following text contains additional important
information.
This Smart Robot vacuum supports from Samsung Smart Home.
More detailed information, please visit Samsung.com/Smarthome.
Indicates that a detachable supply unit.
1_SR20J90@@U_EN_00740K-00_EE.indd 3 2016-03-23 오후 9:45:06
ENGLISH-08
1
Connect the
adapter jack
to the docking
station
2
Connect the
power cord to
the adapter
When using the adapter,
the side with the sticker
attached must face down.
3
Connect the
power plug to
the outlet
The power indicator lamp
(Red) will turn on.
Installation
The docking station must be plugged in and turned on at all times.
DC-IN
DC-IN
Power lamp (Red)
About 1 m
About 0.5 m
About 0.5 m
Install the docking station in a place
without obstacles and danger of
falling.
1_SR20J90@@U_EN_00740K-00_EE.indd 8 2016-03-23 오후 9:45:06
ENGLISH-09
Accessories
Remote control Batteries (AAA type) User manual Spare filter (Option)
Cleaning brush Power cord Adapter
Note
f Install the docking station in a place where the floor and wall are level.
f It is best to install the docking station along the grain of wooden floors.
f If the emergency switch is off, the POWERbot will not charge even if it is docked on the docking
station.
f Always turn on the power of the docking station.
If power is not supplied to the docking station, the POWERbot cannot find it and cannot automatically
recharge.
If the POWERbot is left detached from the docking station, the battery will drain naturally.
f If the POWERbot is in sleep mode, power will not come on even if the emergency switch is turned
off and then on. Press and hold the [Start/Stop] button on the POWERbot to turn off the sleep
mode.
1_SR20J90@@U_EN_00740K-00_EE.indd 9 2016-03-23 오후 9:45:06
ENGLISH-13
Cleaning mode How to select
SR20J90U
Series
SR20J90W
Series
Auto clean
Spot clean
Manual clean
The movement and
direction of the POWERbot
is controlled by the remote
control.
When the POWERbot is being charged, you can select the Auto clean mode
only.
If the POWERbot fails to return to the charger, it will be turned into the sleep
mode. Then the display panel of the main body will be turned off. Press [Start/
Stop] or [Power] button to cancel the sleep mode.
Charging and cleaning times may differ according to conditions of use.
<Displayed icons in the sleep
mode>
Selecting cleaning modes
1_SR20J90@@U_EN_00740K-00_EE.indd 13 2016-03-23 오후 9:45:08
ENGLISH-14
Using POWERbot
Cleaning method for each modes
About 1.5 m
About 1.5 m
Auto clean
Cleans automatically until an entire
space is cleaned once.
Spot clean
Cleans a localized area intensely.
It can be used to clean bread or
cookie crumbs.
Manual clean
You can control the POWERbot
with the remote control and direct it
to clean a desired spot.
1_SR20J90@@U_EN_00740K-00_EE.indd 14 2016-03-23 오후 9:45:08
ENGLISH-15
Using the remote control
1 Power/Recharging
[A Type] [B Type]
Power
Turn POWERbot's power on/off
Recharging
Select to recharge POWERbot at the docking station
while it is cleaning.
Start/Stop
Select to start or stop cleaning
2 Cleaning modes
Auto clean
Select to automatically clean an entire space once
Spot clean
Select to clean a localized area intensely
3 Suction modes
Silence mode
Select to clean with lower operational noise
Normal mode
Select to clean with normal suction power
4 Additional functions
Sound
Each time you press this button, Sound Effects
Mute is selected in this sequence.
Smart control
-
Select to turn on or off the smart control
Wi-Fi connection should be done to control the
POWERbot using Samsung Smart Home app.
1_SR20J90@@U_EN_00740K-00_EE.indd 15 2016-03-23 오후 9:45:09
ENGLISH-16
[A Type]
[B Type]
5 Direction control
[A Type] [B Type]
Select to move forward
Select to turn left
Select to turn right
Moving backward is not available
Inserting batteries
Open the battery cover by lifting it up while pressing the locking tab,
and then insert the batteries as shown in the illustration. Then, close
the cover until it clicks into place.
1
1
2
5
3
4
1
1
2
5
3
Refer to page 21
4
Using the remote control
1_SR20J90@@U_EN_00740K-00_EE.indd 16 2016-03-23 오후 9:45:09
ENGLISH-17
Name of each part
1
4
5
3
3
6
7
8
2
3
Top
1. Display panel
2. Dustbin holder
3. Remote control signal receiver
4. Obstacle sensor
5. Dustbin
6. Camera
7. Dustbin handle
8. Bumper sensor
1
4
2
6
5
5
4
7
4
8
9
3
Bottom
1. Charge pins
2. Power brush
3. Power brush cover
4. Cliff sensor
5. Roller
6. Battery cover
7. Power brush cover button
8. Driving wheel
9. Emergency switch
1_SR20J90@@U_EN_00740K-00_EE.indd 17 2016-03-23 오후 9:45:09
ENGLISH-18
8 94 765
1
2
10
3
11
12
Display panel
<SR20J90U Series>
1. Mute
2. Information indicator
3. Battery indicator
4. Auto clean
5. Spot clean
6. Manual clean
7. Silence mode
8. Normal mode
9. Recharging
10. Spot cleaning button
11. Start/Stop button
12. Recharging button
8 11109
5
4
3
13
14
1
6
2
12
7
<SR20J90W Series>
1. Mute
2. Information indicator
3. Smart Control
4. Wi-Fi indicator
5. Battery indicator
6. One-time/Daily schedule
7. Number display
8. Spot clean
9. Manual clean
10. Silence mode
11. Normal mode
12. Spot cleaning button
13. Start/Stop button
14. Recharging button
Name of each part
1_SR20J90@@U_EN_00740K-00_EE.indd 18 2016-03-23 오후 9:45:09
ENGLISH-20
Cleaning the Power brush
1
Remove the Power
brush cover
2
Remove the Power
brush
3
Clean the Power brush
ON
OFF
ON
OFF
4
Reassemble the Power
brush
5
Reassemble the Power
brush cover
Cleaning the Driving wheel
1
Put a soft cloth on the floor and place
POWERbot upside-down on the cloth.
2
Use a blunt rod or tweezers to remove foreign
matter.
Cleaning and maintaining
1_SR20J90@@U_EN_00740K-00_EE.indd 20 2016-03-23 오후 9:45:12
ENGLISH-39
Memo
1_SR20J90@@U_EN_00740K-00_EE.indd 39 2016-03-23 오후 9:45:17
SR20J90U-serien
SR20J90W-serien
POWERbot
bruksanvisning
imagine the possibilities
Tack för att du väljer att köpa en produkt
från Samsung.
Svenska
Läs igenom anvisningarna noggrant innan du använder den här enheten.
Endast för inomhusbruk.
2_SR20J90@@U_SV_00740K-00_EE.indd 1 2016-03-23 오후 10:51:27
SVENSKA-03
Säkerhetsinformation
SÄKERHETSINFORMATION
VARNING
• Innan du använder apparaten ska du läsa igenom bruksanvisningen noggrant och
spara den för framtida referens.
VARNING
• Eftersom de här anvisningarna täcker flera olika modeller kan egenskaperna hos
din dammsugare variera något från de som beskrivs i den här bruksanvisningen.
SYMBOLER SOM ANVÄNDS FÖR VAR FÖRSIKTIG/VARNING
VARNING
Indikerar att det finns risk för dödsfall eller allvarlig skada.
VAR FÖRSIKTIG
Indikerar att det finns risk för personskada eller materialskada.
ANDRA SYMBOLER SOM ANVÄNDS
OBS!
Anger att följande text innehåller ytterligare viktig information.
Den här smarta självgående dammsugaren får stöd från Samsung Smart
Home.
Mer information finns på Samsung.com/Smarthome.
Anger att en försörjningsenhet är borttagbar.
2_SR20J90@@U_SV_00740K-00_EE.indd 3 2016-03-23 오후 10:51:27
SVENSKA-08
1
Anslut
adapterkontakten
till
dockningsstationen
2
Anslut
strömsladden till
adaptern
När du använder adaptern
måste sidan med etiketten
vara vänd nedåt.
3
Anslut
elkontakten till
uttaget
Strömindikatorlampan (röd)
tänds.
Installation
Dockningsstationen måste anslutas och vara påslagen hela tiden.
DC-IN
DC-IN
Strömlampa (Röd)
Cirka 1 m
Cirka 0,5 m
Cirka 0,5 m
Montera dockningsstationen på en
plats utan hinder och fallrisk.
2_SR20J90@@U_SV_00740K-00_EE.indd 8 2016-03-23 오후 10:51:27
SVENSKA-09
Tillbehör
Fjärrkontroll Batterier (AAA-typ) Bruksanvisning Reservfilter (tillval)
Dammsugningsborste Strömsladd Adapter
Obs!
f Installera dockningsstationen på ett ställe där golvet och väggen är jämna.
f Det är bäst att installera dockningsstationen längs med ådrorna i trägolv.
f Om nödbrytaren är av laddas inte POWERbot även om den dockar med dockningsstationen.
f Slå alltid på strömmen på dockningsstationen.
Om dockningsstationen inte strömförsörjs kan POWERbot inte hitta den och kan inte laddas om
automatiskt.
Om POWERbot är bortkopplad från dockningsstationen kommer batteriet att laddas ur.
f Om POWERbot är i viloläge slås strömmen inte på även om nödbrytaren slås av och på. Håll
knappen [Start/stopp] nedtryckt på POWERbot för att stänga av viloläget.
2_SR20J90@@U_SV_00740K-00_EE.indd 9 2016-03-23 오후 10:51:28
SVENSKA-12
Använda POWERbot
Du måste slå på nödbrytaren innan du använder POWERbot.
Slå på och av strömmen
Tryck på knappen i mer än
3 sekunder.
Starta dammsugningsläget Auto
Tryck på och släpp den här knappen. POWERbot rör på sig och
dammsuger automatiskt tills den har dammsugit ett helt område en gång.
Stoppa dammsugning: Tryck på och släpp
knappen
.
Omladdning
fOmladdning
Du kan befalla POWERbot att ladda om vid
dockningsstationen automatiskt medan den
dammsuger genom att trycka på den här knappen.
Starta dammsugningsläget Spot (Punkt)
Tryck på och släpp den här knappen. POWERbot
dammsuger ett lokaliserat område intensivt.
VARNING
• Om POWERbot inte används under
30 minuter stängs strömmen av
automatiskt.
2_SR20J90@@U_SV_00740K-00_EE.indd 12 2016-03-23 오후 10:51:29
SVENSKA-14
Använda POWERbot
Dammsugningsmetod för varje läge
Cirka 1,5 m
Cirka 1,5 m
Dammsugningsläget Auto
Dammsuger automatiskt tills hela
området är rengjort en gång.
Dammsugningsläget Spot
(Punkt)
Rengör ett visst område intensivt.
Kan användas för att dammsuga
bröd- eller kaksmulor.
Dammsugningsläget
Manual (Manuell)
Du kan styra POWERbot med
fjärrkontrollen och dirigera den till att
rengöra en önskad plats.
2_SR20J90@@U_SV_00740K-00_EE.indd 14 2016-03-23 오후 10:51:29
SVENSKA-16
[Typ A]
[Typ B]
5 Styrkontroll
[Typ A] [Typ B]
Välj för att flytta framåt
Välj för att svänga åt vänster
Välj för att svänga åt höger
Det går inte att flytta bakåt
Sätta i batterier
Öppna batteriluckan genom att lyfta upp den samtidigt som du
trycker ned låsfliken och sätt sedan i batterierna så som visas på
bilden. Stäng sedan locket tills det klickar på plats.
1
1
2
5
3
4
1
1
2
5
3
Se sidan 21
4
Använda fjärrkontrollen
2_SR20J90@@U_SV_00740K-00_EE.indd 16 2016-03-23 오후 10:51:30
SVENSKA-17
Namn på varje del
1
4
5
3
3
6
7
8
2
3
Överdel
1. Skärmpanel
2. Hållare för dammbehållare
3. Signalmottagare för fjärrkontroll
4. Hindersensor
5. Dammbehållare
6. Kamera
7. Handtag för dammbehållare
8. Stötfångarsensor
1
4
2
6
5
5
4
7
4
8
9
3
Undersida
1. Laddningsstift
2. Effektborste
3. Effektborstlucka
4. Fallsensor
5. Rulle
6. Batterilucka
7. Knapp för effektborstlucka
8. Drivhjul
9. Nödbrytare
2_SR20J90@@U_SV_00740K-00_EE.indd 17 2016-03-23 오후 10:51:31
  • Page 1 1
  • Page 2 2
  • Page 3 3
  • Page 4 4
  • Page 5 5
  • Page 6 6
  • Page 7 7
  • Page 8 8
  • Page 9 9
  • Page 10 10
  • Page 11 11
  • Page 12 12
  • Page 13 13
  • Page 14 14
  • Page 15 15
  • Page 16 16
  • Page 17 17
  • Page 18 18
  • Page 19 19
  • Page 20 20
  • Page 21 21
  • Page 22 22
  • Page 23 23
  • Page 24 24
  • Page 25 25
  • Page 26 26
  • Page 27 27
  • Page 28 28
  • Page 29 29
  • Page 30 30
  • Page 31 31
  • Page 32 32
  • Page 33 33
  • Page 34 34
  • Page 35 35
  • Page 36 36
  • Page 37 37
  • Page 38 38
  • Page 39 39
  • Page 40 40
  • Page 41 41
  • Page 42 42
  • Page 43 43
  • Page 44 44
  • Page 45 45
  • Page 46 46
  • Page 47 47
  • Page 48 48
  • Page 49 49
  • Page 50 50
  • Page 51 51
  • Page 52 52
  • Page 53 53
  • Page 54 54
  • Page 55 55
  • Page 56 56
  • Page 57 57
  • Page 58 58
  • Page 59 59
  • Page 60 60
  • Page 61 61
  • Page 62 62
  • Page 63 63
  • Page 64 64
  • Page 65 65
  • Page 66 66
  • Page 67 67
  • Page 68 68
  • Page 69 69
  • Page 70 70
  • Page 71 71
  • Page 72 72
  • Page 73 73
  • Page 74 74
  • Page 75 75
  • Page 76 76
  • Page 77 77
  • Page 78 78
  • Page 79 79
  • Page 80 80
  • Page 81 81
  • Page 82 82
  • Page 83 83
  • Page 84 84
  • Page 85 85
  • Page 86 86
  • Page 87 87
  • Page 88 88
  • Page 89 89
  • Page 90 90
  • Page 91 91
  • Page 92 92
  • Page 93 93
  • Page 94 94
  • Page 95 95
  • Page 96 96
  • Page 97 97
  • Page 98 98
  • Page 99 99
  • Page 100 100
  • Page 101 101
  • Page 102 102
  • Page 103 103
  • Page 104 104
  • Page 105 105
  • Page 106 106
  • Page 107 107
  • Page 108 108
  • Page 109 109
  • Page 110 110
  • Page 111 111
  • Page 112 112
  • Page 113 113
  • Page 114 114
  • Page 115 115
  • Page 116 116
  • Page 117 117
  • Page 118 118
  • Page 119 119
  • Page 120 120
  • Page 121 121
  • Page 122 122
  • Page 123 123
  • Page 124 124
  • Page 125 125
  • Page 126 126
  • Page 127 127
  • Page 128 128
  • Page 129 129
  • Page 130 130
  • Page 131 131
  • Page 132 132
  • Page 133 133
  • Page 134 134
  • Page 135 135
  • Page 136 136
  • Page 137 137
  • Page 138 138
  • Page 139 139
  • Page 140 140
  • Page 141 141
  • Page 142 142
  • Page 143 143
  • Page 144 144
  • Page 145 145
  • Page 146 146
  • Page 147 147
  • Page 148 148
  • Page 149 149
  • Page 150 150
  • Page 151 151
  • Page 152 152
  • Page 153 153
  • Page 154 154
  • Page 155 155
  • Page 156 156
  • Page 157 157
  • Page 158 158
  • Page 159 159
  • Page 160 160
  • Page 161 161
  • Page 162 162
  • Page 163 163
  • Page 164 164
  • Page 165 165
  • Page 166 166
  • Page 167 167
  • Page 168 168
  • Page 169 169
  • Page 170 170
  • Page 171 171
  • Page 172 172
  • Page 173 173
  • Page 174 174
  • Page 175 175
  • Page 176 176
  • Page 177 177
  • Page 178 178
  • Page 179 179
  • Page 180 180
  • Page 181 181
  • Page 182 182
  • Page 183 183
  • Page 184 184
  • Page 185 185
  • Page 186 186
  • Page 187 187
  • Page 188 188
  • Page 189 189
  • Page 190 190
  • Page 191 191
  • Page 192 192
  • Page 193 193
  • Page 194 194
  • Page 195 195
  • Page 196 196
  • Page 197 197
  • Page 198 198
  • Page 199 199
  • Page 200 200

Samsung SR20J9020U Omistajan opas

Tyyppi
Omistajan opas
Tämä käsikirja sopii myös