
445438
C
C
439
D
440
E
441
F
442
G
443
A
444
B
Eb FBb
CHROMATIC TUNER TD-1
INPUT
MIC
BATT.
POWER
KEY
CALIB
0
20
-20
-50
50
445438
C
C
439
D
440
E
441
F
442
G
443
A
444
B
Eb FBb
CHROMATIC TUNER TD-1
INPUT
MIC
BATT.
POWER
KEY
CALIB
0
20
-20
-50
50
445438
C
C
439
D
440
E
441
F
442
G
443
A
444
B
Eb FBb
INPUT
BATT.
0
20
-20
-50
50
445438
C
C
439
D
440
E
441
F
442
G
443
A
444
B
Eb FBb
INPUT
BATT.
0
20
-20
-50
5
0
BATT.
0
20
-20
-50
50
BATT.
0
20
-20
-50
50
TD-1
TD-1
CHROMATIC TUNER
OWNER’S MANUAL / MODE D’EMPLOI
BEDIENUNGSANLEITUNG /
TD-1
TD-1
CHROMATIC TUNER
OWNER’S MANUAL
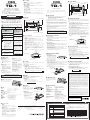
■ COMPONENTS
Thank you for purchasing the YAMAHA TD-1 Chromatic Tuner.
Please read this manual thoroughly and keep it in a safe place for
future reference.
■ PRECAUTIONS
◆ To prevent damage, do not use the tuner in the following locations:
• places where the unit will be in direct sunlight;
• places subject to temperature and humidity extremes;
• places that are sandy or dusty.
◆ To power the tuner, use only two CR-2025 lithium batteries.
◆ For maximum battery life, always be sure the tuner is turned OFF when
not in use.
◆ If an exhausted battery is left in the unit for an extended period of time,
it may leak and cause malfunctioning of the unit. When the battery
becomes exhausted, always remove it and replace it as soon as
possible.
◆ Do not subject the tuner to strong physical shock or vibration. Do not
use excessive force on any of the controls.
◆ Never use solvents such as benzene or thinner to clean the tuner.
Wipe clean with a soft, dry cloth.
◆ After reading the owner's manual, keep it in a safe place for future
reference.
Never dispose of used batteries by burning them.
Also make sure to keep batteries away from children.
■ TUNING PROCEDURE
The tuner will automatically select the note closest to the tone input for
tuning. The accuracy of that note’s pitch (flat or sharp) is displayed by the
meter.
1. Press the POWER switch to turn the power on.
After the POWER is switched on, the indicator for the currently
selected key will light, and the currently selected standard pitch
indicator will flash for approximately 3 seconds.
2. Press the CALIB switch, and select the desired pitch (438 - 445Hz).
(See “PITCH SELECTION”.)
3. Press the KEY switch, and select the desired transposition (C, Eb, F, or
Bb). (See “TRANSPOSITION SETTING”.)
4. The indicator for the closest note played on the instrument lights. Half
tones are indicated by the # indicator.
5. When the appropriate indicator lights, continue to adjust the instrument’s
pitch until the Cent Indicator’s green center indicator lights.
* To tune instruments using an external microphone or pickup, also electric
or electronic instruments, connect a cord to the Input Jack located on the
side of the unit. (The built-in microphone cannot be used when there is a
plug in the input jack.) Play close to the microphone when tuning acoustic
instruments.
Standard Pitch Indicator
Key Switch
(KEY)
Calibration Switch (CALIB)
Note Indicator
Input Jack
Built-in Microphone
POWER Switch
Cent Indicator
Transposition Indicator
(Key)
b b
b b
b b
b b
b b
#
9802 R3
FCC INFORMATION (U.S.A.)
1.IMPORTANT NOTICE: DO NOT MODIFY THIS UNIT!
This product, when installed as indicated in the instructions contained in this
manual, meets FCC requirements. Modifications not expressly approved by
Yamaha may void your authority, granted by the FCC, to use the product.
2.IMPORTANT: When connecting this product to accessories and/or another
product use only high quality shielded cables. Cable/s supplied with this
product MUST be used. Follow all installation instructions. Failure to follow
instructions could void your FCC authorization to use this product in the
USA.
3.NOTE: This product has been tested and found to comply with the require-
ments listed in FCC Regulations, Part 15 for Class ”B” digital devices. Com-
pliance with these requirements provides a reasonable level of assurance
that your use of this product in a residential environment will not result in
harmful interference with other electronic devices. This equipment gener-
ates/uses radio frequencies and, if not installed and used according to the
instructions found in the users manual, may cause interference harmful to
the operation of other electronic devices. Compliance with FCC regulations
does not guarantee that interference will not occur in all installations. If this
product is found to be the source of interference, which can be determined
by turning the unit ”OFF” and ”ON”, please try to eliminate the problem by
using one of the following measures:
Relocate either this product or the device that is being affected by the inter-
ference.
Utilize power outlets that are on different branch (circuit breaker or fuse)
circuits or install AC line filter/s.
In the case of radio or TV interference, relocate/reorient the antenna. If the
antenna lead-in is 300 ohm ribbon lead, change the lead-in to co-axial type
cable.
If these corrective measures do not produce satisfactory results, please con-
tact the local retailer authorized to distribute this type of product. If you can
not locate the appropriate, please contact Yamaha Corporation of America,
Electronic Service Division, 6600 Orangethorpe Ave, Buena Park, CA 90620
The above statements apply ONLY to those products distributed by
Yamaha Corporations of America or its subsidiaries.
■ SPECIFICATIONS
Indicators : Cent indicator, Note indicator,
Calibration indicator, Key indicator
Note Setting Range : A0 (27.5Hz) – C8 (4186.01Hz)
Accuracy : ±1 cent
In Pitch Accuracy : ±3 cent
Standard Pitch Setting Range
: A4=438 Hz – 445 Hz (1 Hz steps)
Transposition : C, Eb, F, Bb
Auto Power Off Function : After approx. 5 minutes
Other Functions : Memory backup function
Battery check function
Connector : INPUT (3.5
monaural)
Power Source : Lithium battery x 2 (CR-2025)
Battery Life : Approximately 3 hrs. (When the
microphone has continuous sound input.)
Dimensions (W x H x D) : 102 x 12 x 64 mm (4-1/8" x 1/2" x 2-1/2")
Weight (including batteries) : 65 g (2.1 oz)
Accessories : Lithium battery x 2 (CR-2025),
Hard case (can be used as stand)
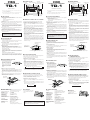
■ THE HARD CASE
The hard case can be used as a
stand as shown in the illustration
on the right.
■ TRANSPOSITION SETTING
This function sets the transposition or key of the instrument. It is possible
to set the transposition for instruments in the key of C, Eb, F, or Bb. The
selected key is confirmed by an indicator.
* The default setting (factory preset) is C.
◆ Transposition Setting Method
1. Press the POWER switch to turn the power on.
2. Press the KEY switch to select the instrument’s key. Each time the
switch is pressed, the key indicator will advance one step.
b b
■ PITCH SELECTION
The TD-1 can be set to standard pitches ranging from A4=438Hz to
A4=445Hz in 1Hz increments.
* The default setting (factory preset) is 442Hz.
◆ Pitch Selection Method
1. Press the POWER switch to turn the power on.
2. Press the CALIB switch once, and the indicator for the currently
selected Standard Pitch will flash. (438 - 445Hz)
3. While the indicator is flashing, press the CALIB switch. The indicators
will flash in sequence each time the pitch switch is pressed. Each
indicator step represents a 1Hz change in standard pitch.
4. When the CALIB switch has not been pressed for about 2 seconds, the
tuner will automatically return to the tuning mode.
Tune until the Center
Indicator (green) lights.
Select the
Transposition Key.
The indicator of the note being tuned lights.
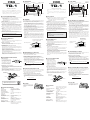
■ BATTERY REPLACEMENT
◆ Battery Check
When battery power becomes
low, while the tuner is in use, the
“cent” indicators on the left and
right will flash. Replace the
batteries with a new set (CR-
2025 x 2) as soon as possible.
◆ Replacement Procedure
1. Remove the battery cover fixing screw at the bottom of the unit and
remove the battery cover by sliding it in the direction of the arrow as
shown in the illustration below.
2. Lift out the old batteries using a pointed tool (tweezers etc.).
3. Insert the new batteries with its - pole facing down (+ pole must be
visible when inserted).
4. Attach the battery cover and secure it using the fixing screw.
Lithium batteries
(CR-2025 x 2)
Bottom
side
Battery cover
Screw
Flash
■ FUNCTIONS OF THE TD-1
◆ Transposition Key
Select one of the 4 transposition settings to accommodate the tuning of
instruments in the keys of C, Eb, F, and Bb.
◆ Pitch Selection
It is possible to set the TD-1 to standard pitches ranging from
A4=438Hz to A4=445Hz in 1Hz increments.
◆ Other Functions
• Auto Power Off Function
When none of the tuner’s buttons are pressed, or there is no sound
input for approximately 5 minutes, the tuner will automatically turn off.
• Battery Check Indicator
When battery power becomes low, the left and right side “cent”
indicators will flash, indicating the battery must be replaced.
• Memory Backup Function
This function retains all current settings in memory when the unit is
turned off (POWER button or Auto Power Off).
THIS DIGITAL APPARATUS DOES NOT EXCEED
THE “CLASS B” LIMITS FOR RADIO NOISE EMIS-
SIONS FROM DIGITAL APPARATUS SET OUT IN
THE RADIO INTERFERENCE REGULATION OF THE
CANADIAN DEPARTMENT OF COMMUNICATIONS.
445
438
C
C
439
D
440
E
441
F
442
G
443
A
444
B
Eb FBb
C
H
R
O
M
A
T
I
C
T
U
N
E
R
T
D
-
1
I
N
P
U
T
M
IC
B
A
T
T
.
POWER
KEY
CALIB
0
20
-20
-5
0
5
0
445
438
C
C
439
D
440
E
441
F
442
G
443
A
444
B
Eb FBb
C
H
R
O
M
A
T
I
C
T
U
N
E
R
T
D
-
1
IN
P
U
T
M
IC
B
A
T
T
.
P
O
W
E
R
K
E
Y
C
A
L
IB
0
20
-20
-5
0
50

445438
C
C
439
D
440
E
441
F
442
G
443
A
444
B
Eb FBb
CHROMATIC TUNER TD-1
INPUT
MIC
BATT.
POWER
KEY
CALIB
0
20
-20
-50
50
445438
C
C
439
D
440
E
441
F
442
G
443
A
444
B
Eb FBb
CHROMATIC TUNER TD-1
INPUT
MIC
BATT.
POWER
KEY
CALIB
0
20
-20
-50
50
445438
C
C
439
D
440
E
441
F
442
G
443
A
444
B
Eb FBb
INPUT
BATT.
0
20
-20
-50
50
445438
C
C
439
D
440
E
441
F
442
G
443
A
444
B
Eb FBb
INPUT
BATT.
0
20
-20
-50
50
BATT.
0
20
-20
-50
50
BATT.
0
20
-20
-50
50
TD-1
TD-1
CHROMATISCHES STIMMGERÄT
BEDIENUNGSANLEITUNG
■ BEDIENELEMENTE
Vielen Dank für den Kauf des chromatischen Stimmgeräts TD-1
von YAMAHA.
Lesen Sie diese Anleitung bitte aufmerksam durch, und bewahren
Sie sie dann zur späteren Bezugnahme gut auf.
■ VORSICHTSMASSREGELN
◆ Verwenden Sie das Stimmgerät nicht an Orten, wo es den folgenden
schädlichen Einflüssen ausgesetzt ist:
• Direktes Sonnenlicht
• Extreme Temperatur- und Luftfeuchtigkeitswerte
• Sand und Staub
◆ Verwenden Sie als Stromquelle ausschließlich ein Paar
Lithiumbatterien des Typs CR-2025.
◆ Schalten Sie das Stimmgerät nach Gebrauch stets aus, um die
Batterien zu schonen.
◆ Wenn verbrauchte Batterien längere Zeit im Gerät verbleiben, können
sie auslaufen und Schäden verursachen. Wenn die Batterien
schwächer werden, sollten Sie sie daher entnehmen und so bald wie
möglich durch frische ersetzen.
◆ Schützen Sie das Stimmgerät vor starken Schlägen und
Erschütterungen. Wenden Sie beim Betätigen der Bedienelemente
nicht zu viel Kraft auf.
◆ Verwenden Sie zum Säubern des Stimmgeräts keine Lösungsmittel
wie Benzin oder Verdünner. Entfernen Sie Staub und Schmutz mit
einem weichen, trockenen Tuch.
◆ Bewahren Sie diese Anleitung nach dem Durchlesen gut auf.
■ STIMMVORGANG
Das Stimmgerät wählt automatisch die Note, deren Tonhöhe dem
Eingabeton am nächsten kommt. Die Cent-Anzeige gibt Auskunft über
die Tonhöhenabweichung (niedriger oder höher).
1. Drücken Sie den POWER-Schalter, um das Stimmgerät
einzuschalten.
Nach dem Einschalten leuchtet die Transpositionsanzeige-LED der
gegenwärtig gewählten Tonart, während die Anzeige-LED der
gegenwärtig eingestellten Standardtonhöhe etwa 3 Sekunden lang
blinkt.
2. Wählen Sie mit dem CALIB-Schalter die gewünschte
Standardtonhöhe (438 bis 445 Hz). (Siehe “EINSTELLUNG DER
STANDARDTONHÖHE”.)
3. Wählen Sie mit dem KEY-Schalter die gewünschte Transposition.
(Siehe “EINSTELLUNG DER TRANSPOSITION”.)
4. Beim Spielen einer Note auf dem Instrument leuchtet nun die dem Ton
entsprechende Notenanzeige auf (Halbtöne werden durch die #-
Anzeige identifiziert).
5. Sobald die richtige Notenanzeige leuchtet, stimmen Sie das
Instrument, bis die grüne LED in der Mitte der Cent-Anzeige leuchtet.
* Zum Stimmen von Instrumenten mit einem externen Mikrofon oder
Tonabnehmer sowie von elektrischen oder elektronischen Instrumenten
schließen Sie deren Ausgangskabel an die Eingangsbuchse an der Seite des
Stimmgeräts an. (Wenn die Eingangsbuchse beschaltet ist, arbeitet das
eingebaute Mikrofon nicht.) Akustische Instrumente sollten beim Stimmen
so dicht wie möglich an das Mikrofon gehalten werden.
INPUT-Buchse (Eingang)
TD-1
TD-1
ACCORDEUR CHROMATIQUE
MODE D’EMPLOI
■ NOMENCLATURE
Nous vous remercions d’avoir porté votre choix sur l’accordeur
chromatique YAMAHA TD-1.
Nous vous prions de lire attentivement ce mode d’emploi et de le
conserver en lieu sûr pour vous y reporter ultérieurement.
■ MARCHE A SUIVRE POUR L’ACCORDAGE
L’accordeur sélectionne automatiquement la note la plus proche de
l’entrée de note, pour l’accordage. La précision de cette hauteur de
note (bémol ou dièse) est affichée sur l’indicateur.
1. Appuyez sur l’interrupteur POWER pour mettre l’accordeur sous
tension.
Une fois l’accordeur sous tension, le témoin de la note actuellement
sélectionnée s’allume et le témoin de hauteur standard sélectionnée
clignote pendant 3 secondes environ.
2. Appuyez sur le sélecteur CALIB et sélectionnez la hauteur désirée
(438 - 445 Hz). (Reportez-vous à “SELECTION DE HAUTEUR”).
3. Appuyez sur le sélecteur KEY et choisissez la transposition désirée (C,
Eb, F ou Bb). (Reportez-vous à “REGLAGE DE TRANSPOSITION”).
4. Le témoin de la note la plus proche jouée sur l’instrument s’allume. Les
rondes sont signalées par le témoin #.
5. Quand le témoin approprié s’allume, continuez à accorder la hauteur
de l’instrument jusqu’à ce que le témoin central vert de l’indicateur de
centièmes s’allume.
* Pour accorder les instruments utilisant un microphone externe ou un
microphone électromagnétique, de même que les instruments électriques ou
électroniques, raccordez le cordon d’alimentation à la prise d’entrée située
sur le côté de l’accordeur. (Le microphone incorporé ne peut être utilisé
quand une prise est branchée dans la prise d’entrée). Faites
particulièrement attention au microphone lorsque vous accordez des
instruments acoustiques.
Témoin d’étalonnage (CALIB)
Témoins de notes
Prise d’entrée
Indicateur de centièmes
Interrupteur
d’alimentation (POWER)
Microphone incorporé
Témoins de
transposition (notes)
Sélecteur de
note (KEY)
Témoin de hauteur standard
■ PRECAUTIONS
◆ Afin de ne pas endommager l’accordeur, évitez de l’utiliser dans des
endroits répondant aux conditions suivantes :
• plein soleil
• humidité ou températures excessives.
• sable ou poussière
◆ Pour alimenter l’accordeur, utilisez exclusivement deux piles au lithium
CR-2025.
◆ Pour garantir une longévité maximale des piles, mettez toujours
l’accordeur hors tension lorsque vous ne l’utilisez pas.
◆ Les piles épuisées qui restent dans l’accordeur pendant une longue
période, peuvent fuir et provoquer des anomalies de fonctionnement.
Lorsque les piles présentent des signes de décharge, remplacez-les
dans le délai le plus bref.
◆ L’accordeur ne doit pas subir de chocs ni de vibrations importants. Ne
le manipulez jamais avec une force excessive.
◆ N’utilisez jamais de solvants tels que de la benzine ou du diluant pour
nettoyer l’accordeur. Essuyez-le avec un chiffon doux et sec.
◆ Après avoir lu ce mode d’emploi, conservez-le en lieu sûr pour vous y
reporter ultérieurement.
Ne jetez jamais les piles au feu et conservez-les
toujours hors de portée des enfants.
■ FONCTIONS DU TD-1
◆ Touche de transposition
Sélectionnez l’un des quatre réglages de transposition pour ajuster
l’accord des instruments dans les notes de C, Eb, F et Bb.
◆ Sélection de hauteur
Vous pouvez fixer le TD-1 à des hauteurs standard comprises dans la
plage de A4 = 438 Hz à A4 = 445 Hz par incréments de 1 Hz.
◆ Autres fonctions
• Fonction de coupure automatique de l’alimentation
Quand, pendant 5 minutes environ, aucune touche n’est sollicitée, ou
quand il n’y a aucune entrée sonore, l’alimentation de l’accordeur est
automatiquement coupée.
• Témoin de charge de piles
Lorsque la charge des piles s’affaiblit, les témoins de centièmes de
gauche et de droite clignotent, indiquant que les piles doivent être
remplacées.
• Fonction de conservation de la mémoire
Cette fonction permet de conserver tous les réglages en mémoire
lorsque l’alimentation est coupée (au moyen de l’interrupteur
(POWER) ou de la fonction de coupure automatique de l’alimentation).
■ REMPLACEMENT DES PILES
■ FICHE TECHNIQUE
Indicateurs et témoins : Indicateur de centièmes, témoin de note,
témoin d’étalonnage, témoin de note
Plage de réglage de note : A0 (27,5 Hz) - C8 (4186,01 Hz)
Précision : ± 1 centième
Précision de hauteur : ± 3 centièmes
Plage de réglage de : A4 = 438 Hz - 445 Hz
hauteur standard (par incréments d’1 Hz)
Transposition : C, Eb, F, Bb
Fonction de coupure
automatique de l’alimentation
: Après 5 minutes environ
Autres fonctions : Conservation en mémoire
Contrôle de charge des piles
Connecteur : Entrée INPUT (mono, 3,5)
Source d’alimentation : Pile au lithium x 2 (CR-2025)
Autonomie des piles : 3 heures environ. (Avec entrée de son
continue au microphone)
Dimensions : 102 x 12 x 64 mm
Poids (piles incluses) : 65 g
Accessoires : Pile au lithium x 2 (CR-2025)
Boîtier rigide (pouvant servir de support)
LE PRESENT APPAREIL NUMERIQUE N'EMET PAS DE BRUITS
RADIOELECTRIQUES DEPASSANT LES LIMITES APPLICABLES AUX
APPAREILS NUMERIQUES DE LA "CLASSE B" PRESCRITES DANS LE
REGLEMENT SUR LE BROUILLAGE RADIOELECTRIQUE EDICTE PAR
LE MINISTERE DES COMMUNICATIONS DU CANADA.
Achten Sie bitte auf korrekte Entsorgung verbrauchter
Batterien. Batterien dürfen nicht verbrannt werden!
Achten Sie bitte auch darauf, daß Batterien nicht in
Kinderhände geraten.
Cent-Anzeige
POWER-Schalter
(Ein/Aus)
Transpositionsanzeige
(Tonart)
Eingebautes Mikrofon
KEY-Schalter
(Tonart)
CALIB-Schalter (Kalibrierung)
Notenanzeige
Standardtonhöhenanzeige
■ FUNKTIONEN DES TD-1
◆ Transpositionseinstellung
Ermöglicht je nach der Stimmung des jeweiligen Instruments
Auswählen einer von 4 Transpositionen für die Tonarten C, Eb, F und
Bb.
◆ Tonhöhenkalibrierung
Die Standardtonhöhe von A4 kann beim TD-1 in Schritten zu 1 Hz im
Bereich von 438 Hz bis 445 Hz verändert werden.
◆ Andere Funktionen
• Abschaltautomatik
Wenn etwa 5 Minuten lang keiner der Schalter betätigt und kein Ton
aufgenommen bzw. Tonsignal eingegeben wird, schaltet das
Stimmgerät automatisch ab.
• Batterie-Warnanzeige
Wenn die Batterien zu schwach werden, weist Blinken der linken und
rechten LED der Cent-Anzeige darauf hin, daß ein Batteriewechsel
fällig ist.
• Speicherschutzfunktion
Die aktuellen Einstellungen im Speicher bleiben auch dann erhalten,
wenn das Stimmgerät ausgeschaltet wird (per POWER-Taste oder
Abschaltautomatik).
■ BATTERIEWECHSEL
◆ Batterie-Warnanzeige
Wenn die Batteriespannung bei
Gebrauch des Stimmgeräts unter
den Mindestwert abfällt, blinken
die linke und die rechte LED der
Cent-Anzeige. Ersetzen Sie die
Batterien in diesem Fall so bald
wie möglich durch frische (CR-
2025 x 2).
Blinken
◆ Auswechseln der Batterien
1. Entfernen Sie die Halteschraube des Batteriefachdeckels an der
Unterseite des Geräts, um den Deckel danach wie in der Abbildung in
Richtung des Pfeils abzuziehen.
2. Heben Sie die alten Batterien mit einem spitzen Werkzeug (Pinzette o.
dgl.) aus dem Fach.
3. Legen Sie die neuen Batterien mit dem Minuspol (-) nach unten in das
Fach (der Pluspol (+) der eingelegten Batterien muß sichtbar sein).
4. Schieben Sie den Batteriefachdeckel wieder auf, um ihn danach mit
der Schraube zu sichern.
■ TECHNISCHE DATEN
Anzeigen : Cent-Anzeige, Notenanzeige,
Kalibrierungsanzeige, Tonartanzeige
Noteneinstellbereich : A0 (27,5 Hz) bis C8 (4186,01 Hz)
Präzision : ±1 Cent
Tonhöhengenauigkeit : ±3 Cent
Standardtonhöhen- : A4 = 438 Hz bis 445 Hz
Einstellbereich (in Schritten zu 1 Hz)
Transpositionen : C, Eb, F, Bb
Abschaltautomatik : nach ca. 5 Minuten
Andere Funktionen : Speicherschutzfunktion, Batterie-
Warnanzeige
Anschlußbuchse : INPUT (Durchm. 3,5 mm, mono)
Stromquelle : zwei Lithiumbatterien (CR-2025)
Batterie-Lebensdauer : ca. 3 Stunden (bei kontinuierlicher
Tonaufnahme des Mikrofons)
Abmessungen (B x H x T) : 102 x 12 x 64 mm
Gewicht
(einschließlich Batterien)
: 65 g
Zubehör : zwei Lithiumbatterien (CR-2025), Etui
(dient auch als Ständer)
Stimmen, bis die grüne LED
in der Mitte leuchtet.
Die gewünschte
Transposition
(Tonart) auswählen.
Die Anzeige der mit der Tonhöhe des Eingangssignals
übereinstimmenden Note leuchtet.
Accordez jusqu’à ce
que le témoin central
(vert) s’allume.
Sélectionnez la note de
transposition.
Le témoin de note en cours d’accordage s’allume.
■ SELECTION DE HAUTEUR
Le TD-1 peut être spécifié aux hauteurs standard dans la plage de A4 =
438 Hz à A4 = 445 Hz, par pas incrémentiels d’1 Hz.
* Le réglage par défaut (préréglé en usine) est de 442 Hz.
◆ Méthode de sélection de hauteur
1. Appuyez sur l’interrupteur POWER pour mettre l’accordeur sous
tension.
2. Appuyez une fois sur le sélecteur CALIB et le témoin de la hauteur
standard actuellement sélectionnée clignotera. (438 - 445 Hz).
3. Pendant que le témoin clignote, appuyez sur le sélecteur CALIB. Les
témoins clignoteront dans l’ordre à chaque pression du sélecteur de
hauteur. Chaque pas incrémentiel de témoin représente un
changement d’1 Hz dans la hauteur standard.
4. Quand le sélecteur CALIB n’est pas sollicité pendant 2 secondes
environ, l’accordeur revient automatiquement au mode d’accordage.
■ REGLAGE DE LA TRANSPOSITION
Cette fonction fixe la transposition ou la note de l’instrument. Il est
possible de fixer la transposition des instruments dans les notes C, Eb,
F ou Bb. La note sélectionnée est confirmée par un témoin.
* Le réglage par défaut (préréglé en usine) est C.
◆ Méthode de réglage de transposition
1. Appuyez sur l’interrupteur POWER pour mettre l’accordeur sous
tension.
2. Appuyez sur le sélecteur KEY pour sélectionner la note de
l’instrument. Chaque fois que vous appuyez sur le sélecteur, le témoin
de note avance d’un pas incrémentiel.
b b
■ EINSTELLUNG DER
STANDARDTONHÖHE
Die Standardtonhöhe von A4 kann beim TD-1 in Schritten zu 1 Hz im
Bereich von 438 Hz bis 445 Hz beliebig verändert werden.
* Die Vorgabeeinstellung (ab Werk) ist 442 Hz.
◆ Verändern der Standardtonhöhe
1. Drücken Sie den POWER-Schalter, um das Stimmgerät
einzuschalten.
2. Drücken Sie einmal auf den CALIB-Schalter. Die LED der aktuell
eingestellten Standardtonhöhe blinkt nun. (438 bis 445 Hz)
3. Tippen Sie, während die LED blinkt, den CALIB-Schalter wiederholt
an. Bei jeder Schalterbetätigung wird dabei zur jeweils nächsten LED
(Tonhöhe) gewechselt. Jeder Einstellschritt verändert die
Standardtonhöhe nach folgendem Schema um 1 Hz:
4. Wenn der CALIB-Schalter etwa 2 Sekunden lang nicht betätigt wird,
schaltet das Gerät automatisch wieder auf Stimmbetrieb zurück.
■ EINSTELLUNG DER TRANSPOSITION
Mit dieser Funktion können Sie das Stimmgerät auf eine andere
Transposition (Tonart) einstellen. Damit haben Sie die Möglichkeit, das
Gerät für Instrumente einzusetzen, die nach C, Eb, F oder Bb gestimmt
sind. Die jeweils leuchtende LED zeigt die gewählte Tonart an.
* Die Vorgabeeinstellung (ab Werk) ist C.
◆ Verändern der Transposition
1. Drücken Sie den POWER-Schalter, um das Stimmgerät
einzuschalten.
2. Wählen Sie die zum Instrument passende Tonart mit dem KEY-
Schalter aus. Bei jeder Schalterbetätigung wird nach folgendem
Schema zur jeweils nächsten Tonart weitergeschaltet:
b b
■ DAS ETUI
Das Etui kann, wie rechts
abgebildet, auch als
Metronomständer verwendet
werden.
■ LE BOÎTIER
Le boîtier peut être utilisé comme
support de la manière illustrée ci-
contre.
◆ Contrôle de charge des piles
Lorsque, pendant l’utilisation de
l’accordeur, les piles deviennent
pratiquement épuisées, les
té moins de centièmes de
gauche et de droite clignotent.
Remplacez ces piles, le plus tôt
possible, par 2 piles (CR-2025)
neuves.
◆ Marche à suivre pour le remplacement
1. Retirez la vis de fixation du couvercle du logement des piles au dos de
l’accordeur et enlevez le couvercle en le faisant glisser dans la
direction de la flèche, de la manière illustrée ci-dessous.
2. Faites sortir les piles déchargées à l’aide d’un objet pointu (pincettes,
etc.).
3. Insérez les piles neuves en mettant le pôle - au dessous (le pôle + est
visible lorsque les piles sont en place).
4. Remettez le couvercle du logement des piles et fixez-le avec la vis.
Clignotement
Couvercle du logement
des piles
Dos de
l’accordeur
Piles au lithium
(CR-2025 x 2)
Lithiumbatterien
(CR-2025 x 2)
Unterseite
Batteriefachdeckel
Schraube
Vis
445
438
C
C
439
D
440
E
441
F
442
G
443
A
444
B
Eb FB
b
C
H
R
O
M
A
T
I
C
T
U
N
E
R
T
D
-
1
I
N
P
U
T
M
I
C
B
A
T
T
.
P
O
W
E
R
K
E
Y
C
A
L
IB
0
20
-20
-5
0
50
4
4
5
4
3
8
C
C
43
9
D
4
40
E
44
1
F
4
4
2
G
4
4
3
A
4
44
B
E
b
FB
b
C
H
R
O
M
A
T
I
C
T
U
N
E
R
T
D
-
1
I
N
P
U
T
M
I
C
B
A
T
T
.
P
O
W
E
R
K
E
Y
C
A
L
I
B
0
20
-
2
0
-50
50

445438
C
C
439
D
440
E
441
F
442
G
443
A
444
B
Eb FBb
CHROMATIC TUNER TD-1
INPUT
MIC
BATT.
POWER
KEY
CALIB
0
20
-20
-50
50
445438
C
C
439
D
440
E
441
F
442
G
443
A
444
B
Eb FBb
CHROMATIC TUNER TD-1
INPUT
MIC
BATT.
POWER
KEY
CALIB
0
20
-20
-50
50
445438
C
C
439
D
440
E
441
F
442
G
443
A
444
B
Eb FBb
INPUT
BATT.
0
20
-20
-50
50
445438
C
C
439
D
440
E
441
F
442
G
443
A
444
B
Eb FBb
INPUT
BATT.
0
20
-20
-5
0
5
0
BATT.
0
20
-20
-50
50
BATT.
0
20
-20
-50
50
TD-1
TD-1
ACCORDATORE CROMATICO
MANUALE PER L’UTENTE
■ COMPONENTI
Grazie per avere acquistato l’accordatore cromatico YAMAHA
TD-1.
Si prega di leggere questo manuale con attenzione e di
conservarlo in un luogo sicuro per eventuali riferimenti nel
futuro.
■ PRECAUZIONI
◆ Per evitare danni, non utilizzare l’accordatore nel luoghi indicati di
seguito:
• luoghi in cui l’unità viene esposta alla luce solare diretta;
• luoghi soggetti a livelli estremi di umidità e temperatura;
• luoghi sabbiosi o polverosi.
◆ Per l’alimentazione dell’accordatore utilizzare solo due batterie al litio
CR-2025.
◆ Per ottenere la massima durata dalle batterie, accertarsi di disattivare
sempre l’alimentazione dell’accordatore quando non lo si utilizza.
◆ Se batterie scariche vengono lasciate nell’unità per lungo tempo, esse
potrebbero perdere causando disfunzioni dell’unità stessa. Quando le
batterie si scaricano, rimuoverle e sostituirle il più presto possibile.
◆ Non sottoporre l’accordatore ad urti o vibrazioni di violenza eccessiva.
Non utilizzare inoltre i comandi con forza eccessiva.
◆ Non utilizzare mai solventi come benzolo o diluente per pulire
l’accordatore. Pulire utilizzando un panno morbido ed asciutto.
◆ Dopo aver letto il manuale per l’utente, conservarlo in un luogo sicuro
per eventuali riferimenti nel futuro.
Non disfarsi mai delle batterie scariche gettandole
nel fuoco.
Accertarsi anche di tenere le batterie fuori dalla
portata dei bambini.
■ PROCEDURA DI ACCORDATURA
L’accordatore seleziona automaticamente la nota più vicina al tono
introdotto per l’accordatura. La precisione dell’altezza di tale nota
(bemolle o diesis) viene visualizzata dall’indicatore.
1. Premere POWER per attivare l’alimentazione.
Dopo aver attivato l’alimentazione con POWER, l’indicatore della
chiave correntemente selezionata si illumina e l’indicatore dell’altezza
standard correntemente selezionata lampeggia per circa 3 secondi.
2. Premere il comando CALIB e selezionare l’altezza desiderata (438-
445Hz). (Vedere “SELEZIONE DELL’ALTEZZA”).
3. Premere il comando KEY e selezionare la trasposizione desiderata (C,
Eb, F o Bb). (Vedere “IMPOSTAZIONE DELLA TRASPOSIZIONE”).
4. L’indicatore della nota più vicina a quella prodotta dallo strumento si
illumina. I mezzitoni sono indicati dall’indicatore #.
5. Quando l’indicatore appropriato si illumina, continuare la regolazione
dell’altezza dello strumento fino a far illuminare l’indicatore verde
centrale degli indicatori dei centesimi.
* Per accordare gli strumenti utilizzando un microfono o un pickup esterno e
per gli strumenti elettrici o elettronici, collegare un cavo alla presa di
ingresso sul lato dell’unità. (Il microfono incorporato viene scollegato
quando la presa di ingresso viene utilizzata). Suonare vicino al microfono
per accordare strumenti acustici.
Indicatore altezza standard
Comando chiave
(KEY)
Comando di taratura (CALIB)
Indicatore nota
Presa di ingresso
Microfono incorporato
Pulsante di
accensione
POWER
CIndicatore “centesimi”
Indicatore di trasposizione
(chiave)
■ DATI TECNICI
Indicatori : indicatori centesimi, indicatori nota,
indicatori taratura altezza, indicatori
chiave
Gamma impostazione note : A0 (27,5Hz) - C8 (4186,01Hz)
Precisione : +/- 1 centesimo
Precisione altezza ingresso : +/- 3 centesimi
Gamma impostazione
altezza standard : A4=438Hz - A4=445Hz (incrementi
da 1Hz)
Trasposizione : C, Eb, F, Bb
Spegnimento automatico : Dopo circa 5 minuti
Altre funzioni : Mantenimento memoria, controllo
batteria
Connettore : Ingresso INPUT (ø3,5 mm mono)
Alimentazione : 2 batterie al litio (CR-2025)
Durata batterie : Circa 3 ore. (Con ingresso continuo
del suono nel microfono).
Dimensioni (LxAxP) : 102x12x64 mm
Peso (batterie incluse) : 65 g
Accessori : 2 batterie al litio (CR-2025), custodia
(può essere utilizzata come supporto)
■ CUSTODIA
La custodia può essere utilizzata
come supporto come indicato
nell’illustrazione a destra.
■ IMPOSTAZIONE DELLA TRASPOSIZIONE
Questa funzione imposta la trasposizione o chiave dello strumento. E’
possibile impostare la trasposizione per strumenti in chiave di C, Eb, F o
Bb. La chiave selezionata viene confermata da un indicatore.
* L’impostazione base (preimpostata in fabbrica) è C.
◆ Metodo di impostazione della trasposizione
1. Premere POWER per attivare l’alimentazione.
2. Premere il comando KEY per selezionare la chiave dello strumento.
Ogni volta che l’interruttore viene premuto, l’indicatore della chiave
avanza di una posizione.
b b
■ SELEZIONE DELL’ALTEZZA
Il TD-1 può essere impostato su altezze standard che vanno da
A4=438Hz ad A4=445Hz in incrementi di 1Hz.
* L’impostazione base (preimpostata in fabbrica) è 442Hz.
◆ Metodo di selezione dell’altezza
1. Premere POWER per attivare l’alimentazione.
2. Premere una volta il comando CALIB e l’indicatore dell’altezza
standard correntemente selezionata si illuminerà. (438-445Hz)
3. Mentre l’indicatore sta lampeggiando, premere il comando CALIB. Gli
indicatori lampeggiano in sequenza ogni volta che il comando viene
premuto. Ciascun indicatore rappresenta il cambiamento di 1 Hz
dell’altezza.
4. Quando il comando CALIB non viene premuto per circa 2 secondi,
l’accordatore ritorna automaticamente al modo di accordatura.
Accordare fino a che
l’indicatore centrale
(verde) non si illumina.
Selezionare la chiave di
trasposizione
L’indicatore della nota che viene accordata
si illumina.
■ SOSTITUZIONE BATTERIE
◆ Controllo delle batterie
Quando le batterie si scaricano,
mentre l’accordatore viene
utilizzato, gli indicatori dei
“centesimi” sinistro e destro
lampeggiano. Sostituire le
batterie con una nuova coppia
(CR-2025 x 2) al più presto.
◆ Procedura di sostituzione
1. Rimuovere la vite di fissaggio del coperchio delle batterie sul lato
inferiore dell’unità e rimuovere il coperchio facendolo scorrere nella
direzione della freccia come indicato nell’illustrazione in basso.
2. Rimuovere le vecchie batterie con un attrezzo appuntito (pinzette,
ecc.).
3. Inserire le nuove batterie col polo negativo (-) rivolto in basso (il polo
positivo + deve rimanere visibile dopo l’inserimento).
4. Installare il coperchio delle batterie e fissarlo con la vite apposita.
Batterie al litio
(CR-2025 x 2)
Lato inferiore
Coperchio batterie
Vite
Lampeggiano
■ FUNZIONI DEL TD-1
◆ Tasto trasposizione
Selezionare una delle quattro impostazioni di trasposizione per
accomodare l’accordatura di strumenti nelle chiavi di C, Eb, F e Bb.
◆ Selezione dell’altezza
E’ possibile impostare il TD-1 su altezze standard che vanno da
A4=438Hz ad A4=445Hz in incrementi di 1Hz.
◆ Altre funzioni
• Funzione di spegnimento automatico
Quando non si preme alcun pulsante o non vi è alcun ingresso di
suono per circa 5 minuti, l’accordatore si spegne automaticamente.
• Indicatore di controllo delle batterie
Quando le batterie si scaricano, gli indicatori dei “centesimi” sinistro e
destro lampeggiano indicando che le batterie devono essere sostituite.
• Funzione di mantenimento della memoria
Questa funzione mantiene in memoria tutte le impostazioni correnti
quando l’unità viene spenta (pulsante POWER o spegnimento
automatico).
TD-1
TD-1
CHROMATISCH STEMAPPARAAT
GEBRUIKSAANWIJZING
■ ONDERDELEN
Dank u voor de aanschaf van de YAMAHA TD-1 chromatische
stemapparaat. Lees deze gebruiksaanwijzing goed door voordat
u de TD-1 gebruikt en bewaar deze op een veilige plaats, zodat,
u. indien nodig, later nog het een en ander kunt opzoeken.
■ VOORZORGSMAATREGELEN
◆ Voorkom beschadiging en bewaar het stemapparaat niet op de
volgende plaatsen:
• waar het stemapparaat zich in directe zonlicht bevindt.
• waar de temperatuur en vochtigheidsgraad extreem zijn;
• waar veel zand of stof is.
◆ Gebruik uitsluitend twee CR-2025 lithiumbatterijen voor het voeden
van het stemapparaat.
◆ Controleer of het stemapparaat uitgeschakeld (OFF) staat als u deze
niet gebruik. Uw batterijen gaan dan langer mee.
◆ Een lege batterij in het stemapparaat kan na verloop van tijd gaan
lekken met een onjuiste werking van het stemapparaat tot gevolg.
Verwijder daarom lege batterijen direct en plaats nieuwe batterijen.
◆ Stel het stemapparaat niet aan sterke schokken of trillingen
onderhevig. Forceer de regelaars en bedieningsorganen niet bij
gebruik.
◆ Gebruik geen oplosmiddelen zoals benzine en thinner om het
stemapparaat schoon te maken. Veeg het stemapparaat indien nodig
met een zachte, droge doek af.
◆ Bewaar deze gebruiksaanwijzing nadat u hem heeft doorgelezen
zodat u later bij twijfels nog het een en ander kunt opzoeken.
Gooi gebruikte batterijen nooit in een vuur.
Houd de batterijen buiten het bereik van kleine kinderen.
■ STEMMEN
Het stemapparaat kiest voor het stemmen automatisch de noot die het
dichtst bij de ingevoerde toon ligt. De nauwkeurigheid van de hoogte van
die toon (neutraal of scherp) wordt op de meter getoond.
1. Druk op de POWER schakelaar om de spanning in te schakelen.
De indicator van de huidige gekozen toon licht op nadat de spanning
wordt ingeschakeld. De indicator van de huidige gekozen standaard-
toonhoogte knippert ongeveer 3 seconden.
2. Druk op de CALIB schakelaar en kies de gewenste toon (438 - 445
Hz). Zie “KIEZEN VAN DE TOONHOOGTE”.)
3. Druk op de KEY schakelaar en kies de gewenste transpositie (C, Eb, F
of Bb). Zie “INSTELLEN VAN TRANSPOSITIE”.)
4. De indicator voor de dichtstbijzijnde noot die met het instrument wordt
gespeeld licht op. Halve tonen worden door de # indicator aangegeven.
5. Stel wanneer de juiste indicator oplicht de toonhoogte van het
instrument af totdat de groene middelste aanduiding van de “cent”
indicator oplicht.
* Voor het stemmen van instrumenten met gebruik van een externe microfoon
of weergavecomponent, met inbegrip van elektrische of elektronische
instrumenten, moet u een snoer met de ingangsaansluiting die u links op het
stemapparaat ziet verbinden. (De ingebouwde microfoon kan niet worden
gebruikt wanneer u een verbinding met deze ingangsaansluiting heeft
gemaakt.) Speel voor het stemmen van akoestische instrumenten dicht bij de
microfoon.
Indicator voor standaard-toonhoogte
Toonschakelaar
(KEY)
IJkingsschakelaar (CALIB)
Noot-indicator
Ingangsaansluiting
Ingebouwde microfoon
POWER schakelaar
“Cent” indicator
Transpositie-indicator
(toon)
■ TECHNISCHE GEGEVENS
Indicators : “cent” indicator, nootindicator,
calibratie-indicator, toonindicator
Nootinstelbereik : A0 (27,5 Hz) = C8 (4186,01 Hz)
Nauwkeurigheid : +/- 1 cent
Toonnauwkeurigheid : +/- 3 cent
Instelbereik standaardtoon : A4 = 438 Hz - 445 Hz (stappen van 1
Hz)
Transpositie : C, Eb, F, Bb
Automatische
uitschakeling van spanning : Na ongeveer 5 minuten
Overige functies : Geheugenondersteuning, Batt-
erijcontrole
Aansluiting : INPUT (3,5 ø mono)
Spanningsbron : Lithiumbatterij x 2 (CR-2025)
Gebruikstijd van batterij : Ongeveer 3 uur (bij doorlopende
invoer van geluid via microfoon)
Afmetingen (B x H x D) : 102 x 12 x 64 mm
Gewicht (inclusief batterijen) : 65 gram
Toebehoren : Lithiumbatterij x 2 (CR-2025),
Kunststoffen doosje (kan tevens als
standaard worden gebruikt)
■ HOUDER
U kunt het kunststoffen doosje ook
zoals u hier rechts ziet als
standaard voor het stemapparaat
gebruiken.
■ INSTELLEN VAN TRANSPOSITIE
Met deze functie wordt de transpositie of toon van het instrument
ingesteld. U kunt de transpositie voor instrumenten op C, Eb, F of Bb
instellen. De gekozen toon wordt door een indicator aangegeven.
* De basisinstelling (fabrieksinstelling) is C.
◆ Handelingen voor het kiezen van de transpositie
1. Druk op de POWER schakelaar om de spanning in te schakelen.
2. Druk op de KEY schakelaar om de toon van het instrument te kiezen.
Door iedere druk op de schakelaar verandert de toonindicator een
stap.
b b
■ KIEZEN VAN DE TOONHOOGTE
Met de TD-1 kunt u standaardtoonhoogten met stappen van 1 Hz vanaf
A4 = 438 Hz t/m A4 = 445 Hz instellen.
* De basisinstelling (fabrieksinstelling) is 442 Hz.
◆ Handelingen voor het kiezen van de toonhoogte
1. Druk op de POWER schakelaar om de spanning in te schakelen.
2. Druk ènmaal op de CALIB schakelaar. De indicator voor de huidige
gekozen standaardtoonhoogte knippert. (438 - 445 Hz)
3. Druk wanneer de indicator knippert op de CALIB schakelaar. De
indicators zullen door iedere druk op de toonhoogteschakelaar
achtereenvolgend knipperen. Iedere indicator stelt een verandering
van 1 Hz in standaardtoonhoogte voor.
4. Het stemapparaat schakelt automatisch weer in de functie voor het
stemmen indien er gedurende ongeveer 2 seconden niet op de CALIB
schakelaar wordt gedrukt.
Stem af totdat de middelste aanduiding
(groen) van de indicator oplicht.
Kies de transpositietoon
De indicator van de noot die wordt gestemd
licht op.
■ VERVANGEN VAN BATTERIJEN
◆ Batterij-indicators
De “cent” indicators links en
rechts knipperen wanneer de
batterijen bijna uitgeput zijn bij
het gebruik van het
stemapparaat. Vervang beide
batterijen door nieuwe (CR-
2025 x 2) zo snel als mogelijk.
◆ Handelingen voor het vervangen
1. Verwijder de schroef van het batterijenklepje onder op het toestel en
verwijder de afdekking door deze zoals u hieronder ziet in de richting
van de pijl te schuiven.
2. Haal met een puntig voorwerp (tangetje) de oude batterijen uit het vak.
3. Plaats de nieuwe batterijen met de - omlaag (de + pool moet zichtbaar
zijn wanneer de batterijen zijn geplaatst.)
4. Plaats het batterijenklepje weer terug en zet met de schroef vast.
Lithiumbatterij
(CR-2025 x 2)
Onderka
nt
Batterijenklepje
Schroef
Knippert
■ FUNCTIES VAN DE TD-1
◆ Transpositietoets
Voor het kiezen van èn van de 4 transpositie-instellingen voor het
stemmen van instrumenten met C, Eb, F en Bb.
◆ Kiezen van toonhoogte
U kunt de TD-1 op standaard-toonhoogten instellen met stappen van 1
Hz vanaf A4 = 438 Hz t/m A4 = 445 Hz.
◆ Overige functies
• Automatische uitschakeling van de spanning
Het stemapparaat wordt automatisch uitgeschakeld indien er
gedurende ongeveer 5 minuten geen bediening wordt uitgevoerd of
geen geluidssignalen worden ingevoerd.
• Indicator voor controleren van batterij
De linker- en rechterkant van de “cent” indicators knipperen wanneer
de batterijen bijna uitgeput zijn. U moet nieuwe batterijen plaatsen.
• Geheugenondersteuningsfunctie
Met deze functie worden alle huidige instellingen in het geheugen
vastgelegd wanneer het stemapparaat wordt uitgeschakeld (met de
POWER toets of door de automatische functie).
4
4
5
4
3
8
C
C
4
3
9
D
4
4
0
E
44
1
F
4
42
G
4
4
3
A
4
44
B
E
b
FB
b
C
H
R
O
M
A
T
I
C
T
U
N
E
R
T
D
-
1
IN
P
U
T
M
I
C
B
A
T
T
.
P
O
W
E
R
K
E
Y
C
A
L
I
B
0
2
0
-2
0
-50
50
445
438
C
C
439
D
440
E
441
F
442
G
443
A
444
B
Eb FBb
C
H
R
O
M
A
T
I
C
T
U
N
E
R
T
D
-
1
I
N
P
U
T
M
IC
B
A
T
T
.
P
O
W
E
R
K
E
Y
C
A
L
IB
0
20
-20
-5
0
50
Bij dit produkt zijn batterijen geleverd.
Wanneer deze leeg zijn, moet u ze niet
weggooien maar inleveren als KCA.

445438
C
C
439
D
440
E
441
F
442
G
443
A
444
B
Eb FBb
CHROMATIC TUNER TD-1
INPUT
MIC
BATT.
POWER
KEY
CALIB
0
20
-20
-50
50
445438
C
C
439
D
440
E
441
F
442
G
443
A
444
B
Eb FBb
INPUT
BATT.
0
20
-20
-50
50
BATT.
0
20
-20
-50
50
TD-1
TD-1
AFINADOR CROMÁTICO
MANUAL DE INSTRUCCIONES
■ COMPONENTES
Muchas gracias por la adquisición del afinador cromático
YAMAHA TD-1.
Lea con atención todo este manual y guárdelo en un lugar seguro
para poderlo consultar en cualquier momento.
■ PRECAUCIONES
◆ Para evitar daños, no emplee el afinador en los lugares siguientes:
•
lugares en los que la unidad pueda quedar bajo la luz directa del sol;
• lugares sometidos a temperatura y humedad extrema;
• lugares en los que haya arena o polvo.
◆ Para alimentar el afinador, emplee solamente dos pilas de litio CR-
2025.
◆ Para que las pilas le duren el máximo, desconecte siempre el afinador
cuando no lo utilice.
◆ Si se dejan pilas gastadas dentro del aparato durante períodos
prolongados, pueden producirse fugas y causar mal funcionamiento
de la unidad. Cuando se gasten las pilas, extráigalas y reemplácelas lo
antes posible.
◆ No someta el afinador a golpes ni vibraciones fuertes. No aplique
fuerza excesiva a los controles.
◆ No emplee nunca disolventes tales como bencina etc. para limpiar el
afinador. Frótelo con un paño suave y seco.
◆ Después de leer el manual de instrucciones, guárdelo en un lugar
seguro para poderlo consultar en cualquier momento.
No tire nunca de forma inadecuada las pilas gastadas.
Asegúrese también de mantener las pilas fuera del
alcance de los niños.
■ PROCEDIMIENTO DE AFINACIÓN
El afinador seleccionará automáticamente la nota más próxima al tono
introducido para afinación. La precisión del tono de la nota (bemol o
sostenido) se indica en el medidor.
1. Presione el interruptor POWER para conectar la alimentación.
Después de haber conectado la alimentación (POWER), se enciende
el indicador de la clave actualmente seleccionada, y el indicador del
tono estándar actualmente seleccionado parpadeará durante unos 3
segundos.
2. Presione el selector CALIB y seleccione el tono que desee (438 0 445
Hz). (Vea “SELECCIÓN DEL TONO”.)
3. Presione el selector KEY y seleccione la transposición que desee (C,
Eb, F, o Bb). (Vea “AJUSTE DE LA TRANSPOSICIÓN”.)
4. Se encenderá el indicador de la nota más cercana a la tocada en el
instrumento. Los medios tonos se indican con el indicador #.
5. Cuando se encienda el indicador apropiado siga ajustando el tono del
instrumento hasta que se encienda el indicador central verde de
“Centésimas”.
* Para afinar instrumentos empleando un micrófono o fonocaptor externo, y
también instrumentos eléctricos o electrónicos, conecte un cable a la toma
de entrada, situada en un lado de la unidad. (No podrá emplearse el
micrófono incorporado cuando se haya enchufado una clavija a la toma de
entrada.) Toque cerca del micrófono cuando afine instrumentos acústicos.
Indicador de tono estándar
Selector de
clave (KEY)
Selector de calibración (CALIB)
Indicador de notas
Toma de entrada
Micrófono incorporado
Interruptor de la
alimentación
(POWER)
Indicador de centésimas
Indicador de transposición
(clave)
■ ESPECIFICACIONES
Indicadores : Indicador de centésimas, indicador de
notas, indicador de calibración, indicador
de clave
Margen de ajuste de notas : A0 (27,5 Hz) – C8 (4186,01 Hz)
Precisión : ±1 centésima
Presión de tono de entrada
: ±3 centésimas
Margen de ajuste
del tono estándar : A4=438 Hz a A4=445 Hz
(incrementos de 1 Hz)
Transposición : C, Eb, F, Bb
Función de desconexión automática
de la alimentación : Después de aprox. 5 minutos
Otras funciones : Función de seguridad de la memoria
Función de comprobación de las pilas
Conector : INPUT (entrada) (3,5
, monofónico)
Alimentación : Pila de litio x 2 (CR-2025)
Duración de las pilas : Aproximadamente 3 horas. (Cuando el
micrófono tiene entrada continua de
sonido.)
Dimensiones (An x Al x Prf)
: 102 x 12 x 64 mm (4-1/8" x 1/2" x 2-1/2")
Peso (incluyendo las pilas)
: 65 g (2.1 oz)
Accesorios : Pila de litio x 2 (CR-2025),
Estuche duro (puede usarse como
soporte)
■ ESTUCHE DURO
Podrá emplear el estuche duro
como soporte como se muestra en
la ilustración de la derecha.
■ AJUSTE DE LA TRANSPOSICIÓN
Esta función ajusta la transposición o clave del instrumento. Es posible
ajustar la transposición para instrumentos en la clave de C, Eb, F, o Bb.
La clave seleccionada se confirma mediante un indicador.
* El ajuste inicial (de fábrica) es C.
◆ Método de ajuste de la transposición
1. Presione el interruptor POWER para conectar la alimentación.
2. Presione el selector KEY para seleccionar la clave del instrumento.
Cada vez que se presione el selector, el indicador de la clave avanza
un paso.
b b
■ SELECCIÓN DEL TONO
El TD-1 puede ajustarse a tonos estándar desde A4=438 Hz a A4=445
Hz en incrementos de 1 Hz.
* El ajuste inicial (de fábrica) es 442 Hz.
◆ Método de selección del tono
1. Presione el interruptor POWER para conectar la alimentación.
2. Presione el selector CALIB una vez, y el indicador del tono estándar
actualmente seleccionado parpadeará. (438 - 445 Hz)
3. Mientras parpadea el indicador, presione el selector CALIB. Los
indicadores parpadearán en secuencia cada vez que se presione el
selector de tono. Cada paso de indicador representa un cambio de 1
Hz en el tono estándar.
4. Cuando no se presiona el selector CALIB durante unos 2 segundos, el
afinador retornará automáticamente al modo de afinación.
Afine hasta que se encienda el
indicador central (verde).
Seleccione la clave de
transposición
Se enciende el indicador de la nota afinada.
■ REEMPLAZO DE LAS PILAS
◆
Comprobación de las pilas
Cuando baja la potencia de las
pilas, mientras se está empleando
el afinador, parpadearán los
indicadores de “centésimas” de la
izquierda y derecha. Reemplace
las pilas por un juego nuevo (CR-
2025 x 2) lo antes posible.
◆ Procedimiento de reemplazo
1. Extraiga el tornillo de fijación de la cubierta de las pilas deslizándola en
la dirección de la flecha como se muestra en la ilustración siguiente.
2. Extraiga las pilas gastadas empleando una herramienta puntiaguda
(pinzas, etc.).
3. Inserte las pilas nuevas con su polaridad - encarada hacia abajo (la
polaridad + debe quedar visible después de la inserción).
4. Vuelva a cerrar la cubierta de las pilas y fíjela con el tornillo de fijación.
Pilas de litio
(CR-2025 x 2)
Lado
inferior
Cubierta de las pilas
Tornillo
Parpadean
■ FUNCIONES DEL TD-1
◆ Clave de transposición
Seleccione uno de los 4 ajustes de transposición para ajustar la
afinación de instrumentos a las claves de C, Eb, F, y Bb.
◆ Selección del tono
Es posible ajustar el TD-1 a tonos estándar desde A4=438 Hz a
A4=445 Hz, en incrementos de 1 Hz.
◆ Otras funciones
• Función de desconexión automática de la alimentación
Cuando no se presiona ninguno de los botones del afinador, o si no se
introduce sonido durante unos 5 minutos, el afinador desconectará
automáticamente su alimentación.
• Indicador de comprobación de las pilas
Cuando se reduce la potencia de las pilas, los indicadores de
“centésimas” de los lados izquierdo y derecho parpadearán,
indicándole que debe reemplazar las pilas.
• Función de seguridad de la memoria
Esta función retiene todos los ajustes actuales en la memoria cuando
se desconecta la unidad (botón POWER o desconexión automática).
445
438
C
C
439
D
440
E
441
F
442
G
443
A
444
B
Eb FB
b
C
H
R
O
M
A
T
I
C
T
U
N
E
R
T
D
-
1
IN
P
U
T
M
I
C
B
A
T
T
.
P
O
W
E
R
K
E
Y
C
A
L
IB
0
20
-20
-5
0
50
-
 1
1
-
 2
2
-
 3
3
-
 4
4


muilla kielillä
- polski: Yamaha TD-1 Instrukcja obsługi
- 日本語: Yamaha TD-1 取扱説明書
- Türkçe: Yamaha TD-1 El kitabı
- English: Yamaha TD-1 Owner's manual
- čeština: Yamaha TD-1 Návod k obsluze
- svenska: Yamaha TD-1 Bruksanvisning
- русский: Yamaha TD-1 Инструкция по применению
- italiano: Yamaha TD-1 Manuale del proprietario
- Deutsch: Yamaha TD-1 Bedienungsanleitung
- português: Yamaha TD-1 Manual do proprietário
- dansk: Yamaha TD-1 Brugervejledning
- français: Yamaha TD-1 Le manuel du propriétaire
- español: Yamaha TD-1 El manual del propietario
- Nederlands: Yamaha TD-1 de handleiding
- română: Yamaha TD-1 Manualul proprietarului