
Printed in Malaysia WV33240-2© 2010 Yamaha Corporation
G
Network Player
Lecteur Réseau
OWNER’S MANUAL
MODE D’EMPLOI
BEDIENUNGSANLEITUNG
BRUKSANVISNING
MANUALE DI ISTRUZIONI
MANUAL DE INSTRUCCIONES
GEBRNUIKSAANWIJZIG
ИНСТРУКЦИЯ ПО ЭКСПЛУАТАЦИИ
NP-S2000_OM_G_cv1_4.fm Page 1 Wednesday, June 22, 2011 5:03 PM

i En
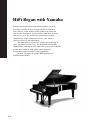
HiFi Began with Yamaha
Yamaha’s involvement with and passion for music goes back
more than a century, to when we built our first reed organ in
1887. Now we are the world’s leading producer of pianos and
other musical instruments, and are involved with music in many
other ways as well. We manufacture professional recording
equipment, we design concert halls and we assist artists at
concerts with set up and sound tuning.
This knowledge and experience benefits our production of
audio components in many ways. We introduced our first HiFi
(High Fidelity) turntable in 1955. Thereafter we were one of the first
to offer mass-produced, high quality audio equipment,
and introduced many legendary stereo components.
We hope you enjoy the genuine HiFi experience of
Yamaha Natural Sound.

ii En
English
CA-1000NS-20
NS-1000M
NS-10M
GT-2000
C-2
NS-690
B-1
B-6
GT-CD1AX-2000
Soavo-2Soavo-1
PX-1
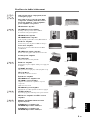
Excellence in Audio Achievement
1922: We introduced a high-quality hand-
wound phonograph.
Since 1955, we have released many HiFi
components, including turntables, tuners,
integrated amplifiers, control amplifiers,
power amplifiers and speakers.
NS-20 Monitor Speaker
CA-1000 Integrated Amplifier
Featuring A-Class operation, the CA-1000 set
the standard for integrated amplifiers.
NS-690 Monitor Speaker
NS-1000M Monitor Speaker
A truly legendary speaker still revered by HiFi enthusiasts
B-1 Power Amplifier
An innovative power amp that used FETs in all stages
C-2 Control Amplifier
Received top prize at the Milan International Music
and HiFi Show.
NS-10M Studio Monitor Speaker
Became of the most popular studio monitors in the world.
A-1 Integrated Amplifier
PX-1 Turntable
Yamaha’s first linear tracking turntable
B-6 Power Amplifier
Pyramid-shaped power amplifier with X power supply and
X amplifier
GT-2000/L Turntable
Ultra-precise heavyweight player embodying GT concept
CD-1 CD Player
First CD Player introduced in 1983
B-2x Power Amplifier
MX-10000 Power Amplifier and
CX-10000 Control Amplifier
Amplifier that redefined the capabilities of separate
components
100th anniversary model
AX-2000 Integrated Amplifier
High S/N ratio (128 dB), digital direct function equipped
GT-CD1 CD Player
Top-loading type player with integrated separate structure
MX-1 Power Amplifier and CX-1 Control
Amplifier
Soavo-1 and Soavo-2 Natural Sound
Speaker Systems
A-S2000 Stereo Amplifier and
CD-S2000 Super Audio CD Player
A-S1000 Stereo Amplifier and
CD-S1000 Super Audio CD Player

iii En
1 To assure the finest performance, please read this manual
carefully. Keep it in a safe place for future reference.
2 Install this sound system in a well ventilated, cool, dry,
clean place - away from direct sunlight, heat sources,
vibration, dust, moisture, and/or cold. For proper
ventilation, allow the following minimum clearances
around this unit.
Top: 10 cm (4 in)
Rear: 10 cm (4 in)
Sides: 10 cm (4 in)
3 Locate this unit away from other electrical appliances,
motors, or transformers to avoid humming sounds.
4 Do not expose this unit to sudden temperature changes
from cold to hot, and do not locate this unit in an
environment with high humidity (i.e. a room with a
humidifier) to prevent condensation inside this unit,
which may cause an electrical shock, fire, damage to this
unit, and/or personal injury.
5 Avoid installing this unit where foreign object may fall
onto this unit and/or this unit may be exposed to liquid
dripping or splashing. On the top of this unit, do not
place:
– Other components, as they may cause damage and/or
discoloration on the surface of this unit.
– Burning objects (i.e. candles), as they may cause fire,
damage to this unit, and/or personal injury.
– Containers with liquid in them, as they may fall and
liquid may cause electrical shock to the user and/or
damage to this unit.
6 Do not cover this unit with a newspaper, tablecloth,
curtain, etc. in order not to obstruct heat radiation. If the
temperature inside this unit rises, it may cause fire,
damage to this unit, and/or personal injury.
7 Do not plug in this unit to a wall outlet until all
connections are complete.
8 Do not operate this unit upside-down. It may overheat,
possibly causing damage.
9 Do not use force on switches, knobs and/or cords.
10 When disconnecting the power cable from the wall outlet,
grasp the plug; do not pull the cable.
11 Do not clean this unit with chemical solvents; this might
damage the finish. Use a clean, dry cloth.
12 Only voltage specified on this unit must be used. Using
this unit with a higher voltage than specified is dangerous
and may cause fire, damage to this unit, and/or personal
injury. Yamaha will not be held responsible for any
damage resulting from use of this unit with a voltage
other than specified.
13 To prevent damage by lightning, keep the power cable
and outdoor antennas disconnected from a wall outlet or
this unit during a lightning storm.
14 Do not attempt to modify or fix this unit. Contact
qualified Yamaha service personnel when any service is
needed. The cabinet should never be opened for any
reasons.
15 When not planning to use this unit for long periods of
time (i.e. vacation), disconnect the AC power plug from
the wall outlet.
16 Be sure to read the “Troubleshooting” section on
common operating errors before concluding that this unit
is faulty.
17 Before moving this unit, press the power switch (on the
main unit) downward to turn off this unit and then
disconnect the AC power plug from the AC wall outlet.
18 Condensation will form when the surrounding
temperature changes suddenly. Disconnect the power
cable from the outlet, then leave this unit alone.
19 When using this unit for a long time, this unit may
become warm. Turn the power off, then leave this unit
alone for cooling.
20 Install this unit near the AC outlet and where the AC
power plug can be reached easily.
21 The batteries shall not be exposed to excessive heat such
as sunshine, fire or the like. When you dispose of
batteries, follow your regional regulations.
CAUTION: READ THIS BEFORE OPERATING YOUR UNIT.
As long as this unit is connected to the AC wall outlet, it is not
disconnected from the AC power source even if you turn off this
unit by the power switch (on the main unit).
WARNING
TO REDUCE THE RISK OF FIRE OR ELECTRIC SHOCK, DO
NOT EXPOSE THIS UNIT TO RAIN OR MOISTURE.
WARNING
THE POWER SUPPLY CABLE OF THIS UNIT MUST BE
CONNECTED TO THE MAIN SOCKET OUTLET VIA A
PROTECTIVE EARTHING CONNECTION.

1 En
English
SUPPLIED ACCESSORIES.............................................................................................................. 2
GENERAL FLOWCHART ...............................................................................................................3
SYSTEM STRUCTURES................................................................................................................... 4
Basic system.........................................................................................................................................................4
Full system ...........................................................................................................................................................5
Roles of each component .....................................................................................................................................6
Supported audio files............................................................................................................................................6
PREPARATIONS ............................................................................................................................... 7
Connections..........................................................................................................................................................7
Downloading the dedicated applications .............................................................................................................8
Turning on this unit..............................................................................................................................................9
COMMUNICATION SETUP .......................................................................................................... 10
Media sharing setup ...........................................................................................................................................10
Media controller setup........................................................................................................................................10
CONTENT BROWSING AND PLAYBACK................................................................................. 12
Operations from PC browser..............................................................................................................................12
Operations from mobile device .........................................................................................................................13
Operations from main unit or remote control ....................................................................................................14
Presetting favorite contents................................................................................................................................15
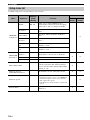
SETUP MENU................................................................................................................................... 17
Setup menu operations .......................................................................................................................................17
Setup menu list...................................................................................................................................................18
Advanced setup menu ........................................................................................................................................19
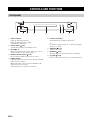
CONTROLS AND FUNCTIONS .................................................................................................... 20
Front panel .........................................................................................................................................................20
Remote control...................................................................................................................................................21
ADDITIONAL INFORMATION .................................................................................................... 22
Basic information on this unit............................................................................................................................22
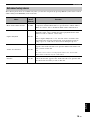
Troubleshooting .................................................................................................................................................24
Front panel display messages.............................................................................................................................26
Taking care of this unit ......................................................................................................................................26
SPECIFICATIONS........................................................................................................................... 27
CONTENTS
About this manual
• This manual is produced prior to production. Design and specifications are subject to change in part as a result of
improvements, etc. In case of differences between the manual and product, the product has priority.
• Pictures and illustrations (screen display, etc.) used in this manual may be different from actual products
depending on use environments.
• Notes contain important information about safety and operating instructions. y indicates a tip for your operation.
Thank you for purchasing Yamaha Network Player NP-S2000. By connecting this unit to your home network and audio
system, you can enjoy Internet radio (vTuner) or music files stored on your music servers (PCs and NAS) in the same
network.
Also, you can select a playback source or operate this unit not only from the supplied remote control but also from an
external media controller such as PC browsers and mobile devices.
y
• If you are not familiar with “DLNA” or “Internet radio”, please read “Basic information on this unit” ( P.22) at the beginning.
• For details on compatible mobile devices, see “Mobile device” ( P.6).
Introduction

2 En
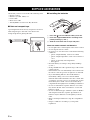
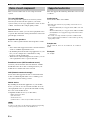
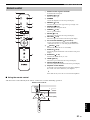
Check that you have received all of the following items.
• Remote control
• Batteries (AA, R6, UM-3) x 2
• Power cable
• RCA stereo cable
• TwonkyMedia server License Key brochure
■ Note on transport tape
Upon shipment from the factory, magnet feet are fixed
with transport tape to this unit’s feet. Remove the
transport tape before placing this unit.
■ Installing the batteries
1 Press the part and slide the battery cover off.
2 Insert two supplied AA batteries according to the
polarity markings (+ and –).
3 Slide the cover back until it snaps into place.
Notes on remote controls and batteries
• Do not spill water or other liquids on the remote control.
• Do not drop the remote control.
• Do not leave or store the remote control in the following
conditions:
– places of high humidity, such as near a bath
– places of high temperatures, such as near a heater or
stove
– places of extremely low temperatures
– dusty places
• Insert the battery according to the polarity markings
(+ and –).
• Change all batteries if the operation range of the remote
control narrows.
• If the batteries run out, immediately remove them from
the remote control to prevent an explosion or acid leak.
• If you find leaking batteries, discard the batteries
immediately, taking care not to touch the leaked
material. If the leaked material comes into contact with
your skin or gets into your eyes or mouth, rinse it away
immediately and consult a doctor. Clean the battery
compartment thoroughly before installing new batteries.
• Do not use old batteries together with new ones. This
may shorten the life of the new batteries or cause old
batteries to leak.
• Do not use different types of batteries (such as alkaline
and manganese batteries) together. Specification of
batteries may be different even though they look the
same.
• Before inserting new batteries, wipe the compartment
clean.
• Dispose of batteries according to your regional
regulations.
SUPPLIED ACCESSORIES
RETURN
PUSH
SELECT
ENTER
SOURCE
OFF
LINK
1
3
2

3 En
English
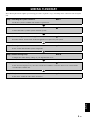
The following flowchart explains general setup procedures required to enjoy streaming music or Internet radio using this
unit.
GENERAL FLOWCHART
Step 1: Deciding the system structure P.4
Decide the system to establish and check the requirements.
Step 2: Connections P.7
Connect this unit to your PC system and audio system.
Step 3: Downloading the dedicated applications P.8
From the website, download the dedicated applications required for your system.
Step 4: Turning on this unit P.9
Power on this unit and other system components.
Step 5: Media sharing setup P.10
Configure the media sharing settings of your digital media server.
Step 6: Media controller setup P.10
Search the network players in your home network and establish a connection between an external media
controller (PC) and this unit.
Step 7: Playback P.12
Select music or Internet radio station to listen to.

4 En
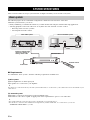
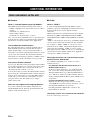
This section describes two major system structure examples and what you can do with each system.
The following figure shows a minimum configuration to utilize the basic functions of this unit.
With this system structure, you can do...
• Easily establishing a communication between your PC and this unit using the dedicated PC setup application.
• Selecting playback source from a browser on any PC in the same network or remote control
– Browsing music stored on your PC
– Selecting Internet radio stations
■ Requirements
To establish the “basic system”, all of the following requirements should be met.
Audio system
Your amplifier has an audio input jack.
A speaker set is connected to your amplifier.
y
For details on a connection between your audio system and this unit, see “Connections” ( P.7). Please also refer to the manual of your
audio devices.
PC network system
Your PC is connected to the Internet via the broadband router.
Your PC has a disc drive capable of ripping CDs and enough hard drive space to store audio files.
y
• For details on Internet connection, please refer to the manual of your network devices.
• For details on a connection and communication setup between your PC and this unit, see “Connections” ( P.7) and
“COMMUNICATION SETUP” ( P.10).
SYSTEM STRUCTURES
Basic system
RETURN
PUSH
SELECT
ENTER
SOURCE
OFF
LINK
S
O
U
R
C
E
D
I
M
M
E
R
R
E
P
E
A
T
R
E
T
U
R
N
N
O
W
P
L
A
Y
I
N
G
A
M
P
V
O
L
U
M
E
S
E
T
U
P
M
U
T
E
P
R
E
S
E
T
M
E
M
O
R
Y
D
I
S
P
L
A
Y
S
H
U
F
F
L
E
H
O
M
E
I
N
P
U
T
E
N
T
E
R
Your audio system Your PC network system
Speakers
Amplifier
Balanced, digital audio
(optical or coaxial), or
analog stereo cable
To AC outlet
This unit (NP-S2000)
PC
Broadband
router
Modem
Internet
Remote control
Network cable

SYSTEM STRUCTURES
5 En
English
The following figure shows a recommended configuration to take full advantage of the functions of this unit.
With this system structure, you can do...
• All features listed in “Basic system” ( P.4)
• Delivering music stored on your NAS (without starting your PC)
• Selecting playback source from your mobile device
– Browsing music stored on your PC and NAS
– Selecting Internet radio stations
■ Requirements
To establish the “full system”, all of the following requirements should be met.
Audio system
Your amplifier has an audio input jack.
A speaker set is connected to your amplifier.
y
For details on a connection between your audio system and this unit, see “Connections” ( P.7). Please also refer to the manual of your
audio devices.
PC network system
Your PC is connected to the Internet via the WiFi broadband router.
Your PC has a disc drive capable of ripping CDs and enough hard drive space to store audio files.
Your NAS is compatible with DLNA and works with your PC and WiFi broadband router properly.
y
• For details on Internet connection, please refer to the manual of your network devices.
• For details on a connection and communication setup between your PC and this unit, see “Connections” ( P.7) and
“COMMUNICATION SETUP” ( P.10).
Mobile device
Your mobile device ( P.6) is wirelessly connected to the WiFi broadband router.
Full system
RETURN
PUSH
SELECT
ENTER
SOURCE
OFF
LINK
S
O
U
R
C
E
D
I
M
M
E
R
R
E
P
E
A
T
R
E
T
U
R
N
N
O
W
P
L
A
Y
I
N
G
A
M
P
V
O
L
U
M
E
S
E
T
U
P
M
U
T
E
P
R
E
S
E
T
M
E
M
O
R
Y
D
I
S
P
L
A
Y
S
H
U
F
F
L
E
H
O
M
E
I
N
P
U
T
E
N
T
E
R
Your audio system
Your PC network system
Speakers Amplifier
Balanced, digital audio
(optical or coaxial), or
analog stereo cable
This unit (NP-S2000)
PC
Modem
Internet
Mobile
device
NAS
WiFi
broadband
router
Network cable
To AC outlet
Remote control

SYSTEM STRUCTURES
6 En
This section describes rolls of each component in the
system.
This unit (NP-S2000)
Decodes digital audio signals received from your PC
network system and sends the signals to your audio
system so that you can enjoy digital music stored on a PC
or NAS, or Internet radio in high-quality sounds.
Remote control
With the remote control, you can select a playback source
or operate this unit while viewing information on the front
panel display of this unit.
Amplifier and speakers
Receive audio signals from this unit and produce sounds.
PC
• Stores music files ripped from CDs or downloaded and
works as a DLNA digital media server.
• By installing the dedicated PC setup application on your
PC, you can configure the communication setup
between your PC and this unit.
• With a browser (Internet Explorer 6.0 or later), you can
select a playback source or operate this unit.
Broadband router (WiFi broadband router)
Connects your PC and this unit to the Internet. A WiFi
broadband router also works as a bridge between your
mobile device and this unit in the network.
NAS (Network attached storage)
Stores music files ripped from CDs or downloaded and
works as a DLNA digital media server, enabling you to
enjoy music without starting your PC.
Mobile device
By installing the dedicated application on your mobile
device, you can use it as an external controller. You can
select playback source or operate this unit while viewing
the screen of the mobile device.
Compatible mobile devices (as of June 2011)
– iPhone, iPod touch, iPad
(iOS 4.0 or later)
– Android™ devices
(Android OS 2.1 or later, ready for WiFi connection)
You may not be able to use the dedicated application depending
on the operating system version of the mobile device
This unit supports the following audio files stored on a PC
or a NAS.
Audio format:
WAV, FLAC, MP3, AAC, WMA
y
• Playable audio formats vary depending on the media server.
For example:
– Windows Media Player 12 supports WAV, MP3, AAC and
WMA.
– Windows Media Player 11 supports WAV, MP3 and WMA.
– TwonkyMedia server (supplied) supports all audio formats
listed above.
For details, visit “http://download.yamaha.com/file/45350”.
• We recommend WAV and FLAC as audio formats producing
high-quality sounds.
Sample rate:
96, 88.2, 64, 48, 44.1, 32, 24, 22.05, 16, 12, 11.025, 8
(kHz)
Bit depth:
16, 24 (bit)
Roles of each component
Note
Supported audio files

7 En
English
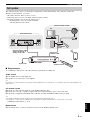
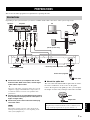
This section describes preparations required before operating this unit.
Depending on the system structure you want to establish, make cable connections of the system components.
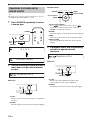
1 Connect this unit to your amplifier with an XLR
balanced cable, RCA stereo cable, coaxial digital
audio cable or optical cable.
y
Select one of the audio connections shown above. If your
amplifier is equipped with XLR balanced input jacks, we
recommend a balanced connection for optimum audio
performance.
2 Connect this unit to your broadband router with an
STP (shielded twisted pair) network cable (CAT-5 or
higher straight cable).
3 Connect the power cable to AC IN and then plug
into an AC outlet.
When using a digital connection, audio output may be
interrupted at the beginning of a track depending on the
audio system (amplifier, etc).
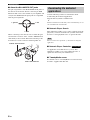
■ About the spike feet
The feet of this unit include built-in spikes that can reduce
the effect of vibrations on the set. To use the spikes,
remove the magnet foot by pulling it. Also, you can adjust
the height of each foot by rotating it if this unit is unstable.
PREPARATIONS
Connections
BALANCED OUT BALANCED OUT
NETWORK
SYSTEM CONNECTOR
DIGITAL OUT
OPTICAL COAXIAL
AC INR
ANALOG OUT
OUTPUT
R L L
LAN
WAN
2
3
1
Speakers Amplifier
XLR balanced
cable
RCA
stereo cable
(supplied)
Optical cable
Coaxial digital
audio cable
PC
Internet
Modem
Broadband
router
This unit (NP-S2000)
Power cable (supplied)
To AC outlet
NAS
(for full system only)
* Used for product inspection service
Note
Caution
The spikes may scratch the shelf or floor. We recommend you use
a support when placing this unit on expensive furniture, etc.
Spike
Magnet foot

PREPARATIONS
8 En
■ About the BALANCED OUT jacks
The pin assignments for the BALANCED OUT jacks of
this unit are shown below. Before connecting an XLR
balanced cable, refer to the manual of your amplifier and
verify that its XLR balanced input jacks are compatible
with the pin assignments.
When connecting to this unit, be sure to match the pins
and insert the connector of the “female” XLR balanced
cable until you hear a click. When disconnecting, hold
down the lever of the connector and then pull it out.
Visit the following website for information about
downloading the dedicated applications.
http://download.yamaha.com/file/45350
y
The latest information on this unit (owner’s manual, FAQ, etc.) is
also available in the download file.
■ Network Player Search
This application enables you to easily search the network
players in your home network from your PC and start the
browser to select playback source or operate this unit.
Please read “License agreement” ( P.28) before using this
application.
■ Network Player Controller
An application for mobile devices ( P.6). This
application enables you to select playback source or
operate this unit from your mobile device.
■ TwonkyMedia server
For details, refer to “TwonkyMedia server License Key
brochure” supplied with this unit.
2: hot1: ground
3: cold
“Female” XLR connector
“Male” XLR connector
Downloading the dedicated
applications
Note
Full System

PREPARATIONS
9 En
English
If you have established all cable connections, turn on this unit and other system components.
y
When the power switch on main unit is set to STANDBY/ON, you can switch this unit between on and standby by pressing the power
button on the remote control ( P.21).
Turning on this unit
RETURN
PUSH
SELECT
ENTER
SOURCE
OFF
LINK
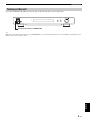
Set the power switch to STANDBY/ON

10 En
This section describes the setup required on digital media
servers (PC or NAS) and controllers (PC).
To enable a sharing of PC/NAS music contents over the
network, configure the sharing setting of the media server.
■ Sharing setup on PC
When using Windows Media Player 12
(on Windows 7)
1 In “Control Panel”, select “Choose
homegroup and sharing options”
under “Network and Internet”.
2 Check the “Stream my pictures,
music, and videos to all devices on
my home network” box and then
select “Choose media streaming
options”.
3 Select “Allowed” from the drop-
down menu next to “NP-S2000”.
4 In the same way, select “Allowed”
from the drop-down menu next to
“Media programs on this PC and
remote connections”.
5 Click “OK” to exit.
y
Since this unit supports Windows 7, you can directly control
playback of this unit from Windows Media Player 12.
When using Windows Media Player 11
1 Start Windows Media Player 11 on
your PC.
2 Select “Library” and then “Media
Sharing”.
3 Check the “Share my media to” box,
select the “NP-S2000” icon and then
click “Allow”.
4 In the same way, select the icons for
devices to be used as external media
controllers (other PCs and mobile
devices) and then click “Allow”.
5 Click “OK” to exit.
When using TwonkyMedia server
If you have saved music files on your PC with iTunes
(Non-DRM AAC/MP3 files), you can enable music
streaming by using TwonkyMedia server. For details,
refer to “TwonkyMedia server License Key brochure”
supplied with this unit.
Change the media receiver setting on TwonkyMedia
server to allow this unit and devices to be used as external
media controllers (other PCs and mobile devices) to
access TwonkyMedia server.
■ Sharing setup on NAS
Refer to the manual of your NAS and change the media
sharing setting on the NAS to allow this unit and devices
to be used as external media controllers (other PCs and
mobile devices) to access the NAS.
To select a playback source or operate this unit from
external media controllers, first you need specify the IP
address of this unit on a browser (Internet Explorer 6.0 or
later). By using the dedicated application “Network Player
Search”, you can easily search the network players in your
home network from your PC and establish a connection.
y
• For details on the download of the dedicated applications, see
“Downloading the dedicated applications” ( P.8).
• To use your mobile devices as an external media controller, see
“Operations from mobile device” ( P.13).
COMMUNICATION SETUP
Media sharing setup
Media controller setup
Full System

COMMUNICATION SETUP
11 En
English
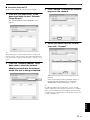
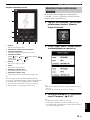
■ Controller setup on PC
In this section, Windows 7 is used as an example.
1 Click the “NP Search.exe” in the
download folder to start “Network
Player Search”.
The “NETWORK PLAYER SEARCH” screen
appears.
y
The menu language is automatically selected according to the
language setting on the operating system. When using Windows,
you can also select a language from “Language” under the “Tool”
menu.
2 From the “Network Adapter” drop-
down menu, select the network
adapter connected to the network
which this unit is being connected.
3 Click “Search” to search the network
players in the network.
4 Select the model from the list and
then click “Connect”.
The network player control screen appears in the
browser.
Now you are ready to select a playback source or
operate this unit. For details, see “CONTENT
BROWSING AND PLAYBACK” ( P.12).
y
By adding the URL of the network player control screen (IP
address of this unit) to the bookmark of the browser, you will be
able to open it without using “Network Player Search” from the
next time. However, the IP address of this unit may change if you
are using a DHCP server.
Select
Click
Select
Click

12 En
This section describes how to browse contents and start
playback from the PC browser (Internet Explorer 6.0 or
later), mobile device or front panel/remote control of this
unit.
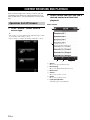
1 In the “Source” screen, select a
source type.
y
• The “Source” screen is displayed after following the procedure
in “Controller setup on PC” ( P.11).
• Select “Setup” to configure the settings of this unit ( P.17).
2 Select a menu item until you find a
desired content and then start
playback.
Menu screen
1 Return
Move to the previous menu screen.
2 Now Playing
Move to the playback information screen.
3 Menu items
4 Source
Move to the “Source” screen.
5 Home
Move to the top menu screen.
6 Page Up/Page Down
Switch the pages of the menu list.
CONTENT BROWSING AND PLAYBACK
Operations from PC browser
1
3
2
45 6

CONTENT BROWSING AND PLAYBACK
13 En
English
Playback information screen
1 Return
Move to the previous screen.
2 Album art or station icon (if available)
3 Playback information
Shows the information on the playback content.
4 Playback functions
DLNA:
(play), (pause), (skip backward),
(skip forward)
Internet Radio:
(play), (stop)
5 Source
Move to the “Source” screen.
6 Home
Move to the top menu screen.
7 Shuffle (for “DLNA” only)
Switch the shuffle mode (on, off).
8 Repeat (for “DLNA” only)
Switch the repeat mode (repeat all, repeat single, off).
y
You can register your favorite Internet Radio stations by
accessing the “vTuner Radio Guide” website with a PC browser.
To use this feature, you need the MAC address of this unit
( P.18) and your e-mail address to create your personal
account. For details, visit “http://yradio.vtuner.com/”.
By using the dedicated application “Network Player
Controller” ( P.8), you can browse contents and start
playback from your mobile device.
1 Tap the “NP Controller” icon on your
mobile device to start “Network
Player Controller”.
2 In the “Player Select” screen, select
a network player to connect to.
y
• This screen is skipped when only one network player has been
detected.
• To search the network players again, tap “Search”.
3 Follow the procedure in “Operations
from PC browser” ( P.12).
y
• To update the media server list, tap “Search”.
• To reload the content list of the selected media server, tap
“Load”. Reload the content list when you have added or deleted
any content on the media server.
1
2
3
4
5678
Operations from mobile device
Full System

CONTENT BROWSING AND PLAYBACK
14 En
y
For details on the controls on the front panel/remote control, see
“CONTROLS AND FUNCTIONS” ( P.20).
1 Press SOURCE repeatedly to select
a source type.
2 Use the following controls to select a
menu item until you find a desired
content.
Main unit
Jog dial
Rotate to select a menu item and press to confirm the
selection.
RETURN
Show the upper-level menu in the front panel display.
Remote control
Cursor buttons/ ENTER
Press / to select a menu item (or press /
repeatedly to select from the gauge) and press
ENTER to confirm the selection.
RETURN
Show the upper-level menu in the front panel display.
HOME
Show the top-level menu in the front panel display.
NOW PLAYING
Show the playback information in the front panel
display.
3 If playback starts, use the following
controls to operate desired
functions.
Main unit
Jog dial
Rotate left to skip backward and right to skip
forward. Press to start or pause playback.
RETURN
Show the previous menu in the front panel display.
Operations from main unit or
remote control
RETURN
PUSH
SELECT
ENTER
SOURCE
DIMMER
REPEAT
MEMORY
DISPLAY
SHUFFLE
SOURCE
SOURCE
SOURCE
D L N A
Internet Radio
Symphony #9-4
RETURN
PUSH
SELECT
ENTER
SOURCE
RETURN
Jog dial
RETURN
NOW PLAYING HOME
ENTER
RETURN
Cursor buttons/
ENTER
HOME
NOW PLAYING
Symphony #9-4
RETURN
PUSH
SELECT
ENTER
SOURCE
RETURN
Jog dial

CONTENT BROWSING AND PLAYBACK
15 En
English
Remote control
Playback buttons
DLNA: (play), (pause), (skip
backward), (skip forward)
Internet Radio: (play), (stop)
SHUFFLE (for “DLNA” only)
Switch the shuffle mode (on, off).
REPEAT (for “DLNA” only)
Switch the repeat mode (repeat all, repeat single, off).
DISPLAY
Switch the playback information shown in the front
panel display.
RETURN
Show the previous menu in the front panel display.
y
You can register your favorite Internet Radio stations by
accessing the “vTuner Radio Guide” website with a PC browser.
To use this feature, you need the MAC address of this unit
( P.18) and your e-mail address to create your personal
account. For details, visit “http://yradio.vtuner.com/”.
The preset function enables to make a quick access to your
favorite contents (up to 20 contents) with the remote
control.
y
For details on the controls on the front panel/remote control, see
“CONTROLS AND FUNCTIONS” ( P.20).
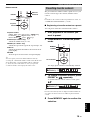
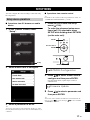
■ Registering a favorite content as a preset
You can preset music files or Internet radio stations.
1 Start playback of the content you
want to preset.
2 Press MEMORY to enter the preset
mode.
The empty preset number is automatically selected.
3 To change the preset location, press
PRESET or / repeatedly.
To switch between “1 to 10” and “11 to 20”, press
/.
y
Preset locations already used are displayed without numbers. If
one of these locations is selected, it will be replaced with new
content.
4 Press MEMORY again to confirm the
selection.
RETURN
NOW PLAYING HOME
ENTER
DIMMER
REPEAT
DISPLAY
SHUFFLE
REPEAT
RETURN
Playback
buttons
SHUFFLE
DISPLAY
Presetting favorite contents
RETURN
NOW PLAYING
SETUP
PRESET
MEMORY
HOME
ENTER
PRESET
MEMORY
Cursor buttons
Memory: 2
2 468910
14151617 20
Memory:13
13

CONTENT BROWSING AND PLAYBACK
16 En
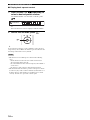
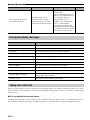
■ Playing back a preset content
1 Press PRESET or / repeatedly to
select a desired preset number.
To switch between “1 to 10” and “11 to 20”, press
/.
y
Preset locations not in use are displayed without numbers.
2 Within five seconds, press .
y
To clear all preset settings, execute “Initialize” in the advanced
setup menu ( P.17). Make sure that this operation will reset all
the settings of this unit to factory default.
• This unit does not recall the preset content in the following
cases:
– the PC which stores the selected content is turned off or
disconnected from the network.
– the selected Internet radio station is temporary unavailable or
out of service.
– the directory of the selected content has been changed.
• This unit memorizes the relative position of the preset contents
in a directory. If you have added or deleted any music files to or
from the directory, this unit may not recall the preset content
correctly. In such cases, preset the contents again.
Notes
Select: 3
1 2 5 73
ENTER
Sivu latautuu ...
Sivu latautuu ...
Sivu latautuu ...
Sivu latautuu ...
Sivu latautuu ...
Sivu latautuu ...
Sivu latautuu ...
Sivu latautuu ...
Sivu latautuu ...
Sivu latautuu ...
Sivu latautuu ...
Sivu latautuu ...
Sivu latautuu ...
Sivu latautuu ...
Sivu latautuu ...
Sivu latautuu ...
Sivu latautuu ...
-
 1
1
-
 2
2
-
 3
3
-
 4
4
-
 5
5
-
 6
6
-
 7
7
-
 8
8
-
 9
9
-
 10
10
-
 11
11
-
 12
12
-
 13
13
-
 14
14
-
 15
15
-
 16
16
-
 17
17
-
 18
18
-
 19
19
-
 20
20
-
 21
21
-
 22
22
-
 23
23
-
 24
24
-
 25
25
-
 26
26
-
 27
27
-
 28
28
-
 29
29
-
 30
30
-
 31
31
-
 32
32
-
 33
33
-
 34
34
-
 35
35
-
 36
36
-
 37
37


Yamaha CD-S2000 Omistajan opas
- Tyyppi
- Omistajan opas
- Tämä käsikirja sopii myös
muilla kielillä
- Türkçe: Yamaha CD-S2000 El kitabı
- English: Yamaha CD-S2000 Owner's manual
- svenska: Yamaha CD-S2000 Bruksanvisning
- русский: Yamaha CD-S2000 Инструкция по применению
- italiano: Yamaha CD-S2000 Manuale del proprietario
- Deutsch: Yamaha CD-S2000 Bedienungsanleitung
- dansk: Yamaha CD-S2000 Brugervejledning
- français: Yamaha CD-S2000 Le manuel du propriétaire
- Nederlands: Yamaha CD-S2000 de handleiding
- română: Yamaha CD-S2000 Manualul proprietarului