Braun 5694 Ohjekirja

Kategoria
Men's shavers
Tyyppi
Ohjekirja
730
720
www.braun.com/register
Type 5694
Type 5695
Series7
reset
trimmer
trimmer
trimmer
on
off
on
off
Series 7Series 7
Series 7
Series 7
730
intensive
sensitive
98541480_730_S1.indd 198541480_730_S1.indd 1 15.10.2008 14:56:04 Uhr15.10.2008 14:56:04 Uhr
Braun Infolines
D
A
00 800 27 28 64 63
00 800 BRAUNINFOLINE
CH
08 44 - 88 40 10
GB
0800 783 70 10
IRL
1 800 509 448
F
0 810 309 780
B
0 800 14 592
E
901 11 61 84
P
808 20 00 33
I
(02) 6 67 86 23
NL
0 800-445 53 88
DK
70 15 00 13
N
22 63 00 93
S
020 - 21 33 21
FIN
020 377 877
TR
0 212 473 75 85
HK
852-25249377
(Audio Supplies Company Ltd.)
www.service.braun.com
Deutsch 4, 8
English 9, 13
Français 14, 18
Español 19, 23
Português 24, 28
Italiano 29, 33
Nederlands 34, 38
Dansk 39, 43
Norsk 44, 48
Svenska 49, 53
Suomi 54, 58
Türkçe 59
∂ÏÏËÓÈο 64, 68
Braun GmbH
Frankfurter Straße 145
61476 Kronberg/Germany
98541480/X-08
D/GB/F/E/P/I/NL/DK/N/S/FIN/TR/GR
98541480_730_S2.indd 198541480_730_S2.indd 1 15.10.2008 14:57:06 Uhr15.10.2008 14:57:06 Uhr
reset
trimmer
trimmer
trimmer
on
off
on
off
Series 7
730
intensive
sensitive
trimmer
trimmer
trimmer
on
off
on
off
reset
trimmer
trimmer
trimmer
on
off
on
off
Series 7Series
7
Series 7
Series 7
730
intensive
sensitive
2
1
3
4
5
8
7
6
9
10
12
Series 7
Series 7
Series 7
11
98541480_730_S3.indd 198541480_730_S3.indd 1 15.10.2008 14:59:32 Uhr15.10.2008 14:59:32 Uhr
4
Deutsch
Unsere Produkte werden hergestellt, um höchste
Ansprüche an Qualität, Funktionalität und Design
zu erfüllen. Wir wünschen Ihnen mit Ihrem Braun
Rasierer viel Freude.
Achtung
Ihr Rasierer ist mit einem Spezialkabel mit
integriertem Netzteil für Sicherheitskleinspan-
nung ausgestattet. Es dürfen weder Teile aus-
getauscht noch Veränderungen vorgenommen
werden, da sonst Stromschlaggefahr besteht.
Kinder oder Personen mit eingeschränkten
physischen, sensorischen oder geistigen
Fähigkeiten dürfen dieses Gerät nicht benutzen,
es sei denn, sie werden durch eine für ihre
Sicherheit zuständige Person beaufsichtigt.
Grundsätzlich raten wir aber, das Gerät von
Kindern fern zu halten.
Beschreibung
1 Schersystem
2 Entriegelungstaste für das Schersystem
3 «lock» Taste für den Scherkopf
4 Ausklappbarer Langhaarschneider
5 Ein-/Ausschalter
6 «sensitive» (–) Taste
7 «intensive» (+) Taste
8 Reset-Taste
9 Rasierer-Display
0 Steckerbuchse
q Reiseetui
w Spezialkabel
Rasierer aufl aden
Die ideale Umgebungstemperatur für das Laden
liegt zwischen 5 °C und 35 °C.
Über das Spezialkabel w den ausgeschalteten
Rasierer mindestens 1 Stunde am Netz auf-
laden.
Voll geladen kann der Rasierer je nach Bart-
stärke bis zu 50 Minuten ohne Netzanschluss
betrieben werden.
Wenn der Akku leer ist, können Sie das Gerät
auch direkt über das Spezialkabel vom Netz
betreiben.
STOPSTOP
98541480_730.indd 498541480_730.indd 4 15.10.2008 14:36:38 Uhr15.10.2008 14:36:38 Uhr
5
Rasierer-Display 9
Die grüne Anzeige zeigt den Akku-Ladezustand
an. Während des Ladens oder beim Betrieb des
Rasierers blinkt die Anzeige.
Ist der Rasierer vollständig geladen, leuchtet
die Anzeige «high» permanent, vorausgesetzt
der Rasierer ist eingeschaltet oder am Netz
angeschlossen.
Bei eingeschaltetem Rasierer blinkt die rote
Restkapazitäts-Anzeige («low»), wenn die
Akku-Kapazität unter 20% abgesunken ist.
Die verbleibende Ladung reicht noch für 2–3
Rasuren.
So benutzen Sie Ihren Rasierer
Persönliche Einstellung Ihres Rasierers
Mit den Tasten «sensitive» 6 und «intensive» 7
können Sie Ihren Rasierer auf Ihre persönlichen
Bedürfnisse anpassen, die in den verschiedenen
Gesichtspartien unterschiedlich sein können.
Die drei möglichen Einstellungen werden mit der
Kontrollleuchte im Ein-/Ausschalter 5 angezeigt:
«Intensive» = dunkelblau (mit viel Power bei
starkem Bartwuchs)
• «Normal» = hellblau
«Sensitive» = weiß (für gründliche Rasur auch
in empfi ndlichen Bereichen des
Gesichts und Nackens)
Für die gründlichste und schnellste Rasur
empfehlen wir die Einstellung «intensive».
Durch Drücken der « + » oder « » Taste können
Sie Ihre bevorzugte Einstellung wählen. Beim
Wiedereinschalten ist automatisch die zuletzt
gewählte Einstellung aktiv.
c
h
a
r
g
e
h
i
g
h
m
i
d
l
o
w
h
i
g
h
l
o
w
730 720
c
h
a
r
g
e
h
i
g
h
m
i
d
l
o
w
h
i
g
h
l
o
w
730 720
c
h
a
r
g
e
h
i
g
h
m
i
d
l
o
w
h
i
g
h
l
o
w
730 720
c
h
a
r
g
e
h
i
g
h
m
i
d
l
o
w
h
i
g
h
l
o
w
730 720
on
off
on
off
n
siv
e
s
itive
on
off
on
off
n
siv
e
s
itive
on
off
on
off
n
siv
e
s
itive
sensitivenormalintensive
on
off
on
off
n
siv
e
s
itive
on
off
on
off
n
siv
e
s
itive
on
off
on
off
n
siv
e
s
itive
sensitivenormalintensive
98541480_730.indd 598541480_730.indd 5 15.10.2008 14:36:40 Uhr15.10.2008 14:36:40 Uhr
6
Rasieren
Drücken Sie den Ein-/Ausschalter
5, um den
Rasierer einzuschalten:
Der bewegliche Schwingkopf und die fl exiblen
Scherfolien sorgen automatisch für eine
optimale Anpassung an die Gesichtsform.
Für die Rasur an engen Gesichtspartien
(z.B. unter der Nase) schieben Sie die «lock»
Taste 3 nach hinten, um den Schwingkopf in
Winkelstellung zu fi xieren.
Zum kontrollierten Trimmen von Schnauzbart
und Haaransatz schieben Sie den ausklapp-
baren Langhaarschneider («trimmer»)
4 nach
oben.
Tipps für eine optimale Rasur
Für optimale Rasier-Ergebnisse empfehlen wir
drei einfache Schritte:
1. Rasieren Sie sich immer, bevor Sie Ihr Gesicht
waschen.
2. Rasierer stets im rechten Winkel (90°) zur
Haut halten.
3. Haut straffen und gegen die Bartwuchsrich-
tung rasieren.
Reinigung
Der Scherkopf ist geeignet zur Reinigung
unter fl ießendem Wasser.
Achtung: Der Rasierer ist vom Anschluss-
kabel zu trennen, bevor der Scherkopf
mit Wasser gereinigt wird.
Durch regelmäßiges Reinigen verbessern Sie
die Rasierleistung Ihres Rasierers. So können
Sie den Scherkopf nach jeder Rasur einfach und
schnell unter fl ießendem Wasser reinigen:
Rasierer einschalten (kabellos) und den
Scherkopf unter heißes, fl ießendes Wasser
halten. Gelegentlich Flüssigseife (ohne
Scheuermittel) benutzen. Schaum vollständig
abspülen und den Rasierer noch einige
Sekunden laufen lassen.
Dann den Rasierer ausschalten, die Entriege-
lungstaste 2 drücken, das Schersystem 1
abnehmen und trocknen lassen.
Bei regelmäßiger Nassreinigung sollten Sie
wöchentlich einen Tropfen Leichtmaschinenöl
auf der Oberfl äche des Schersystems
verteilen.
t
r
reset
lock
1
2
trimmer
lock
lock
lock
on
on
off
off
intensive
sensitive
t
r
reset
lock
1
2
trimmer
lock
lock
lock
on
on
off
off
intensive
sensitive
releaserelease
oil
trim
mer
on
er
re
le
a
s
e
trimmer
re
le
a
s
e
click!
Series 7
Series 7
Series
Series
oil
trim
mer
on
er
re
le
a
s
e
trimmer
re
le
a
s
e
click!
Series 7
Series 7
Series
Series
98541480_730.indd 698541480_730.indd 6 15.10.2008 14:36:41 Uhr15.10.2008 14:36:41 Uhr
7
Alternativ können Sie den Rasierer mit der
mitgelieferten Bürste reinigen:
Rasierer ausschalten. Das Schersystem
abnehmen und ausklopfen. Mit der Bürste
die Scherkopf-Innenseite reinigen.
Das Schersystem darf nicht mit der Bürste
gereinigt werden.
So halten Sie Ihren Rasierer in Bestform
Wechselanzeige für das Schersystem/Reset
Um 100 % der Rasierleistung zu erhalten,
wechseln Sie das Schersystem 1, wenn die
Wechselanzeige auf dem Display 9 aufl euchtet
(nach ca. 18 Monaten) oder wenn es Verschleiß-
erscheinungen zeigt.
Die Wechselanzeige leuchtet noch während der
nächsten 7 Rasuren, um Sie an den Scher-
systemwechsel zu erinnern. Danach erfolgt ein
automatisches Reset der Anzeige.
Wenn Sie das Schersystem gewechselt haben,
drücken Sie die Reset-Taste 8 mindestens
3 Sekunden lang, um die Wechselanzeige
manuell zurückzustellen. Dabei blinkt die
Wechselanzeige zunächst noch und erlischt,
sobald das Reset abgeschlossen ist. Die
Wechselanzeige kann zu jeder Zeit manuell
zurückgesetzt werden.
Zubehör
Im Handel oder beim Braun Kundendienst
erhältlich:
• Schersystem 70S
Informationen zum Umweltschutz
Dieses Gerät enthält Akkus. Im Sinne des
Umweltschutzes darf dieses Gerät am
Ende seiner Lebensdauer nicht mit dem
Hausmüll entsorgt werden. Die Entsor-
gung kann über den Braun Kundendienst
oder lokal verfügbare Rückgabe- und
Sammelstellen erfolgen.
Änderungen vorbehalten.
Dieses Gerät entspricht den EU-Richtlinien
EMV 2004/108/EG und Niederspannung
2006/95/EG.
Elektrische Angaben siehe Bedruckung
auf dem Spezialkabel.
re
le
a
s
e
re
le
a
s
e
re
le
a
s
e
Series 7
Series 7
re
le
a
s
e
re
le
a
s
e
re
le
a
s
e
Series 7
Series 7
dd
m
er
re
le
a
s
e
70S
Series 7
m
er
re
le
a
s
e
70S
Series 7
98541480_730.indd 798541480_730.indd 7 15.10.2008 14:36:42 Uhr15.10.2008 14:36:42 Uhr
8
Garantie
Als Hersteller übernehmen wir für dieses Gerät
– nach Wahl des Käufers zusätzlich zu den
gesetzlichen Gewährleistungsansprüchen
gegen den Verkäufer – eine Garantie von
2 Jahren ab Kaufdatum. Innerhalb dieser
Garantiezeit beseitigen wir nach unserer Wahl
durch Reparatur oder Austausch des Gerätes
unentgeltlich alle Mängel, die auf Material- oder
Herstellungsfehlern beruhen. Die Garantie kann
in allen Ländern in Anspruch genommen werden,
in denen dieses Braun Gerät von uns autorisiert
verkauft wird.
Von der Garantie sind ausgenommen: Schäden
durch unsachgemäßen Gebrauch (Knickstellen
an der Scherfolie, Bruch), normaler Verschleiß
(z.B. Schersystem) sowie Mängel, die den
Wert oder die Gebrauchstauglichkeit des
Gerätes nur unerheblich beeinfl ussen. Bei Ein-
griffen durch nicht von uns autorisierte Braun
Kundendienstpartner sowie bei Verwendung
anderer als Original Braun Ersatzteile erlischt
die Garantie.
Im Garantiefall senden Sie das Gerät mit
Kaufbeleg bitte an einen autorisierten Braun
Kundendienstpartner. Die Anschrift für
Deutschland können Sie kostenlos unter
00800/27 28 64 63 erfragen.
98541480_730.indd 898541480_730.indd 8 15.10.2008 14:36:43 Uhr15.10.2008 14:36:43 Uhr
9
Our products are designed to meet the highest
standards of quality, functionality and design. We
hope you enjoy your new Braun Shaver.
Warning
Your shaver is provided with a special cord
set, which has an integrated Safety Extra Low
Voltage power supply. Do not exchange or
tamper with any part of it, otherwise there is risk
of electric shock.
This appliance is not intended for use by children
or persons with reduced physical or mental
capabilities, unless they are supervised by a
person responsible for their safety. In general,
we recommend that you keep the appliance out
of reach of children.
Description
1 Foil & Cutter cassette
2 Cassette release button
3 Shaver head «lock» switch
4 Pop-out long hair trimmer
5 On/off switch
6 «sensitive» (–) setting button
7 «intensive» (+) setting button
8 Reset button
9 Shaver display
0 Shaver power socket
q Travel case
w Special cord set
Charging
The best environmental temperature for charging
is between 5 °C and 35 °C.
Using the special cord set w, connect the
shaver to an electrical outlet with the motor
switched off and charge it for at least one hour.
A full charge provides up to 50 minutes
of cordless shaving time. This may vary
according to your beard growth.
If the rechargeable battery has run out of
power (discharged), you may also shave by
connecting the shaver to an electrical outlet via
the special cord set.
STOPSTOP
English
98541480_730.indd 998541480_730.indd 9 15.10.2008 14:36:44 Uhr15.10.2008 14:36:44 Uhr
10
Shaver display 9
The green indicator fl ashes when the shaver is
being charged or when in use.
When the battery is fully charged, the charge
segment «high» will light up continuously
provided that the shaver is switched on or
connected to an electrical outlet.
The red «low» indicator fl ashes when the battery
capacity has dropped below 20%, provided the
shaver is switched on. The remaining capacity
will then be suffi cient for 2 to 3 shaves.
Personalizing your shaver
With the «sensitive» 6 and «intensive» 7
buttons you can choose the best setting for
shaving different areas of your face and as per
your specifi c needs. The different settings are
indicated by the pilot light incorporated in the
on/off switch 5:
«Intensive» = dark blue (powerful shave)
• «Normal» = light blue
«Sensitive» = white (for a thorough comfortable
shave in sensitive areas of your
face such as neck)
For a thorough and fast shave we recommend
the «intensive» setting.
Pressing the « + » or « » button activates your
preferred setting. When switching on next time,
the last used setting will be activated.
c
h
a
r
g
e
h
i
g
h
m
i
d
l
o
w
h
i
g
h
l
o
w
730 720
c
h
a
r
g
e
h
i
g
h
m
i
d
l
o
w
h
i
g
h
l
o
w
730 720
c
h
a
r
g
e
h
i
g
h
m
i
d
l
o
w
h
i
g
h
l
o
w
730 720
c
h
a
r
g
e
h
i
g
h
m
i
d
l
o
w
h
i
g
h
l
o
w
730 720
on
off
on
off
n
siv
e
s
itive
on
off
on
off
n
siv
e
s
itive
on
off
on
off
n
siv
e
s
itive
sensitivenormalintensive
on
off
on
off
n
siv
e
s
itive
on
off
on
off
n
siv
e
s
itive
on
off
on
off
n
siv
e
s
itive
sensitivenormalintensive
98541480_730.indd 1098541480_730.indd 10 15.10.2008 14:36:44 Uhr15.10.2008 14:36:44 Uhr
11
How to use
Press the on/off switch
5 to operate the shaver:
The pivoting shaver head and fl oating foils
automatically adjust to every contour of your
face.
To shave hard to reach areas (e.g. under the
nose) slide the shaver head «lock» switch 3 to
the back position to lock the pivoting head at
an angle.
To trim sideburns, moustache or beard, slide
the pop-out long hair trimmer
4 upwards.
Tips for the perfect shave
For best shaving results, Braun recommends you
to follow 3 simple steps:
1. Always shave before washing your face.
2. At all times, hold the shaver at right angles
(90°) to your skin.
3. Stretch your skin and shave against the
direction of your beard growth.
Cleaning
The shaver head is suitable for cleaning
under running tap water.
Warning: Detach the shaver from the
power supply before cleaning the shaver
head in water.
Regular cleaning ensures better shaving
performance. Rinsing the shaving head under
running water after each shave is an easy and
fast way to keep it clean:
Switch the shaver on (cordless) and rinse
the shaving head under hot running water.
You may use liquid soap without abrasive
substances. Rinse off all foam and let the
shaver run for a few more seconds.
Next, switch off the shaver, press the release
button 2 to remove the Foil & Cutter cassette
1 and let it dry.
If you regularly clean the shaver under
water, then once a week apply a drop of
light machine oil on top of the Foil & Cutter
cassette.
t
r
reset
lock
1
2
trimmer
lock
lock
lock
on
on
off
off
intensive
sensitive
t
r
reset
lock
1
2
trimmer
lock
lock
lock
on
on
off
off
intensive
sensitive
releaserelease
oil
trim
mer
on
er
re
le
a
s
e
trimmer
re
le
a
s
e
click!
Series 7
Series 7
Series
Series
oil
trim
mer
on
er
re
le
a
s
e
trimmer
re
le
a
s
e
click!
Series 7
Series 7
Series
Series
98541480_730.indd 1198541480_730.indd 11 15.10.2008 14:36:45 Uhr15.10.2008 14:36:45 Uhr
12
Alternatively, you may clean the shaver using the
brush provided:
Switch off the shaver. Remove the Foil & Cutter
cassette
1 and tap it out on a fl at surface.
Using the brush, clean the inner area of the
pivoting head. However, do not clean the foil
and cutter cassette with the brush as this may
damage it.
Keeping your shaver in top shape
Replacing the Foil & Cutter cassette / reset
To maintain 100% shaving performance,
replace the Foil & Cutter cassette 1, when the
replacement symbol lights up on the shaver
display 9 (after about 18 months) or when
cassette is worn
The replacement symbol will remind you during
the next 7 shaves to replace the Foil & Cutter
cassette. Then the shaver will automatically reset
the display.
After you have replaced the Foil & Cutter
cassette, use a ball-pen to push the reset button
8 for at least 3 seconds to reset the counter.
While doing so, the replacement light blinks and
goes off when the reset is complete. The manual
reset can be done at any time.
Accessories
Available at your dealer or Braun Service
Centres:
Foil & Cutter cassette 70S
Environmental notice
This product contains rechargeable
batteries. In the interest of protecting the
environment, please do not dispose of the
product in household waste at the end of
its useful life. Disposal can take place at a
Braun Service Centre or at appropriate
collection points provided in your country.
Subject to change without notice.
This product conforms to the European
Directives EMC 2004/108/EC and Low
Voltage 2006/95/EC.
For electric specifi cations, see printing on the
special cord set.
re
le
a
s
e
re
le
a
s
e
re
le
a
s
e
Series 7
Series 7
re
le
a
s
e
re
le
a
s
e
re
le
a
s
e
Series 7
Series 7
dd
m
er
re
le
a
s
e
70S
Series 7
m
er
re
le
a
s
e
70S
Series 7
98541480_730.indd 1298541480_730.indd 12 15.10.2008 14:36:45 Uhr15.10.2008 14:36:45 Uhr
13
Guarantee
We grant a 2 year guarantee on the product
commencing on the date of purchase. Within the
guarantee period we will eliminate any defects in
the appliance resulting from faults in materials or
workmanship, free of charge either by repairing
or replacing the complete appliance at our
discretion.
This guarantee extends to every country where
this appliance is supplied by Braun or its
appointed distributor.
This guarantee does not cover: damage due to
improper use, normal wear and tear (e.g. shaver
foil or cutter block) as well as defects that have
a negligible effect on the value or operation of
the appliance. The guarantee becomes void if
repairs are undertaken by unauthorised persons
and if original Braun parts are not used.
To obtain service within the guarantee period,
hand in or send the complete appliance with
your sales receipt to an authorised Braun
Customer Service Centre.
For UK only:
This guarantee in no way affects your rights
under statutory law.
98541480_730.indd 1398541480_730.indd 13 15.10.2008 14:36:46 Uhr15.10.2008 14:36:46 Uhr
14
Français
Nos produits sont conçus pour répondre aux
normes les plus élevées en matière de qualité,
fonctionnalité et design. Nous espérons que
vous apprécierez votre nouveau rasoir Braun.
Attention
Votre système de rasage est livré avec
un cordon d’alimentation qui intègre une
prise transformateur basse tension. Vous
ne devez remplacer ou modifi er aucun de
ses composants, afi n d’éviter tout risque
d’électrocution.
Cet appareil n’est pas destiné à des enfants
ou des personnes aux capacités physiques,
sensorielles ou mentales réduites à moins
qu’elles ne soient sous la surveillance d’un
adulte responsable de leur sécurité. Nous
recommandons de garder l’appareil hors de
portée des enfants.
Description
1 Cassette de rasage
2 Bouton d’éjection de la cassette
3 «lock» de verrouillage de la tête du rasoir
4 Tondeuse rétractable pour poils longs
5 Interrupteur marche/arrêt
6 Bouton de réglage sensible « sensitive » (–)
7 Bouton de réglage intensif « intensive » (+)
8 Bouton de réinitialisation
9 Ecran d’affi chage du rasoir
0 Prise d’alimentation du rasoir
q Trousse de voyage
w Cordon d’alimentation
Charge du rasoir
La température ambiante idéale pour la mise en
charge se situe entre 5 °C et 35 °C.
A l‘aide du cordon d‘alimentation w, branchez
le rasoir à une prise de courant avec le moteur
arrêté et chargez-le pendant au moins une
heure
Une charge complète procure jusqu’à 50
minutes de temps de rasage sans fi l. Cela peut
varier selon la densité, la dureté et la longueur
de votre barbe.
STOPSTOP
98541480_730.indd 1498541480_730.indd 14 15.10.2008 14:36:46 Uhr15.10.2008 14:36:46 Uhr
15
Si la batterie est complètement déchargée,
vous pouvez également vous raser en
branchant le rasoir sur une prise de courant via
le cordon d‘alimentation.
Ecran d’affi chage du rasoir 9
Le voyant vert clignote lorsque le rasoir est en
charge ou en utilisation.
Lorsque la batterie est complètement chargée,
le segment de charge « high » est allumé en
continu, quand le rasoir fonctionne ou quand il
est branché sur une prise de courant.
L’indicateur « low » rouge clignote quand le
rasoir fonctionne pour indiquer que la capacité
de la batterie est inférieure à 20 %. La capacité
restante est suffi sante pour 2 à 3 rasages.
Personnalisez votre rasoir
A l’aide des boutons de réglage sensible
« sensitive » 6 et intensif « intensive » 7, vous
pouvez sélectionner le meilleur réglage pour
raser les différentes zones de votre visage et
pour répondre à vos besoins spécifi ques. Les
différents réglages sont indiqués par le voyant
lumineux intégré à l’interrupteur marche / arrêt
5 :
« Intensive » = bleu foncé (rasage puissant)
« Normal » = bleu clair
« Sensitive » = blanc (pour un rasage doux,
complet et agréable des zones
sensibles du visage ou du cou)
Pour un rasage complet et rapide, nous
recommandons le réglage « intensive ».
Appuyez sur le bouton « + » ou « » pour activer
votre réglage préféré. Lors de la prochaine
mise en marche, le dernier réglage utilisé sera
sélectionné.
c
h
a
r
g
e
h
i
g
h
m
i
d
l
o
w
h
i
g
h
l
o
w
730 720
c
h
a
r
g
e
h
i
g
h
m
i
d
l
o
w
h
i
g
h
l
o
w
730 720
c
h
a
r
g
e
h
i
g
h
m
i
d
l
o
w
h
i
g
h
l
o
w
730 720
c
h
a
r
g
e
h
i
g
h
m
i
d
l
o
w
h
i
g
h
l
o
w
730 720
on
off
on
off
n
siv
e
s
itive
on
off
on
off
n
siv
e
s
itive
on
off
on
off
n
siv
e
s
itive
sensitivenormalintensive
on
off
on
off
n
siv
e
s
itive
on
off
on
off
n
siv
e
s
itive
on
off
on
off
n
siv
e
s
itive
sensitivenormalintensive
98541480_730.indd 1598541480_730.indd 15 15.10.2008 14:36:46 Uhr15.10.2008 14:36:46 Uhr
16
Utilisation
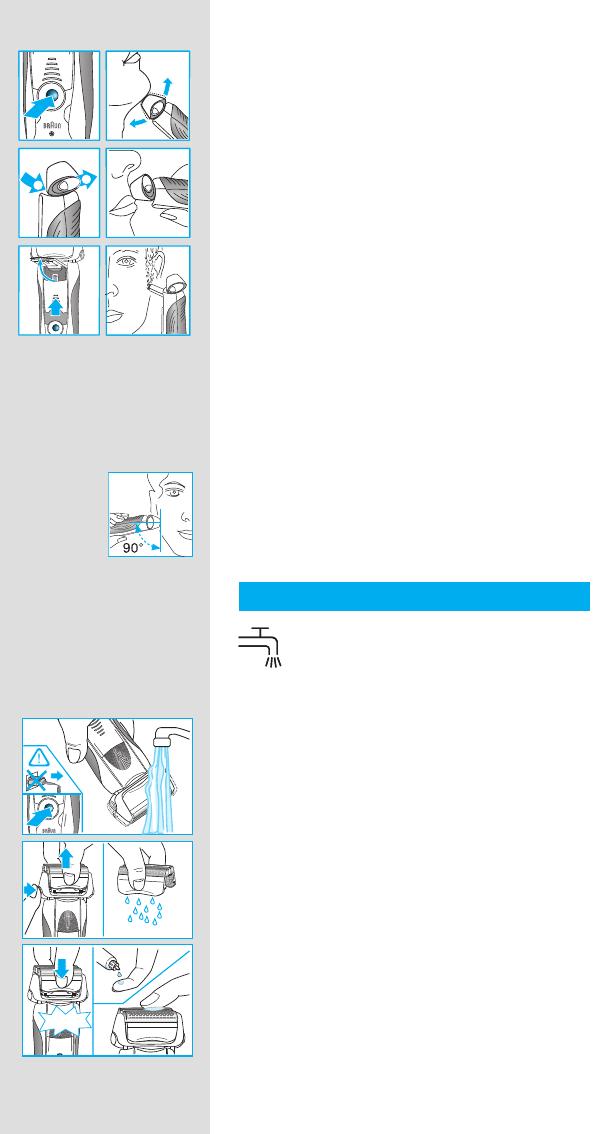
Appuyez sur l’interrupteur marche / arrêt 5 pour
mettre en marche le rasoir :
La tête pivotante du rasoir et les grilles
exibles s'adaptent automatiquement aux
contours de votre visage.
Pour raser les zones diffi ciles à atteindre
(ex. : sous le nez), faites glisser le « lock » de
verrouillage de la tête du rasoir 3 vers l’arrière
pour bloquer la tête pivotante en position
inclinée.
Pour tailler les pattes, moustache et barbe,
faites coulisser la tondeuse rétractable pour
poils longs 4 vers le haut.
Conseils pour un rasage parfait
Pour des résultats de rasage optimaux, Braun
vous invite à suivre les 3 recommandations
suivantes :
1. Rasez-vous toujours avant de vous laver le
visage.
2. Tenez toujours le rasoir à angle droit (90°) par
rapport à votre peau.
3. Tendez la peau et rasez la barbe dans le sens
inverse de la pousse du poil.
Nettoyage
La tête du rasoir peut passer sous le
robinet d’eau courante.
Attention : Débranchez le rasoir avant de
le nettoyer à l’eau.
Un nettoyage régulier garantit une performance
de rasage optimale. Rincer la tête du rasoir sous
l‘eau courante après chaque utilisation est une
façon facile et rapide de la garder propre :
Mettez le rasoir en marche (sans cordon
d'alimentation) et rincez la tête du rasoir
sous le robinet. Il est possible d'utiliser du
savon liquide ne contenant pas de substance
abrasive. Rincez toute la mousse et laissez le
rasoir en marche pendant quelques secondes.
Ensuite, arrêtez le rasoir, appuyez sur le
bouton d'éjection de la cassette 2 pour retirer
la cassette de rasage 1 et laissez-la sécher.
Si vous nettoyez régulièrement le rasoir sous
l'eau, appliquez ensuite une fois par semaine
une goutte d'huile fl uide de machine à coudre
sur le haut de la cassette de rasage.
tr
reset
lock
1
2
trimmer
lock
lock
lock
on
on
off
off
intensive
sensitive
tr
reset
lock
1
2
trimmer
lock
lock
lock
on
on
off
off
intensive
sensitive
releaserelease
oil
trimmer
on
er
re
le
a
s
e
trimmer
re
le
a
s
e
click!
Series 7
Series 7
Series
Series
oil
trimmer
on
er
re
le
a
s
e
trimmer
re
le
a
s
e
click!
Series 7
Series 7
Series
Series
98541480_730.indd 1698541480_730.indd 16 15.10.2008 14:36:47 Uhr15.10.2008 14:36:47 Uhr
17
Vous pouvez aussi nettoyer le rasoir à sec avec
la brosse fournie :
Arrêtez le rasoir. Retirez la cassette de
rasage 1 et tapotez-la sur une surface plane.
Nettoyez l'intérieur de la tête pivotante à l'aide
de la brosse. Toutefois, ne nettoyez pas la
cassette avec la brosse car cela risque de
l'endommager.
Gardez votre rasoir en bon état
Remplacement de la cassette de rasage /
réinitialisation
Pour conserver une performance de rasage effi -
cace à 100 %, remplacez la cassette de rasage
1 lorsque le symbole s’allume sur l’écran du
rasoir 9 (au bout de 18 mois environ) ou lorsque
la cassette est usée.
Le symbole de remplacement vous rappellera
durant les 7 prochains rasages de remplacer la
cassette de rasage. Le rasoir réinitialisera ensuite
automatiquement l’écran.
Après le remplacement de la cassette de rasage,
utilisez un stylo pour presser le bouton de
réinitialisation 8 pendant au moins 3 secondes
afi n de réinitialiser le compteur.
Le témoin lumineux de remplacement clignote et
s’éteint lorsque la réinitialisation est terminée. Il
est possible de faire une réinitialisation manuelle
à tout moment.
Accessoires
Disponibles chez votre vendeur ou dans les
centres de service Braun :
Cassette de rasage 70S
Informations relatives à l’environnement
Ce produit contient des batteries
rechargeables. Dans un souci de
protection de l’environnement, veuillez
ne pas jeter le produit avec les ordures
ménagères au terme de son cycle de vie.
Vous pouvez remettre ce produit au centre
de service Braun ou aux points de collecte
dans votre pays.
Susceptible d’être modifi é sans préavis.
re
le
a
s
e
re
le
a
s
e
re
le
a
s
e
Series 7
Series 7
re
le
a
s
e
re
le
a
s
e
re
le
a
s
e
Series 7
Series 7
dd
m
er
re
le
a
s
e
70S
Series 7
m
er
re
le
a
s
e
70S
Series 7
98541480_730.indd 1798541480_730.indd 17 15.10.2008 14:36:48 Uhr15.10.2008 14:36:48 Uhr
18
Cet appareil est conforme aux normes
Européennes fi xées par les Directives
2004/108/EC et la directive Basse Tension
2006/95/EC.
Pour les spécifi cations électriques, se référer aux
inscriptions sur l’adaptateur basse tension.
Garantie
Nous accordons une garantie de 2 ans sur ce
produit, à partir de la date d‘achat.
Pendant la durée de la garantie, Braun prendra
gratuitement à sa charge la réparation des vices
de fabrication ou de matière en se réservant
le droit de décider si certaines pièces doivent
être réparées ou si l‘appareil lui-même doit être
échangé.
Cette garantie s‘étend à tous les pays où cet
appareil est commercialisé par Braun ou son
distributeur exclusif.
Cette garantie ne couvre pas : les dommages
occasionnés par une utilisation inadéquate,
l’usure normale (par exemple, grille et bloc-
couteaux) ainsi que les défauts d’usures qui ont
un effet négligeable sur la valeur ou l’utilisation
de l’appareil. Cette garantie devient caduque
si des réparations ont été effectuées par des
personnes non agréées par Braun et si des pièces
de rechange ne provenant pas de Braun ont été
utilisées.
Pour toute réclamation intervenant pendant la
période de garantie, retournez ou rapportez
l‘appareil ainsi que l‘attestation de garantie à
votre revendeur ou à un Centre Service Agréé
Braun.
Appelez au 08.10.30.97.80 (ou se référez
à
http://www.braun.com/global/contact/
servicepartners/europe.country.html) pour
connaitre le Centre Service Agrée Braun le
plus proche de chez vous.
Clause spéciale pour la France
Outre la garantie contractuelle exposée ci-
dessus, nos clients bénéfi cient de la garantie
légale des vices cachés prévue aux articles 1641
et suivants du Code civil.
98541480_730.indd 1898541480_730.indd 18 15.10.2008 14:36:49 Uhr15.10.2008 14:36:49 Uhr
19
Nuestros productos han sido diseñados para
cumplir los más altos estándares de calidad,
funcionalidad y diseño. Esperamos que su nueva
afeitadora Braun sea de tu entera satisfacción.
Precaución
Esta afeitadora incluye un cable de conexión a la
red eléctrica. No cambie o manipule ninguna de
sus partes, de otro modo podría correr el riesgo
de recibir una descarga eléctrica.
No deberían utilizar este aparato ni niños ni
personas con reducidas capacidades físicas o
mentales, a menos que estén supervisados por
una persona responsable de su seguridad. En
general, se recomienda que mantenga el aparato
fuera del alcance de los niños.
Descripción
Afeitadora
1 Lámina y bloque de cuchillas
2 Botón para liberar la lámina y el bloque de
cuchillas
3 Botón para bloquear el movimiento del
cabezal («lock«)
4 Corta-patillas
5 Botón de encendido y apagado
6 Botón para la opción «sensitive» (–)
7 Botón para la opción «intensive» (+)
8 Botón de re-inicio
9 Pantalla digital de la afeitadora
0 Clavija de entrada del cable de conexión a la
red eléctrica con la afeitadora
q Estuche de viaje
w Cable de conexion a la red eléctrica
Proceso de carga
La mejor temperatura para la carga es entre
5 °C y 35 °C.
Use el cable de conexión a la red eléctrica w
para conectar la afeitadora a una red eléctrica
con el motor apagado y cárguela al menos
durante una hora.
Una carga completa proporcionará más de 50
minutos de afeitado sin cable. Esto dependerá
del tipo de barba.
STOPSTOP
Español
98541480_730.indd 1998541480_730.indd 19 15.10.2008 14:36:49 Uhr15.10.2008 14:36:49 Uhr
20
Si la batería recargable está vacía, también se
puede afeitar si conecta la afeitadora a una red
eléctrica por medio del cable de conexión a la
red eléctrica.
La pantalla digital de la
afeitadora
9
La luz indicadora verde parpadea cuando la
afeitadora esta en proceso de carga o está
siendo usada.
Cuando la batería esta cargada el indicador de
carga «high» lucirá de forma continua siempre
que la afeitadora esté encendida o conectada a
la red electrica.
El piloto indicador de batería baja (rojo) se
iluminará intermitentemente siempre y cuando
la capacidad de la batería esté por debajo del
20%. Esto supone que tiene lo sufi ciente para
efectuar 2 o 3 afeitados más.
Afeitado personalizado
Personaliza tu afeitado
Con los botones «sensitive» 6 e «intensive» 7
puede elegir el mejor modo de afeitado para las
diferentes zonas de tu rostro así como ajustarse
a sus necesidades específi cas. Los diferentes
modos de personalización vienen indicados
por el piloto de luz incorporado en el botón de
encendido/apagado 5:
«Intensive» = azúl oscuro (afeitado potente)
• «Normal» = azúl claro
«Sensitive» = blanco (para un afeitado minu-
cioso y confortable en las zonas
sensibles de su rostro como el
cuello)
Para un preciso y rápido afeitado recomenda-
mos el modo «intensive».
Pulsando el botón de « + » o « » se activa su
modo de afeitado preferido. Cuando encienda
de nuevo la afeitadora la próxima vez se activará
el modo último que haya activado.
c
h
a
r
g
e
h
i
g
h
m
i
d
l
o
w
h
i
g
h
l
o
w
730 720
c
h
a
r
g
e
h
i
g
h
m
i
d
l
o
w
h
i
g
h
l
o
w
730 720
c
h
a
r
g
e
h
i
g
h
m
i
d
l
o
w
h
i
g
h
l
o
w
730 720
c
h
a
r
g
e
h
i
g
h
m
i
d
l
o
w
h
i
g
h
l
o
w
730 720
on
off
on
off
n
siv
e
s
itive
on
off
on
off
n
siv
e
s
itive
on
off
on
off
n
siv
e
s
itive
sensitivenormalintensive
on
off
on
off
n
siv
e
s
itive
on
off
on
off
n
siv
e
s
itive
on
off
on
off
n
siv
e
s
itive
sensitivenormalintensive
98541480_730.indd 2098541480_730.indd 20 15.10.2008 14:36:49 Uhr15.10.2008 14:36:49 Uhr
1 / 1