Simplicity 2691487 Ohjekirja

Kategoria
Lawnmowers
Tyyppi
Ohjekirja

Tämä käsikirja sopii myös

80029484WST
Copyright © Briggs & Stratton Corporation
Milwaukee, WI, USA. All rights reserved.
Revision A
1
2
3
4
5
6
7
2
8
9
10
11
12
13
14
15
3
16
17
18
4
Manual Contents:
Products Covered by This Manual......................................5
General Information..............................................................5
European Office Contact Information.................................5
Operator Safety.....................................................................5
Features and Controls..........................................................7
Operation...............................................................................8
Maintenance.........................................................................13
Storage.................................................................................15
Troubleshooting..................................................................16
Specifications......................................................................17
Products Covered by This
Manual
The following products are covered by this manual:
2691487-00
General Information
For additional information, refer to the
Customer Contact Guide
and
Setup Instructions
included with the unit.
The illustrations in this document are representative. Your unit
may vary from the images shown.
LEFT
and
RIGHT
are
referenced from the operating position.
The use of Important and Note in the text indicates clarifications,
exceptions, or alternatives to the procedures given.
All language translations of this document are derived from the
original English source file.
All packaging, used oil, and batteries should be recycled
according to applicable government regulations.
European Office Contact
Information
For questions regarding European emissions, please contact
our European office at:
Max-Born-Straße 2, 68519 Viernheim, Germany.
Operator Safety
Save these instructions for future reference. This manual
contains safety information to make you aware of the hazards
and risks associated with the product and how to avoid them.
It also contains important instructions that should be followed
during the initial set-up, operation, and maintenance of the
product.
This product is designed and intended for cutting well maintained
grass and is not intended for any other purpose.
It is important that you read and understand these instructions
before attempting to start or operate this equipment.
Be thoroughly familiar with the controls and the proper use of
the product.
Know how to stop the unit and disengage controls quickly.
Slope Identification Guide
How to measure the slope of a lawn surface with a
smartphone or an angle finder tool:
WARNING
Do not operate on slopes greater than 10 degrees.
1. Use a straight edge at least two (2) feet long (A, Figure 1).
A 2x4 or a straight piece of metal works well.
2. Angle finder tools.
a. Use your smartphone: Many smartphones (B, Figure
1) have an inclinometer (angle finder) located under
the compass application (app). Or, search an app store
for an Inclinometer app.
b. Use angle finder tools: Angle finder tools (C & D,
Figure 1) are available at local hardware stores or online
(also called inclinometer, protractor, angle meter, or
angle gauge). Dial type (C) or digital type (D) work,
others may not. Follow user instructions with the angle
finder tool.
3. Place the two (2) feet long straight edge along the steepest
part of the lawn slope. Place the board up and down the
slope.
4. Lay the smartphone or angle finder tool on the straight edge
and read the angle in degrees. This is the slope of your
lawn.
Note:
A paper gauge slope identification guide is included in
your product literature packet and is also available to download
from the manufacturer's website.
Safety Symbols and Meanings
MeaningSymbolMeaningSymbol
Read and
understand the
operator's manual
before operating or
servicing the unit.
Safety information
about hazards that can
result in personal
injury.
5
MeaningSymbolMeaningSymbol
StopRemove the key before
performing service.
Read the operator's
manual before
performing service.
Explosion hazardFire hazard
Toxic fume hazardShock hazard
Wear eye protectionMoving parts
Hot surface hazardHazardous chemical
Thrown objects
hazard
Amputation hazard
Keep children awayKeep a safe distance
Amputation hazardRoll-over hazard
Safety Alert Symbol and Signal Words
The safety alert symbol identifies safety information about
hazards that can result in personal injury. A signal word
(DANGER, WARNING, or CAUTION) is used with the alert
symbol to indicate the likelihood and the potential severity of
injury. In addition, a hazard symbol may be used to represent
the type of hazard.
DANGER indicates a hazard which, if not avoided, will
result in death or serious injury.
WARNING indicates a hazard which, if not avoided, could
result in death or serious injury.
CAUTION indicates a hazard which, if not avoided, could
result in minor or moderate injury.
NOTICE
indicates an action that could result in damage to the
product.
Safety Decals
Before operating your machine, read and understand the safety
decals. Compare Figure 2 with the table following. The cautions
and warnings are for your safety. To avoid a personal injury or
damage to the machine, understand and follow all the safety
decals.
If any safety decals become worn or damaged, and cannot be
read, order replacement decals from your local dealer.
A
B
C
D
6
Safety Decal Icons
WARNING: Read and understand the Operator’s Manual before
using this machine. Know the location and function of all controls.
Do not operate this machine unless you are trained.
1
DANGER - LOSS OF TRACTION, SLIDING, STEERING AND
CONTROL ON SLOPES HAZARD: If machine stops forward
motion or starts sliding on a slope, stop the blades and drive slowly
off the slope.
2
DANGER: FIRE HAZARD: Keep unit free of grass, leaves and
excess oil. Do not add fuel while engine is hot or running. Stop
engine, remove key and allow to cool for at least 3 minutes prior
to adding fuel. Do not add fuel indoors, in an enclosed trailer,
garage or other enclosed areas. Clean up spilled fuel. Do not
smoke while operating this machine.
3
DANGER - TIPPING AND SLIPPING HAZARD: Mow up and
down slopes not across. Do not operate on slopes over 10
degrees. Avoid sudden and sharp (fast) turns while on slopes.
4
DANGER - AMPUTATION AND DISMEMBERMENT HAZARD:
To avoid injury from rotating blades and moving parts, keep safety
devices (guards, shields and switches) in place and working.
5
Do not mow when children or others are around. Never carry riders
especially children even with the blades off. Do not mow in reverse
unless absolutely necessary. Look down and behind before and
while backing.
6
Consult technical literature before performing technical repairs or
maintenance. When leaving the machine, shutoff engine, set the
parking brake to the lock position and remove the ignition key.
7
Keep by-standers and children a safe distance away. Remove
objects that can be thrown by the blade. Do not mow without
discharge chute in place.
8
Do not mow without discharge chute or entire grass catcher in
place.
9
To avoid injury from rotating blades, stay clear of deck edge and
keep others away.
10
Safety Messages
WARNING
Read, understand, and follow all the instructions and warnings
in the operator's manual and on the machine, engine, and
attachments before operating this machine. Failure to observe
the safety instructions in this manual and on the equipment
could result in death or serious injury.
Only allow operators who are responsible, trained and
familiar with the instructions and physically capable to
operate the machine.
Do not operate the machine while under the influence of
alcohol or drugs.
Wear safety glasses and closed toe footwear.
Do not put hands or feet near rotating parts or under the
machine. Keep clear of the discharge opening at all times.
Keep the machine in good working order. Replace worn
or damaged parts.
Be careful when servicing blades. Wrap the blade(s) or
wear gloves. Replace damaged blades. Do not repair or
alter blade(s).
Use full width ramps for loading and unloading a machine
for transport.
See attachment or accessory for proper wheel weights
or counterweights.
To help prevent fires, keep machine free of grass, leaves,
or other debris build up; clean up oil or fuel spillage and
remove any fuel soaked debris and allow the machine to
cool before storing.
WARNING
Running engine gives off carbon monoxide, an odorless,
colorless, poison gas. Breathing carbon monoxide can cause
headaches, fatigue, dizziness, vomiting, confusion, seizures,
nausea, fainting or death.
Operate equipment ONLY outdoors.
Keep exhaust gas from entering a confined area through
windows, doors, ventilation intakes, or other openings.
Features and Controls
Match the callout letters in Figure 3 to the features and controls
that match your machine listed in the accompanying table.
Control Symbols and Meaning
Reverse Mowing OptionA
7
Hourmeter (if equipped)B
Ignition SwitchC
OFF
RUN
Start
Headlight Switch
Power Take-Off Switch Up, Engage BladesD
Power Take-OffE
Power Take-Off Switch Down, Disengage BladesF
Cruise ControlG
Parking BrakeH
Throttle ControlI
Throttle Control SLOW PositionJ
Throttle Control FAST PositionK
ChokeL
Ground Speed PedalsM
Mower Height of Cut AdjustmentN
Transmission Release LeverO
Fuel TankP
Brake PedalR
Seat Adjustment Lever (if equipped)S
Operation
Operating Area
1. Familiarize yourself with the area in which you plan to
operate the rider mower.
2. Make sure that the area is free of debris or objects that
could be picked up by the blades and thrown.
DANGER
This machine is capable of throwing objects that could injure
bystanders or cause damage to buildings.
Do not operate the machine without the entire grass
catcher, discharge chute, or other safety devices in place
and functioning properly. Check frequently for signs of
wear or detoriation and replace as needed.
Clear the operating area of any objects which could be
thrown by or interfere with the operation of the machine.
3. Move the rider mower outside, before you start the engine.
8
WARNING
Engines give off carbon monoxide, an odorless, colorless,
poison gas. Breathing carbon monoxide can cause nausea,
fainting, or death.
4. Note all slopes and drop-offs.
DANGER
Operating on slopes, or near water, or drop-offs can result in
loss of control and roll-over.
Mow up and down slopes not across.
Reduce speed and be careful on slopes.
Do not operate on slopes over 10 degrees, which is a 3.5
foot rise over a 20 foot length.
Give yourself a minimum of two mower widths of clearance
around water, retaining walls, or drop-offs.
Avoid mowing wet grass.
Do not operate machine under any condition where
traction, steering, or stability is in question. Tires could
slide even if the wheels are stopped.
Avoid starting and stopping on slopes.
Avoid making sudden changes in speed or direction.
Make turns slowly and gradually.
Be careful while operating machine with a grass catcher
or other attachment(s). They can affect the stability of the
machine.
Follow the manufacturer's recommendation for weight
limits for towed equipment and towing on slopes (refer to
Towed Equipment
).
5. Be sure the operating area is clear of bystanders, especially
children.
DANGER
This rider mower is capable of amputating hands and feet.
Stop the mower when children or others are near.
Keep children out of the operating area and under the
watchful care of a responsible adult.
Do not carry passengers, especially children, even with
the blade(s) shut off. Children can fall off and be seriously
injured or interfere with the safe machine operation.
Children who have been given rides in the past can
suddenly appear in the mowing area for another ride and
be run over or backed over by the machine.
Use care when approaching blind corners, shrubs, trees,
or other objects that obscure vision.
Safety Interlock System Tests
This machine is equipped with a Safety Interlock System. Do
not attempt to bypass or tamper with the switches/devices.
WARNING
If the machine does not pass a safety test, do not operate the
machine. See an authorized dealer.
Test 1 Engine should NOT crank if:
PTO switch is ON, OR
Brake pedal is NOT fully depressed (parking brake OFF),
OR
Operator is NOT sitting in seat.
Test 2 Engine SHOULD crank and start if:
Operator is sitting in seat, AND
PTO switch is OFF, AND
Brake pedal is fully depressed (parking brake ON).
Test 3 Engine should SHUT OFF if:
Operator rises off seat.
Test 4 Check Mower Blade Stopping Time
Mower blades and mower drive belt should come to a complete
stop within five seconds after electric Power Take-Off (PTO)
switch is turned OFF. If mower drive belt does not stop within
five seconds, see an authorized dealer.
Test 5 Reverse Mowing Option (RMO) Check
Engine should shut off if reverse travel is attempted if the
Power Take-Off (PTO) has been switched on and Reverse
Mowing Option (RMO) has been activated.
Reverse Mowing Option (RMO) light should illuminate when
RMO has been activated.
DANGER
Mowing in reverse can be hazardous to bystanders. Tragic
accidents can occur if the operator is not alert to the presence
of children. Never activate the Reverse Mowing Option (RMO)
if children are present. Children are often attracted to the
machine and the mowing activity.
Engine
Check and Add Engine Oil
Use of Briggs & Stratton Warranty Certified oils for best
performance. Other high-quality detergent oils are acceptable
if classified for service SF, SG, SH, SJ or higher. Do not use
special additives.
Outdoor temperatures determine the proper oil viscosity for
the engine. Use the chart to select the best viscosity for the
outdoor temperature range expected.
9
SAE 30 - Below 40 °F (4 °C) the use of SAE 30 will result in hard starting.A
10W-30 - Above 80 °F (27 °C) the use of 10W-30 may cause increased
oil consumption. Check oil level more frequently.
B
5W-30C
Synthetic 5W-30D
Vanguard™ Synthetic 15W-50E
*Below 40°F (4°C) the use of SAE 30 will result in hard starting
.
**Above 80°F (27°C) the use of 10W-30 may cause increased oil consumption.
Check oil level more frequently.
1. Place the tractor on a level surface (Figure 4).
2. Stop the engine and remove the key.
3. Clean the oil fill area of any debris.
4. Remove the dipstick and wipe with a clean cloth.
5. Fully insert the dipstick.
6. Remove the dipstick (A, Figure 5) and check the oil level.
It should be at the FULL mark (B) on the dipstick.
7. If FULL, insert the dipstick and tighten securely.
8. If LOW, add oil slowly into the engine oil fill tube (C ) . Do
not overfill. After adding oil, wait one minute, then recheck
the oil level.
Note:
Do not add oil at the quick oil drain (if equipped).
9. Replace and tighten the dipstick.
Oil Pressure
If the oil pressure is too low, a pressure switch (if equipped)
will either stop the engine or activate a warning device on the
equipment. If this occurs, stop the engine and check the oil
level with the dipstick.
If the oil level is below the ADD mark, add oil until it reaches
the FULL mark. Start the engine and check for proper pressure
before continuing to operate.
If the oil level is between the ADD and FULL marks, do not
start the engine. Contact an authorized dealer to have the oil
pressure problem corrected.
Add Fuel
Fuel must meet these requirements:
Clean, fresh, unleaded gasoline.
A minimum of 87 octane / 87 AKI (91 RON). For high
altitude use, see below.
Gasoline with up to 10% ethanol (gasohol) is acceptable.
NOTICE
Do not use unapproved gasolines, such as E15
and E85. Do not mix oil in gasoline or modify the engine to
run on alternate fuels. Use of unapproved fuels will cause
damage to engine components, which will not be covered
under warranty.
To protect the fuel system from gum formation, mix a fuel
stabilizer into the fuel. See Storage. All fuel is not the same. If
starting or performance problems occur, change fuel providers
or change brands. This engine is certified to operate on gasoline.
The emissions control system for this engine is EM (Engine
Modifications).
High Altitude requirements:
At altitudes over 5,000 feet (1524 meters), a minimum 85
octane / 85 AKI (89 RON) gasoline is acceptable.
For carbureted engines, high altitude adjustment is required
to remain emissions compliant. Operation without this
adjustment will cause decreased performance, increased
fuel consumption, and increased emissions. Contact a
Briggs & Stratton Authorized Service Dealer for high altitude
adjustment information.
Operation of the engine at altitudes below 2,500 feet (762
meters) with the high altitude adjustment is not
recommended.
For Electronic Fuel Injection (EFI) engines, no high altitude
adjustment is necessary.
WARNING
Fuel and its vapors are extremely flammable and explosive.
Always handle fuel with extreme care.
Failure to observe these safety instructions can cause fire or
explosion which could result in severe burns or death.
When Adding Fuel
Turn engine off and let engine cool at least 3 minutes
before removing the fuel cap.
Extinguish all cigarettes, cigars, pipes, and other souces
of ignition.
Fill fuel tank outdoors or in well-ventilated area.
Do not overfill fuel tank. To allow for expansion of the fuel,
do not fill above the bottom of the fuel tank neck.
Keep fuel away from sparks, open flames, pilot lights,
heat, and other ignition sources.
Check fuel lines, tank, cap, and fittings frequently for
cracks or leaks. Replace if necessary.
If fuel spills, wait until it evaporates before starting engine.
Use only an approved fuel container.
1. Clean the fuel cap area of dirt and debris.
10
2. Remove the fuel cap (A, Figure 6). Also see Features and
Controls section.
3. Fill the fuel tank (B) with fuel. To allow for expansion of the
fuel, do not fill above the bottom of the fuel tank neck (C).
4. Reinstall the fuel cap.
Start the Engine
WARNING
Fuel and its vapors are extremely flammable and explosive.
Fire or explosion can cause severe burns or death.
When Starting the Engine
Ensure that spark plug, muffler, fuel cap, and air cleaner
(if equipped) are in place and secured.
Do not crank engine with spark plug removed.
If engine floods, set choke (if equipped) to OPEN/RUN
position, move throttle (if equipped) to FAST position and
crank until engine starts.
WARNING
Engines give off carbon monoxide, an odorless, colorless,
poison gas.
Breathing carbon monoxide can cause nausea, fainting, or
death.
Fire or explosion can cause severe burns or death.
Start and run engine outdoors.
Do not start or run engine in enclosed area, even if doors
or windows are open.
1. Check the oil level (refer to
Check and Add Engine Oil
).
2. Make sure equipment drive controls are disengaged.
3. Sit in the seat and lift UP the seat adjustment lever to lock
the seat in position.
4. Engage the parking brake. Push the brake pedal, pull UP
on the parking brake control, and release the brake pedal.
5. Disengage PTO switch by pushing IN.
6. Set the throttle/choke control to the CHOKE position.
7. Insert the key into the ignition switch and turn it to the
ON/START position.
8. After the engine starts, move the throttle/choke control to
half speed. Warm up the engine by running it for at least
30 seconds.
9. Set throttle/choke control to the FAST position,
In the event of an emergency the engine can be stopped by
simply turning the ignition swtch to STOP. For normal engine
shut down follow the procedure given in
Stop Tractor and
Engine
.
Note:
If the engine does not start after repeated attempts,
contact an authorized dealer.
Stop Tractor and Engine
WARNING
Fuel and its vapors are extremely flammable and explosive.
Fire or explosion can cause severe burns or death.
Do not choke the carburetor to stop the engine.
1. Release the ground speed pedals (A, Figure 7) to return to
the NEUTRAL position.
2. While still on the lawn, disengage the PTO switch (B), then
wait for all moving parts to stop.
3. Move the throttle control (C) (or throttle/choke control) to
SLOW position and turn the ignition key (D) to OFF.
4. Remove the key.
5. Engage the parking brake (E). Push the brake pedal (F),
pull UP on the parking brake control, and release the brake
pedal.
In the event of an emergency the engine can be stopped by
simply turning the ignition switch to STOP.
Tractor Operation
1. Sit in the seat and adjust the seat so that you can
comfortably reach all the controls (refer to
Features and
Controls
).
2. Engage the parking brake.
a. Fully depress the brake pedal.
b. Pull UP on the parking brake control
c. Release the brake pedal.
3. Make sure the PTO switch is disengaged.
4. Start the engine (refer to
Start Engine
).
5. Disengage the parking brake.
a. Fully depress the brake pedal.
b. Press DOWN on the parking brake control.
c. Release the brake pedal.
6. Depress the forward ground speed control pedal to travel
forward. Release the pedal to stop.
Note:
The further down the pedal is depressed the faster the
tractor will travel.
7. Stop the tractor by releasing the ground speed control
pedals, setting the parking brake, and stopping the engine
(see Stop Tractor and Engine).
Cruise Control
To engage:
11
1. Push the forward ground speed Pedal (refer to
Features
and Controls
).
2. Pull up the cruise control when the desired speed is
reached. The cruise will lock in one of its five locking
positions.
To disengage:
1. Push the brake pedal (refer to
Features and Controls
). OR
2. Push the forward ground speed pedal.
Mowing
DANGER
This machine is capable of amputating hands and feet, and
throwing objects. Failure to observe the following safety
instructions could result in serious injury or death.
Only operate the machine in daylight hours or good
artificial light.
Avoid holes, ruts, bumps, rocks, or other hidden hazards.
Uneven terrain can overturn the machine or cause
operator to lose their balance or footing.
Do not direct discharge material toward anyone. Avoid
discharging material against a wall or obstruction as
material may ricochet back toward the operator.
Stop the blade(s) when crossing gravel surface.
Do not leave a running machine unattended. Always park
on level ground, disengage the attachment, set parking
brake, stop engine and remove starter insert or key.
1. Engage the parking brake (B, Figure 8).
2. Make sure the PTO switch (C) is disengaged.
3. Start the engine (refer to
Start Engine
).
4. Set the throttle control (D) to the FAST position.
5. Engage the PTO to activate the mower blades.
6. Use the Height-of-Cut Lever (A) to set the cutting height to
the desired level.
7. Disengage the parking brake, then begin mowing.
8. When finished mowing, shut off the PTO.
9. STOP the engine (refer to
Stop Tractor and Engine
).
WARNING
The engine will shut off if the reverse ground speed pedal is
depressed while the PTO is on and the RMO has not been
activated. The operator should always turn the PTO off prior
to driving across on roads, paths, or any area that may be
used by other vehicles. Sudden loss of drive could create a
hazard.
Reverse Mowing Option (RMO)
DANGER
Mowing in reverse can be hazardous to bystanders. Tragic
accidents can occur if the operator is not alert to the presence
of children. Children are often attracted to the machine and
the mowing activity. Never assume that children will remain
where you last saw them.
Keep children out of the operating area and under the
watchful care of a responsible adult.
Do not carry passengers, especially children, even with
the blade(s) shut off. Children can fall off and be seriously
injured or interfer with the safe machine operation.
Children who have been given rides in the past can
suddenly appear in the mowing area for another ride and
be run over or backed over by the machine
Do not mow in reverse unless absolutely necessary.
Always look down and behind before and while backing.
If the machine mows in reverse without Reverse Mowing
Option activated, see an authorized dealer immediately.
The Reverse Mowing Option (RMO) allows the operator to mow
in reverse.
To activate:
1. Engage the Power Take-Off (PTO) (B, Figure 9).
2. Turn the Reverse Mowing Option (RMO) key (A) to ON.
3. The L.E.D. light illuminates.
4. The operator mows in reverse.
Note:
The key should be removed to restrict access to the RMO.
12
Maintenance
WARNING
Unintentional sparking can result in fire or electric shock.
Unintentional start-up can result in entanglement, traumatic
amputation, or laceration.
Before performing adjustments or repairs:
Disconnect the spark plug wire and keep it away from the
spark plug.
Disconnect battery at negative terminal (only engines with
electric start).
Use only correct tools.
Do not tamper with governor spring, links, or other parts
to increase engine speed.
Replacement parts must be of the same design and
installed in the same position as the original parts. Other
parts may not perform as well, may damage the unit, and
may result in injury.
Do not strike the flywheel with a hammer or hard object
because the flywheel may shatter during operation.
Maintenance Schedule
RIDER AND MOWER
Every 8 Hours or Daily
Check safety interlock system
Clean debris off rider and mower deck
Clean debris from engine compartment
Every 25 Hours or Annually*
Check tire pressure
Check mower blade stopping time
Check rider and mower for loose hardware
Every 50 Hours or Annually*
Clean battery and cables
Check rider brakes
See Dealer Annually to
Lubricate rider and mower
Check mower blades**
* Whichever come first.
** Check blades more often in regions with sandy soils or high dust
conditions.
ENGINE
First 5 Hours
Change engine oil
Every 8 Hours or Daily
Check engine oil level
Every 25 Hours or Annually*
Clean engine air filter and pre-cleaner**
ENGINE
Every 50 Hours or Annually*
Change engine oil
Replace oil filter
Annually
Replace air filter
Replace pre-cleaner
See Dealer Annually to
Inspect muffler and spark arrester
Replace spark plug
Replace fuel filter
Clean engine air cooling system
* Whichever comes first.
** Clean more often in dusty conditions or when airborne debris is present.
Check Tire Pressure
For proper traction and for the best mowing performance,
regularly check the tire inflation pressure. Refer to Check Tire
Pressure in the
Maintenance Schedule
and to Tire Inflation
Pressure in the
Specifications Chart
.
Clean the Battery and Cables
WARNING
When removing or installing battery cables, disconnect the
negative cable FIRST and reconnect it LAST. If not done in
this order, the positive terminal can be shorted to the frame
by a tool.
1. Disconnect the cables from the battery, negative (-) cable
first.
2. Remove the battery hold-down strap and battery.
3. Clean the battery compartment with a solution of baking
soda and water.
4. Clean the battery terminals and cable ends with a wire brush
and battery terminal cleaner until shiny.
5. Reinstall the battery in the battery compartment, and secure
with the battery hold-down strap.
6. Reattach the battery cables, positive (+) cable first (A, B,
Figure 10).
7. Coat the cable ends and battery terminals with petroleum
jelly or non-conducting grease.
Charge the Battery
WARNING
Keep open flames and sparks away from the battery; the
gasses coming from it are highly explosive. Ventilate the
battery well during charging.
13
A dead battery or one too weak to start the engine may be the
result of a defect in the charging system or other electrical
component. If there is any doubt about the cause of the problem,
see your dealer. If you need to replace the battery, follow the
steps under
Clean the Battery and Cables
.
To charge the battery, follow the instructions provided by the
battery charger manufacturer as well as all warnings included
in the safety rules sections of this book. Charge the battery until
fully charged. Do not charge at a rate higher than 10 amps.
Check Mower Blade Stop Time
WARNING
If the mower blade does not come to a complete stop within
5 seconds, the clutch must be adjusted. Do not operate the
machine until the proper adjustment has been performed by
an authorized dealer.
Mower blades and mower drive belt should come to a complete
stop within five seconds after electric Power Take-Off (PTO)
switch is turned OFF. If mower drive belt does not stop within
five seconds, see an authorized dealer for repairs.
Change the Engine Oil
1. Run engine until warm.
2. Place the rider on a level surface (refer to Figure 11).
3. Stop the engine and remove starter insert (A, Figure 11) or
key.
4. Clean oil fill and filter areas of any debris.
5. Remove dipstick (B) and lay on clean cloth.
6. Disconnect the oil drain hose (A, Figure 12).
7. Carefully remove cap (B) and lower hose into an approved
container (C).
8. After the oil has drained, install cap tightly, then attach the
hose to the side of the engine.
9. Remove the oil filter (B, Figure 13) and dispose of properly
10. Lightly lubricate the oil filter gasket (A) with fresh, clean oil..
11. Install the oil filter by hand until the gasket contacts the oil
filter adapter (C), then tighten the oil filter 1/2 to 3/4 turns.
12. Add oil (refer to the
Check and Add Engine Oil
section).
Air Filter Assembly (Cartridge with
pre-cleaner)
WARNING
Never start or run the engine with the air cleaner assembly or
air filter removed as it is a fire hazard.
NOTICE
Do not use pressurized air or solvents to clean the filter.
Pressurized air can damage the filter and solvents will dissolve
the filter.
1. Loosen the fasteners (A, Figure 14) and remove the cover
(B).
2. Remove the air cleaner assembly (C) and disassemble.
3. Clean up any possible debris that might get into the
carburetor throat (D).
4. Remove the pre-cleaner from the air filter.
5. To loosen debris, gently tap the air filter on a hard surface.
If the air filter is excessively dirty, replace with a new air
filter.
6. Wash the pre-cleaner in liquid detergent and water. Then
allow it to thoroughly air dry. Do not oil the pre-cleaner.
7. Assemble the dry pre-cleaner to the air filter.
8. Install the air filter assembly.
9. Install the cover and secure the fasteners.
Check the Spark Plugs
WARNING
Unintentional sparking can result in fire or electric shock.
Unintentional start-up can result in entanglement, traumatic
amputation, or laceration.
When testing for spark:
Use approved spark plug tester.
Do not check for spark with spark plug removed.
NOTICE
Spark plugs have different heat ranges. It is important that
the correct spark plug is used, otherwise, engine damage can
occur. Replace the spark plug with the same type or equivalent
one.
Clean Spark Plug
Clean with wire brush and sturdy knife. Do NOT use abrasives.
Check Spark Plug Gap
Use a spark plug feeler gauge (A, Figure 15) to check the gap
between the two electrodes. When the gap is correct, the gauge
will drag slightly as you pull it through the gap.
If necessary, use the spark plug gauge to adjust the gap by
gently bending the curved electrode without touching the center
electrode or the porcelain.
Install Spark Plug
Finger tighten, then tighten with wrench as shown in Figure 16.
14
180 in-lbs (20 Nm), OR
1/2 turn when reinstalling the original spark plug. 1/4 turn
when installing a new spark plug.
Push the Tractor by Hand
To push the tractor, perform the following:
1. Disengage the Power Take-Off (PTO) (A, Figure 17).
2. Turn the engine off.
3. Pull the transmission release to lock into the released
position.
4. The tractor can be pushed by hand
WARNING
Towing the unit will cause transmission damage. Do not use
another vehicle to push or pull this machine. Do not actuate
the transmission release lever while engine is running.
Towed Equipment
1. Tow only with a machine that has a hitch designed for
towing.
2. Do not attach towed equipment except at the hitch point.
3. Follow the recommendations for weight limit for towed
equipment and towing on slopes as listed below.
Gross weight (trailer and load) of 400 pounds.
Maximum of 20 pound foot up or down on the tongue.
Go from a 10 degree limit to a 5 degree limit on any
slope.
4. Never allow children or others in or on towed equipment.
5. On slopes, the weight of the towed equipment may cause
loss of traction and loss of control.
6. Travel slowly and allow extra distance to stop.
7. Do not shift to neutral and coast down hill.
Wash the Mower Deck (if equipped)
Note:
Use the washout port (C, Figure 18) to clean the underside of
the mower deck.
1. Place the rider on a smooth level surface.
2. Attach the quick disconnect (A, Figure 18) to the garden
hose (B) and then connect to the washout port (C) on the
mower deck.
3. Turn the water on.
4. Sit in the seat and start the engine.
5. Set the Height-of-Cut in the highest position.
6. Engage the Power Take-Off (PTO) switch to activate the
mower blades. The rotation of the blades and the running
water will clean the underside of the mower deck.
7. Disengage the Power Take-Off and stop the engine.
8. Turn the water off.
9. Remove the garden hose and quick disconnect from the
washout port (C).
Storage
WARNING
Never store the unit (with fuel) in an enclosed, unventilated
structure. Fuel vapors can travel to an ignition source (such
as a furnace, water heater, etc.) and cause an explosion.
Store away from furnaces, stoves, water heaters, or other
appliances that have pilot lights or other ignition sources
because they can ignite fuel vapors.
Equipment
Disengage the Power Take-Off (PTO), set the parking brake,
and remove the starter insert.
Allow the machine to cool.
Battery life will be increased if it is removed. Put in a cool, dry
place and keep fully charged during storage. If the battery is
left in the unit, disconnect the negative cable.
Fuel System
Fuel can become stale when stored over 30 days. Stale fuel
causes acid and gum deposits to form in the fuel system or on
essential carburetor parts. To keep fuel fresh, use Briggs &
Stratton® Advanced Formula Fuel Treatment & Stabilizer,
available wherever Briggs & Stratton genuine service parts are
sold.
There is no need to drain gasoline from the engine if a fuel
stabilizer is added according to instructions. Run the engine for
2 minutes to circulate the stabilizer throughout the fuel system
before storage. If gasoline in the engine has not been treated
with a fuel stabilizer, it must be drained into an approved
container. Run the engine until it stops from lack of fuel. The
use of a fuel stabilizer in the storage container is recommended
to maintain freshness.
Engine Oil
While the engine is still warm, change the engine oil.
Before starting the machine after it has been stored:
Check all fluid levels. Check all maintenance items.
Perform all recommended checks and procedures found in
this manual.
Allow the engine to warm up for several minutes before use.
15
Troubleshooting
Troubleshooting the Rider
REMEDYLOOK FORPROBLEM
Fully depress brake pedal.Brake pedal not depressed.Engine will not turnover or start.
If engine is hot, allow engine to cool, then refill the
fuel tank.
Out of fuel.
Place in OFF position.PTO switch is in ON position.
Move knob to NEUTRAL/OFF position.Cruise control engaged.
Disengage the choke.Engine flooded.
Refer to
Clean the Battery and Cables
.Battery terminals require cleaning.
Charge or replace battery.Battery discharged or dead.
Visually check wiring. If wires are frayed or broken,
see authorized dealer.
Wiring loose or broken.
Clean air filter.Fuel mixture too rich.Engine starts hard or runs poorly.
Check/add oil as required.Low oil level.Engine knocks.
Refer to the
Check and Add Engine Oil
section.Using wrong grade of oil.
Refer to the
Check and Add Engine Oil
section.Using wrong grade of oil.Excessive oil consumption.
Drain excess oil.Too much oil in crankcase.
Refer to the
Service the Air Filter
section.Dirty air filter.Engine exhaust is black.
Open choke.Choke closed.
Depress pedals.Ground speed control pedals not depressed.Engine runs, but rider will not drive.
Move into DRIVE position.Transmission release lever in PUSH position.
Disengage parking brake.Parking brake is engaged.
Refer to the
Check Tire Pressure
section.Improper tire inflation.Rider steers hard or handles poorly.
Note:
For all other problems, contact an Authorized Service Dealer.
Troubleshooting the Mower
REMEDYLOOK FORPROBLEM
Refer to the
Check Tire Pressure
section.Rider tires not properly inflated.Mower cut is uneven.
Set to FAST throttle.Engine speed too slow.Mower cut is rough looking.
Slow down.Ground speed too fast.
Set to FAST throttle.Engine speed too slow.Engine stalls easily with mower engaged.
Slow down.Ground speed too fast.
Refer to the
Service Air Filter
section.Dirty or clogged air cleaner.
Cut tall grass at maximum Height-of-Cut during first
pass.
Height-of-Cut set too low.
Run engine for several minutes to warm up.Engine not up to operating temperature.
Start the mower in a cleared area.Starting mower in tall grass.
Engage PTO.PTO not engaged.Engines runs and rider drives, but mower will not cut.
Note:
For all other problems, contact an Authorized Service Dealer.
16
Specifications
Specification Chart
ModelItem
INTEK™ - Briggs & StrattonEngine
40.0 cu in. (656 cc)Displacement
9 ampElectrical System - Alternator, Regulated
12V - 195 CCABattery
48 oz (1,4 L)Oil Capacity
.030 in. (,76 mm)Spark Plug Gap
180 in.-lbs (20 Nm)Spark Plug Torque
2.9 gal (11 L)Fuel Tank Capacity
Transmission
Tuff Torq® Hydro K46BPMake and Type
Mower Deck
42 in. (107 cm)Cutting Width
2 or 3 Standard LiftNumber of Blades
1.5 to 4 in. (3,8 to 10,2 cm)Height of Cut
Chassis
15 x 6-6Front Wheels Size
12 to 14 psi (0,82 to 0,96 bar)Front Wheels Inflation Pressure
20 x 8-8Rear Wheels Size
10 psi (,68 bar)Rear Wheels Inflation Pressure
Power Ratings
The gross power rating for individual gasoline engine models is labeled in accordance with SAE (Society of Automotive Engineers)
code J1940 Small Engine Power & Torque Rating Procedure, and is rated in accordance with SAE J1995. Torque values are
derived at 2600 RPM for those engines with “rpm” called out on the label and 3060 RPM for all others; horsepower values are
derived at 3600 RPM. The gross power curves can be viewed at www.BRIGGSandSTRATTON.COM. Net power values are
taken with exhaust and air cleaner installed whereas gross power values are collected without these attachments. Actual gross
engine power will be higher than net engine power and is affected by, among other things, ambient operating conditions and
engine-to-engine variability. Given the wide array of products on which engines are placed, the gasoline engine may not develop
the rated gross power when used in a given piece of power equipment. This difference is due to a variety of factors including,
but not limited to, the variety of engine components (air cleaner, exhaust, charging, cooling, carburetor, fuel pump, etc.), application
limitations, ambient operating conditions (temperature, humidity, altitude), and engine-to-engine variability. Due to manufacturing
and capacity limitations, Briggs & Stratton may substitute an engine of higher rated power for this engine.
Parts and Accessories
Contact an authorized dealer.
17
Indholdsfortegnelse:
Omfattede produkter i denne manual................................18
Generel information............................................................18
Kontaktoplysninger for europæisk kontor.......................18
Førersikkerhed ...................................................................18
Funktioner og betjeningsanordninger..............................20
Betjening..............................................................................21
Vedligeholdelse...................................................................26
Opbevaring..........................................................................29
Fejlfinding............................................................................30
Specifikationer.....................................................................31
Omfattede produkter i denne
manual
Følgende produkter er omfattede af denne manual:
2691487-00
Generel information
For yderligere information henviser vi til
Kundekontaktvejledning
og
Opsætningsvejledning
inkluderet med enheden.
Illustrationerne i dette dokument er repræsentative. Din maskine
kan variere fra de viste billeder.
VENSTRE
og
HØJRE
er
refereret fra betjeningspositionen.
Brugen af Bemærk i teksten indikerer afklaringer, undtagelser
eller alternativer til de givne procedurer.
Alle sprogoversættelser af dette dokument er udført med
udgangspunkt i den oprindelige engelske kildefil.
Al emballage, brugt olie og batterier skal bortskaffes med henblik
genbrug i henhold til de gældende regeringsvedtægter.
Kontaktoplysninger for
europæisk kontor
Ved spørgsmål i forbindelse med europæiske emissioner bedes
du kontakte vores europæiske kontor på:
Max-Born-Straße 2, 68519 Viernheim, Germany.
Førersikkerhed
Opbevar denne vejledning til senere brug. Denne vejledning
indeholder sikkerhedsinformation, som gør dig opmærksom
farer og risici forbundet med produktet, samt hvordan de kan
undgås. Den indeholder også vigtige instruktioner, der skal
følges ifm. den første indstilling, betjening og vedligeholdelse
af produktet.
Dette produkt er udelukkende konstrueret og beregnet til slåning
af velholdt græs. Det er ikke beregnet til noget andet formål.
Det er vigtigt, at du læser og forstår disse instruktioner, før du
forsøger at starte eller betjene dette udstyr.
Du skal være indgående bekendt med kontrolanordningerne
og den korrekte brug af udstyret.
Lær, hvordan du hurtigt stopper enheden og afbryder
kontrolanordningerne.
Guide til identifikation af skråninger
Sådan måler du hældningen en græsplæne med en
smartphone eller et vinkelmålerværktøj:
ADVARSEL
ikke betjenes skråninger, som er højere end 10grader.
1. Brug en lige kant mindst 0,6 meter (to fod) lang (A, figur 1).
Et 2x4 eller et lige stykke metal kan også du.
2. Vinkel -finder værktøj.
a. Brug din smartphone: Mange smartphones (B, figur
1) har en hældningsmåler sammen med kompas
-appen. Ellers kan du lede i en app store efter en
hældningsmåler-app.
b. Brug et hældningsmålerværktøj:
Hældningsmålerværktøj (C og D, figur 1) er tilgængelige
i lokale isenkræmmere eller online (også kaldet
inklinometer, vinkelmåler eller hældningsmåler).
Urskive-type (c) eller digital type (D) virker, andre gør
muligvis ikke. Følg instruktioner for hældnings
målerværktøjet.
3. Placér den 0,6 meter (to fod) lange, lige kant langs den
mest stejle del af plænehældningen. Placér brættet op og
ned langs hældningen.
4. Læg smartphonen eller hældningsmåleren langs kanten og
aflæs vinkelgraderne. Det er din græsplænes hældning.
Bemærk:
En identifikationsguide til papirmåler til hældninger er
inkluderet i produktmanualpakken og er også tilgængelig til at
downloade fra producentens hjemmeside.
Sikkerhedssymboler og deres betydninger
BetydningSymbolBetydningSymbol
Læs og forstå
brugervejledningen,
før brug af eller
servicering af
enheden.
Sikkerhedsinformation
om farer, som kan
resultere i
personskade.
18
BetydningSymbolBetydningSymbol
StopUdtag nøglen inden
udførelse af
vedligeholdelse. Læs
brugsanvisningen, før
service udføres.
EksplosionsfareBrandfare
Fare for giftige
dampe
Fare for stød
Brug
sikkerhedsbriller
Bevægelige Dele
Fare ved varm
overflade
Farligt kemikalie
Fare for slyngede
genstande
Fare for amputation af
lemmer
Hold børn vækHold
sikkerhedsafstand
Fare for amputation
af lemmer
Fare for rulning
Sikkerhedssymboler og signalord
Advarselssymbolet fare identifikanter sikkerhedsinformation
om farer, som kan resultere i personskade. Et signal ord (FARE,
ADVARSEL, eller BEMÆRK) bliver brugt sammen med
alarmsymbolet for at illustrere sandsynligheden og den mulige
grad af skade. Desuden kan et faresymbol bruges til at illustrere
faretypen.
FARE indikerer en fare, der, hvis ikke undgået, vil medføre
dødsfald eller alvorlige personskader.
ADVARSEL indikerer en fare, der, hvis ikke undgået, kunne
medføre dødsfald eller alvorlige personskader.
BEMÆRK indikerer en fare, der, hvis ikke undgået, kunne
medføre mindre eller moderat skade.
BEMÆRK
indikerer en situation, som kan medføre beskadigelse
af produktet.
Sikkerhedsmærkater
Før du betjener din maskine, skal du læse og forstå
sikkerhedsmærkaterne. Sammenhold figurerne 2 med den
efterfølgende tabel. Advarslerne og sikkerhedsforanstaltningerne
er for din egen sikkerheds skyld. For at undgå personskade
eller beskadigelse af maskinen, bedes du sørge for, at du forstår
og følger alle sikkerhedsmærkaterne.
Hvis nogen af sikkerhedsmærkaterne bliver slidte eller
beskadigede og ulæselige, skal du bestille nye hos din lokale
forhandler.
A
B
C
D
19
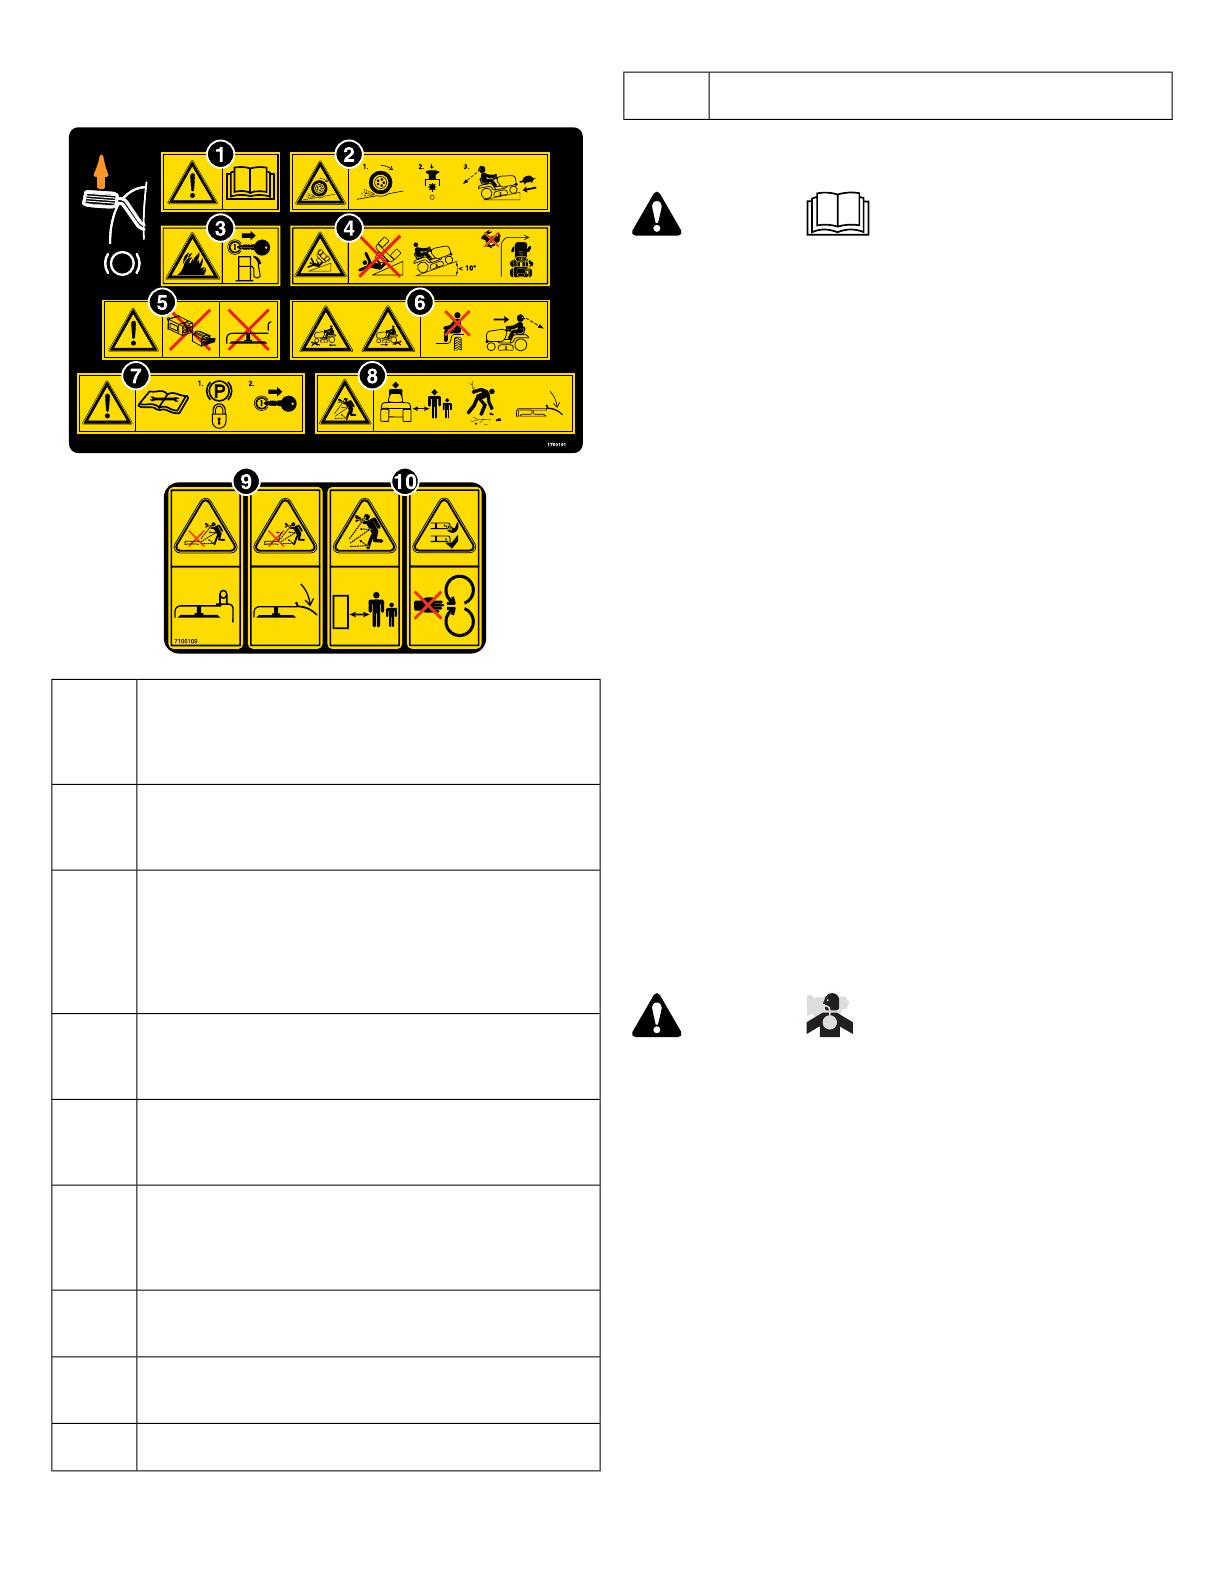
Sikkerhedsmærkatikoner
ADVARSEL: Læs, og gør dig bekendt med
betjeningsvejledningen, inden du bruger denne maskine. Vær
bekendt med placeringerne og funktionerne af alle
betjeningsanordninger. Du ikke bruge denne maskine,
medmindre du har lært at bruge den.
1
FARE - TAB AF TRÆKKRAFT, SKRIDNING, STYRING OG
HERREDØMME SKRÅNINGER: Hvis maskinen ikke vil køre
fremad eller begynder at skride en skråning, skal du standse
klipningen og langsomt køre væk fra skråningen.
2
FARE: BRANDFARE: Hold maskinen ren for græs, blade og
overskydende olie. Påfyld ikke brændstof, når motoren er varm
eller kører. Stop motoren, udtag nøglen, og lad den køle af i mindst
tre minutter, før du fylder brændstof på. Fyld ikke brændstof
indendørs eller i en lukket anhænger eller garage eller andre
indelukkede områder. Tør spildt brændstof op. Ryg ikke under
betjening af denne maskine.
3
FARE - FOR AT VÆLTE OG SKRIDE: Slå græs op og ned og
ikke tværs af skråninger. ikke betjenes skråninger, som
er stejlere end 10 grader. Undgå pludselige og skarpe (hurtige)
sving skråninger.
4
FARE - AMPUTATION OG ALVORLIG LEMLÆSTELSE: For at
undgå ulykker fra roterende skær og bevægelige dele skal du
sørge for, at sikkerhedsanordningerne (skærme og kontakter) er
plads og er funktionsdygtige.
5
Undlad at slå græs, når der er børn eller andre personer i
nærheden. Tag aldrig passagerer med, specielt ikke børn, heller
ikke selvom skærene er slået fra. Slå ikke græs i bakgear,
medmindre det er ubetinget nødvendigt. Kig dig tilbage og nedad
før og mens du bakker.
6
Se den tekniske manual, inden du udfører reparationer eller
vedligeholdelse. Når du forlader maskinen, sluk for motoren,
træk håndbremsen, og fjern tændingsnøglen.
7
Hold uvedkommende og børn behørig afstand. Fjern
genstande, der kan risikere at blive slynget afsted af de roterende
skær. Undlad at slå græs hvis affaldsslisken ikke er plads.
8
Undlad at slå græs, hvis affaldsslisken eller hele opsamleren ikke
er plads.
9
For at undgå ulykker med roterende skær skal du holde dig
afstand af klippeaggregatets kant og ligeledes holde andre væk.
10
Sikkerhedsmeddelelser
ADVARSEL
Du skal læse, forstå og følge alle instruktioner og advarsler i
producentens manual og maskinen, motoren og tilkoblet
udstyr , før du betjener denne maskine. Manglende
overholdelse af sikkerhedsforanstaltningerne i denne manual
og udstyret kunne resultere i død eller alvorlig personskade.
Tillad kun kørere, der er ansvarlige, trænede og bekendte
med instruktionerne og fysisk i stand til at betjene
maskinen.
Brug aldrig maskinen, hvis du er under indflydelse af
alkohol eller narkotika.
Brug beskyttelsesbriller og lukket fodtøj.
Hold ikke dine hænder eller fødder nær ved roterende
dele eller under maskinen. Hold til enhver tid afstand fra
udkaståbningen.
Hold maskinen i god stand. Udskift slidte og beskadigede
dele.
Vær forsigtig, når du betjener knivene. Indpak knivene
eller brug handsker. Erstat beskadigede knive. Reparér
eller ændr ikke knivene.
Brug ramper i fuld bredde for at laste eller losse en
maskine til transport.
Se vedhæftede eller tilbehør for passende hjulvægt eller
modvægte.
For at forebygge brand skal du holde maskinen fri for
ophobning af græs, blade eller andet snavs ; tør spild af
olie eller brændstof op, fjern alt affald ramt af brændstof
og lad maskinen køle af før opbevaring.
ADVARSEL
Kørende motorer udsender kulilte, en lugtfri, farveløs, giftig
luftart. Indånding af kulilte kan forårsage hovedpine, træthed,
svimmelhed, opkast, forvirring, anfald, kvalme, besvimelse
eller dødsfald.
Brug KUN udstyret udendørs.
Sørg for at forhindre udstødning i at komme ind et
lukket område gennem vinduer, døre, ventilationskanaler
eller andre åbninger.
Funktioner og
betjeningsanordninger
Match henvisningsbogstaver i Figur 3 til funktionerne og
styregrebene, der passer til din maskine og er opstillet i den
medfølgende oversigt.
20
  • Page 1 1
  • Page 2 2
  • Page 3 3
  • Page 4 4
  • Page 5 5
  • Page 6 6
  • Page 7 7
  • Page 8 8
  • Page 9 9
  • Page 10 10
  • Page 11 11
  • Page 12 12
  • Page 13 13
  • Page 14 14
  • Page 15 15
  • Page 16 16
  • Page 17 17
  • Page 18 18
  • Page 19 19
  • Page 20 20
  • Page 21 21
  • Page 22 22
  • Page 23 23
  • Page 24 24
  • Page 25 25
  • Page 26 26
  • Page 27 27
  • Page 28 28
  • Page 29 29
  • Page 30 30
  • Page 31 31
  • Page 32 32
  • Page 33 33
  • Page 34 34
  • Page 35 35
  • Page 36 36
  • Page 37 37
  • Page 38 38
  • Page 39 39
  • Page 40 40
  • Page 41 41
  • Page 42 42
  • Page 43 43
  • Page 44 44
  • Page 45 45
  • Page 46 46
  • Page 47 47
  • Page 48 48
  • Page 49 49
  • Page 50 50
  • Page 51 51
  • Page 52 52
  • Page 53 53
  • Page 54 54
  • Page 55 55
  • Page 56 56
  • Page 57 57
  • Page 58 58
  • Page 59 59
  • Page 60 60
  • Page 61 61
  • Page 62 62
  • Page 63 63
  • Page 64 64
  • Page 65 65
  • Page 66 66
  • Page 67 67
  • Page 68 68
  • Page 69 69
  • Page 70 70
  • Page 71 71
  • Page 72 72
  • Page 73 73
  • Page 74 74
  • Page 75 75
  • Page 76 76
  • Page 77 77
  • Page 78 78
  • Page 79 79
  • Page 80 80
  • Page 81 81
  • Page 82 82
  • Page 83 83
  • Page 84 84
  • Page 85 85
  • Page 86 86
  • Page 87 87
  • Page 88 88
  • Page 89 89
  • Page 90 90
  • Page 91 91
  • Page 92 92
  • Page 93 93
  • Page 94 94
  • Page 95 95
  • Page 96 96
  • Page 97 97
  • Page 98 98
  • Page 99 99
  • Page 100 100
  • Page 101 101
  • Page 102 102
  • Page 103 103
  • Page 104 104
  • Page 105 105
  • Page 106 106
  • Page 107 107
  • Page 108 108
  • Page 109 109
  • Page 110 110
  • Page 111 111
  • Page 112 112
  • Page 113 113
  • Page 114 114
  • Page 115 115
  • Page 116 116
  • Page 117 117
  • Page 118 118
  • Page 119 119
  • Page 120 120
  • Page 121 121
  • Page 122 122
  • Page 123 123
  • Page 124 124
  • Page 125 125
  • Page 126 126
  • Page 127 127
  • Page 128 128
  • Page 129 129
  • Page 130 130
  • Page 131 131
  • Page 132 132
  • Page 133 133
  • Page 134 134
  • Page 135 135
  • Page 136 136
  • Page 137 137
  • Page 138 138
  • Page 139 139
  • Page 140 140
  • Page 141 141
  • Page 142 142
  • Page 143 143
  • Page 144 144
  • Page 145 145
  • Page 146 146
  • Page 147 147
  • Page 148 148
  • Page 149 149
  • Page 150 150
  • Page 151 151
  • Page 152 152
  • Page 153 153
  • Page 154 154
  • Page 155 155
  • Page 156 156
  • Page 157 157
  • Page 158 158
  • Page 159 159
  • Page 160 160
  • Page 161 161
  • Page 162 162
  • Page 163 163
  • Page 164 164
  • Page 165 165
  • Page 166 166
  • Page 167 167
  • Page 168 168
  • Page 169 169
  • Page 170 170
  • Page 171 171
  • Page 172 172
  • Page 173 173
  • Page 174 174
  • Page 175 175
  • Page 176 176
  • Page 177 177
  • Page 178 178
  • Page 179 179
  • Page 180 180

Simplicity 2691487 Ohjekirja

Kategoria
Lawnmowers
Tyyppi
Ohjekirja
Tämä käsikirja sopii myös