Panasonic HXA100E Pikaopas

Tyyppi
Pikaopas
GN
Basic Operating Instructions
Wearable Camera
Model No.
HX-A100
Please read these instructions carefully before using this product, and save this manual for future
use.
This document explains basic operations of the unit. For more detailed
explanation, please refer to “Operating Instructions (PDF format)” which
is recorded in the enclosed CD-ROM.
VQT4X90
until
2013/2/28
HX-A100_VQT4X90_mst.book 1 ページ 2013年1月22日 火曜日 午後8時8分
Peruskäyttöohjeet
Käyttäjään kiinnitettävä kamera
Mallinumero HX-A100
Lue nämä käyttöohjeet huolellisesti ennen käyttöä ja säilytä ne mahdollista myöhempää
tarvetta varten.
FI
Tässä asiakirjassa kuvataan laitteen perustoiminnot. Lisätietoja on
oheisen CD-levyn sisältämässä PDF-muotoisessa käyttöoppaassa.
2
VQT4X90
For E only
EMC Electric and magnetic
compatibility
This symbol (CE) is located on the rating plate.
Cautions for use
Keep this unit as far away as possible from
electromagnetic equipment (such as
microwave ovens, TVs, video games etc.).
If you use this unit on top of or near a TV, the
pictures and/or sound on this unit may be
disrupted by electromagnetic wave radiation.
Do not use this unit near cell phones because
doing so may result in noise adversely
affecting the pictures and/or sound.
Recorded data may be damaged, or pictures
may be distorted, by strong magnetic fields
created by speakers or large motors.
Electromagnetic wave radiation generated by
microprocessors may adversely affect this
unit, disturbing the pictures and/or sound.
If this unit is adversely affected by
electromagnetic equipment and stops
functioning properly, press the reset button.
Do not use this unit near radio transmitters
or high-voltage lines.
If you record near radio transmitters or
high-voltage lines, the recorded pictures and/
or sound may be adversely affected.
About connecting to a PC
Do not use any other USB cables except the
supplied one.
Information for Your Safety
WARNING:
To reduce the risk of fire, electric shock or
product damage,
Do not let water or other liquids drip or
splash inside the unit.
Do not expose accessories (battery pack,
battery charger, AC adaptor, SD memory
card and etc.) to rain, moisture, dripping or
splashing.
Do not place objects filled with liquids,
such as vases, on accessories.
Use only the recommended accessories.
Do not remove covers.
Do not repair this unit by yourself. Refer
servicing to qualified service personnel.
CAUTION!
To reduce the risk of fire, electric shock or
product damage,
Do not install or place this unit in a
bookcase, built-in cabinet or in another
confined space. Ensure this unit is well
ventilated.
Do not obstruct this unit’s ventilation
openings with newspapers, tablecloths,
curtains, and similar items.
Do not place sources of naked flames,
such as lighted candles, on this unit.
This unit is intended for use in moderate
climates.
Product Identification Marking is located on
the bottom of the unit.
HX-A100_VQT4X90_mst.book 2 ページ 2013年1月22日 火曜日 午後8時8分
Turvallisuustietoja
VAROITUS:
Tulipalon, sähköiskun tai laitteen vaurioi-
tumisen vaaran vähentämiseksi
älä päästä laitteen sisään vettä tai muita
nesteitä
älä altista akun, laturin, muuntajan ja
SD-muistikortin kaltaisia varusteita
sateelle, kosteudelle tai roiskeille
älä aseta nesteitä sisältäviä esineitä, ku-
ten maljakoita, laitteen päälle tai lähelle
käytä vain suositeltuja varusteita
älä irrota kansia
älä korjaa tätä laitetta itse. Vain koulutet-
tu huoltohenkilöstö saa tehdä huoltotyöt.
n Varotoimet
Pidä tämä laite mahdollisimman kaukana
sähkömagneettisuutta aiheuttavista
laitteista, kuten mikroaaltouuneista,
televisiosta tai videopeleistä.
Jos käytät tätä laitetta television päällä tai
lähellä, sen lähettämät sähkömagneettiset
aallot voivat vaikuttaa kuvaan ja ääneen.
Älä käytä tätä laitetta matkapuhelimen
lähellä. Muutoin kuvaan ja ääneen voi tulla
häiriöitä.
Kaiuttimen tai suurien moottorien aiheutta-
mat voimakkaat magneettikentät voivat
vaurioittaa tallennettuja tietoja tai vääristää
kuvia.
Mikroprosessorien aiheuttamat sähkömag-
neettiset aallot voivat vaikuttaa kameraan,
jolloin kuvaan tai ääneen voi tulla häiriöitä.
Jos sähkömagneettinen laite vaikuttaa
haitallisesti tähän laitteeseen ja se lakkaa
toimimasta kunnolla, paina nollauspaini-
ketta.
Älä käytä tätä laitetta radiolähettimien tai
korkeajännitejohtojen lähellä.
Jos otat kuvia lähellä radiolähettimiä tai
korkeajännitejohtoja, kuvaan tai ääneen voi
tulla häiriöitä.
Yhdistäminen tietokoneeseen
Älä yhdistä kameraan muuta USB-johtoa
kuin sen mukana toimitettu.
HUOMAUTUS!
Tulipalon, sähköiskun tai laitteen vaurioi-
tumisen välttämiseksi
älä asenna äläkä sijoita tätä laitetta
kirjahyllyyn, suljettuun kaappiin tai
muuhun umpinaiseen tilaan. Varmista,
että laitteen ympärillä on kunnollinen
ilmanvaihto.
Älä anna esimerkiksi sanomalehden,
pöytäliinan tai verhojen tukkia laitteen
ilmanvaihtoaukkoja.
Älä laita laitteen päälle tai lähelle avotul-
ta, esimerkiksi palavaa kynttilää.
Tämä laite on tarkoitettu käytettäväksi
leudossa ilmastossa.
Laitteen tunnistaminen: Merkintä näkyy
laitteen pohjassa.
n Sähköinen ja magneettinen
yhteensopivuus
Tämä symboli (CE) sijaitsee tyyppikil-
vessä.
Vain E
4
VQT4X90
-If you see this symbol-
Information for Users on Collection and Disposal of Old Equipment
and used Batteries
These symbols on the products, packaging, and/or accompanying
documents mean that used electrical and electronic products and
batteries should not be mixed with general household waste.
For proper treatment, recovery and recycling of old products and used
batteries, please take them to applicable collection points, in
accordance with your national legislation and the Directives 2002/96/
EC and 2006/66/EC.
By disposing of these products and batteries correctly, you will help to
save valuable resources and prevent any potential negative effects on
human health and the environment which could otherwise arise from
inappropriate waste handling.
For more information about collection and recycling of old products and
batteries, please contact your local municipality, your waste disposal
service or the point of sale where you purchased the items.
Penalties may be applicable for incorrect disposal of this waste, in
accordance with national legislation.
For business users in the European Union
If you wish to discard electrical and electronic equipment, please
contact your dealer or supplier for further information.
[Information on Disposal in other Countries outside the European
Union]
These symbols are only valid in the European Union. If you wish to
discard these items, please contact your local authorities or dealer and
ask for the correct method of disposal.
Note for the battery symbol (bottom two symbol examples):
This symbol might be used in combination with a chemical symbol. In
this case it complies with the requirement set by the Directive for the
chemical involved.
Cd
HX-A100_VQT4X90_mst.book 4 ページ 2013年1月22日 火曜日 午後8時8分
- Jos näet symbolin -
n Tietoja vanhojen laitteiden ja käytettyjen paristojen keräyksestä
ja hävittämisestä
Nämä merkinnät tuotteissa, pakkauksissa ja/tai niihin liitetyissä doku-
menteissa tarkoittavat, että käytettyjä sähkö- ja elektroniikkalaitteita
sekä paristoja ei tule sekoittaa tavalliseen kotitalousjätteeseen.
Vanhojen tuotteiden ja käytettyjen paristojen asianmukainen käsittely,
talteen ottaminen ja kierrätys edellyttävät niiden viemistä tarjolla
oleviin keräyspisteisiin kansallisten määräysten sekä direktiivien
2002/96/EC ja 2006/66/EC mukaisesti.
Kun hävität tuotteet ja paristot asianmukaisesti, autat säilyttämään
arvokkaita luonnonvaroja sekä ehkäisemään ihmisen terveydelle ja
ympäristölle haitallisia vaikutuksia, joita vääränlainen jätteenkäsittely
voi aiheuttaa.
Ota yhteys asuinkuntasi viranomaisiin, jätteenkäsittelystä vastaavaan
tahoon tai tuotteiden ostopaikkaan saadaksesi lisätietoja vanhojen
tuotteiden ja paristojen keräyksestä ja kierrätyksestä. Tuotteiden
epäasianmukaisesta hävittämisestä saattaa seurata kansallisessa
lainsäädännössä määrätty rangaistus.
Yrityksille Euroopan unionissa
Lisätietoja sähkö- ja elektroniikkalaitteiden hävittämisestä saat
jälleenmyyjältä tai tavarantoimittajalta.
[Tietoja hävittämisestä Euroopan unionin ulkopuolella]
Nämä merkinnät ovat voimassa ainoastaan Euroopan unionin alueella.
Ota yhteys paikallisiin viranomaisiin tai jälleenmyyjään saadaksesi
tietoja oikeasta jätteenkäsittelymenetelmästä.
Paristomerkintää koskeva huomautus (alla kaksi esimerkkiä
merkinnöistä):
Tämä merkki voi olla käytössä yhdessä kemiallisen merkinnän
kanssa. Siinä tapauksessa merkki noudattaa kyseistä kemikaalia
koskevan direktiivin vaatimuksia.
5
VQT4X90
Information for Your Safety......................2
(Important) About the Waterproof/
Dustproof................................................... 6
Accessories...............................................9
Read this first ..........................................10
What you can do with this unit .............. 11
Preparation
Wearing this unit..................................... 12
Power supply........................................... 14
Charging the battery ......................... 14
Charging and recording time............. 15
Recording to a card ................................ 16
Cards that you can use with this
unit .................................................... 16
Inserting/removing a microSD
card ................................................... 16
Turn this unit on/off ................................ 17
Wi-Fi
®
function........................................18
Connecting directly with a
smartphone .............................................19
Installing Image App.......................... 19
Connecting this unit with a
smartphone ....................................... 19
Starting Image App............................ 20
Setting up with Setup Wizard ................ 21
Setting date and time..............................22
Basic
Recording ................................................23
Recording motion pictures ................ 23
Recording still pictures ...................... 23
Playback ..................................................24
Others
Recordable time/Number of recordable
pictures.................................................... 25
Requests when disposing of this unit
...... 26
Specifications ......................................... 28
About copyright ...................................... 29
Limited Warranty
(ONLY FOR AUSTRALIA) ....................... 30
Contents
How to open the Operating Instructions (PDF format)
When you insert the CD-ROM and open the [INDEX.pdf] in the CD-ROM, the Operating
Instructions list will be displayed. Click the document name of the Operating Instructions you
would like to open.
Adobe Reader is required to view the PDF file. Please download it from the homepage of
Adobe Systems Incorporated.
For United Kingdom and Ireland
customers
Sales and Support Information
Customer Communications Centre
For customers within the UK: 0844 844 3899
For customers within lreland: 01 289 8333
Monday–Friday 9:00 am – 5:00 pm
(Excluding public holidays).
For further support on your product, please
visit our website:
www.panasonic.co.uk
Direct Sales at Panasonic UK
Order accessory and consumable items for
your product with ease and confidence by
phoning our Customer Communications
Centre
Monday–Friday 9:00 am – 5:00 pm
(Excluding public holidays).
Or go on line through our Internet
Accessory ordering application at
www.pas-europe.com
.
Most major credit and debit cards accepted.
All enquiries transactions and distribution facilities
are provided directly by Panasonic UK.
It couldn’t be simpler!
Also available through our Internet is direct
shopping for a wide range of finished products.
Take a browse on our website for further
details.
HX-A100_VQT4X90_mst.book 5 ページ 2013年1月22日 火曜日 午後8時8分
Sisällys
n PDF-muotoisen käyttöohjeen lukeminen
Kun asetat CD-ROM-levyn levyasemaan ja avaat INDEX.pdf-tiedoston, käyttöohje
tulee näkyviin. Napsauta avattavan asiakirjan nimeä.
n PDF-tiedoston avaaminen edellyttää Adobe Reader -ohjelmaa. Voit ladata sen
Adobe Systems Incorporatedin sivustosta.
Turvallisuustietoja ................................ 2
Tärkeää: vesi- ja pölytiiviys ................. 6
Tarvikkeet ............................................... 9
Lue tämä ensin .................................... 10
Tämän laitteen toiminnot ..................... 11
Valmistelu
Laitteen käyttäminen .......................... 12
Virtalähde ............................................. 14
Akun lataaminen ............................ 14
Lataamis- ja tallennusaika ............... 15
Tallentaminen kortille ......................... 16
Tämän laitteen kanssa
yhteensopivat kortit ........................ 16
MicroSD-kortin asettaminen
paikoilleen ja poistaminen .............. 16
Laitteen käynnistäminen ja
sammuttaminen .................................. 17
Wi-Fi
®
-toiminto .................................... 18
Yhdistäminen suoraan
älypuhelimeen ..................................... 19
Image-sovelluksen asentaminen ... 19
Tämän laitteen yhdistäminen
älypuhelimeen ................................ 19
Image-sovelluksen
käynnistäminen .............................. 20
Asetusten määrittäminen ohjatun
toiminnon avulla ................................. 21
Päivämäärän ja kellonajan
asettaminen ......................................... 22
Perusominaisuudet
Tallennus ............................................... 23
Videoleikkeiden kuvaaminen ........... 23
Valokuvaaminen .............................. 23
Toisto ..................................................... 24
Muut toiminnot
Tallennusaika ja valokuvien määrä ..... 25
Tämän laitteen hävittäminen .............. 26
Tekniset tiedot ...................................... 28
Tekijänoikeudet .................................... 29
6
VQT4X90
This does not guarantee no destruction, no malfunction, or waterproofing in all conditions.
* This means that this unit can be used underwater for specified time in specified pressure in
accordance with the handling method established by Panasonic.
Handling of this unit
Waterproofing is not guaranteed if the unit is subject to an impact as a result of being hit or
dropped etc. If an impact to this unit occurs, it should be inspected (subject to a fee) by a
Panasonic’s Service Centre to verify that the waterproofing is still effective.
The waterproof performance may be degraded due to the strong water pressure when this unit is
used deeper than 1.5 m underwater.
When this unit is splashed with detergent, soap, hot spring, bath additive, sun oil, sun screen,
chemical, etc., wipe it off immediately.
Do not rinse with running water, such as tap water.
Waterproof function of this unit is for sea water and fresh water only.
Any malfunction caused by customer misuse, or mishandling will not be covered by the warranty.
Cards are not waterproof. Do not handle with a wet hand. Also, do not insert wet card into this
unit.
Do not open or close the side cover when your hands are wet or water droplets are present on
this unit. Failure to do so may lead to damage such as rusty terminals caused by water droplets.
Foreign objects may adhere to the inner side of the side cover (around the rubber seal or
connecting terminals) when the side cover is opened or closed in places with sand or dust
etc. If you close the side cover with foreign objects adhering to it, water may enter the
inside. Be very careful because doing so may cause malfunctions.
Do not leave this unit for a long period of time in places where temperature is very low (at high
altitude etc.) or very high (inside a car under strong sunlight, close to a heater, on the beach, etc.)
Waterproof performance may be degraded.
The inside of this unit is not waterproof. Water leakage will cause malfunction.
If any foreign object has adhered to the inner side of the side cover, remove it.
If any liquid such as water droplets has adhered to this unit or inner side of the side cover,
wipe off with a soft dry cloth. Do not open or close the side cover near the water, when
underwater, using wet hands, or when this unit is wet. It may cause water leakage.
(Important) About the Waterproof/
Dustproof
Waterproof/Dustproof Performance
This unit’s waterproof/dustproof rating complies with the “IP58” rating. Provided the care
and maintenance guidelines described in this document are strictly followed, this unit
can operate underwater, to a depth not exceeding 1.5 m for a time not exceeding
30 minutes. *
HX-A100_VQT4X90_mst.book 6 ページ 2013年1月22日 火曜日 午後8時8分
Tärkeää: vesi- ja pölytiiviys
Vesi- ja pölytiiviys
Tämän laitteen vesi- ja pölytiiviys täyttää IP58-vaatimukset. Jos tässä asiakirjassa
kuvattuja ohjeita noudatetaan huolellisesti, tätä laitetta voi käyttää veden alla enintään
1,5 metrin syvyydessä enintään 30 minuutin ajan yhtäjaksoisesti.*
Tämä ei takaa tuhoutumattomuutta, toimintahäiriöttömyyttä tai vedenpitävyyttä kaikissa oloissa.
* Tätä laitetta voi käyttää veden alla mainitun ajan verran ja mainitussa paineessa, kun noudatetaan
Panasonicin antamia käsittelyohjeita.
n Tämän laitteen käsitteleminen
Vesitiiviyttä ei taata, jos laite altistuu iskulle esimerkiksi putoamisen tai osuman saamisen seurauk-
sena. Jos laite altistuu iskulle, se on toimitettava tarkistettavaksi Panasonicin huoltokorjaamoon,
jossa voidaan varmistaa laitteen olevan yhä vesitiivis. Tarkistamisesta veloitetaan.
Vesitiiviys voi heikentyä, jos laitteeseen kohdistuu suurempi kuin 1,5 metrin syvyydessä vallitseva
paine.
Jos laitteeseen roiskuu esimerkiksi pesuainetta, saippuaa, kylpyvaahtoa, aurinkosuojavoidetta
tai kemikaalia, huuhtele se pois heti.
Älä huuhtele juoksevalla vedellä, kuten vesijohtovedellä.
Tämä laite on vesitiivis vain meri- ja makeassa vedessä.
Takuu ei kata väärinkäytön seurauksia.
Kortit eivät ole vesitiiviitä. Älä käsittele niitä märin käsin. Älä myöskään aseta laitteeseen märkää
korttia.
Älä avaa tai sulje sivukantta, kun kätesi ovat märät tai laitteen pinnalla on vesipisaroita. Muutoin
laite voi vaurioitua. Vesipisarat voivat esimerkiksi ruostuttaa liitäntöjä.
Jos sivukansi avataan paikoissa, joissa on hiekkaa tai pölyä, sivukannen sisäpuolelle ku-
mitiivisteeseen tai liitäntöihin voi joutua vieraita esineitä. Jos sivukansi suljetaan ja siihen
on tarttunut vieraita esineitä, laitteen sisään voi päästä vettä. Tällöin voi aiheutua toiminta-
häiriöitä.
Älä jätä laitetta pitkäksi ajaksi erittäin kylmään tai kuumaan paikkaan, esimerkiksi auton sisälle
aurinkoisella säällä, lämmittimen lähelle tai hiekkarannalle. Muutoin vesitiiviys voi heikentyä.
Laitteen sisäosa ei ole vesitiivis. Vesivuoto aiheuttaa toimintahäiriön.
Jos sivukannen sisäpuolelle on tarttunut vieras esine, poista se.
Jos laitteeseen tai sen sivukannen sisään pääsee nestettä, kuten vesipisaroita, pyyhi se
pois kuivalla ja pehmeällä liinalla. Älä avaa tai sulje sivukantta lähellä vettä, veden alla,
märin käsin tai kun laite on märkä. Muutoin voi aiheutua vesivuotoja.
7
VQT4X90
When inner side of the lens is fogged (condensation)
Condensation may occur and the inner side of the lens may be fogged when this unit is moved to a
warm area from a cold area, such as at high altitude.
It is not a malfunction or failure of this unit. It may be caused by the environment in which
this unit is used.
Be careful of condensation since it causes lens stains, fungus and unit malfunction.
What to do when inner side of the lens is fogged
Turn off this unit and open the side cover in a place with constant ambient temperature, away
from high temperatures, humidity, sand and dust. The fog will disappear naturally in about 2 hours
with the side cover open when the temperature of this unit gets close to the ambient temperature.
Contact Panasonic’s Service Centre if the fogging does not disappear.
1 Open the side cover.
2 Check that there are no foreign objects on the inner side of the side cover.
If there are any foreign objects, such as lint, hair, sand, etc., on the surrounding area, water will
leak within a few seconds causing malfunction.
3 If there is foreign matter adhering to the unit, remove it.
Be extremely careful to remove any sand etc. that may adhere to the sides and corners of the
rubber seal.
Wipe it off with a dry soft cloth if there is any liquid. It may cause water leaks and malfunction if
you use this unit with liquid adhered.
4 Check for cracks and deformation of the rubber seal on the side cover.
The integrity of the rubber seals may decrease after about 1 year, with use and age. To avoid
permanently damaging this unit the seals should be replaced once every two years. Please
contact Panasonic’s Service Centre for related costs and other information.
5 Close the side cover securely.
To prevent water seeping into this unit, be careful not to trap foreign objects such as
liquids, sand, hair or dust etc.
Check before using underwater
Do not open or close the side cover in places with sand and dust, close to water, or with wet
hands. Sand or dust adhering may cause water leaks.
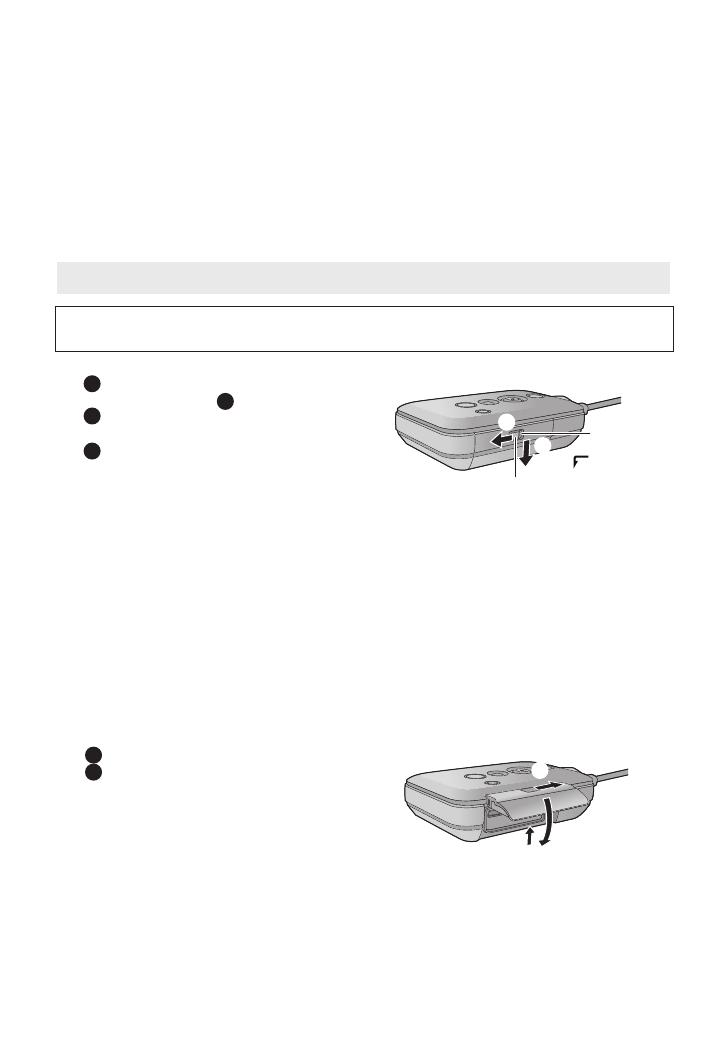
1 Slide the LOCK switch A to the left to
unlock the side cover.
B: Unlocked when the red indicator is visible
2 Slide the side cover downward to
open it.
A
B
1 Close the side cover and slide it
upward.
2 Slide the LOCK switch to the right to
lock the side cover.
Lock securely to the points where the
red portion of the LOCK switch is no
longer visible.
Securely close it until it clicks.
HX-A100_VQT4X90_mst.book 7 ページ 2013年1月22日 火曜日 午後8時8分
n Jos objektiivin sisäpintaan tiivistyy kosteutta
Objektiivin sisäpintaan voi tiivistyä kosteutta, kun laite siirretään kylmästä lämpimään.
Tämä ei ole toimintahäiriö. Syynä voi olla laitteen käyttöympäristö.
Kosteus voi aiheuttaa objektiiviin tahroja, sienien kasvua ja toimintahäiriöitä.
Mitä on tehtävä, jos objektiivin sisäpintaan tiivistyy kosteutta
Katkaise laitteesta virta. Avaa sivukansi paikassa, jossa vallitsee tasainen lämpötila ja jossa ei ole
kosteutta, hiekkaa eikä pölyä. Kosteus haihtuu itsestään noin 2 tunnin kuluessa, kun sivukansi on
avattu ja laitteen lämpötila vastaa ympäröivää lämpötilaa.
Jos kosteus ei haihdu, ota yhteys Panasonicin huoltokorjaamoon.
Tarkistukset ennen käyttämistä veden alla
Älä avaa tai sulje sivukantta märin käsin, veden lähellä tai paikoissa, joissa on hiekkaa tai
pölyä. Hiekka tai pöly voi aiheuttaa vesivuotoja.
1 Avaa sivukansi.
Avaa sivukannen lukitus painamalla
lukituskytkin vasemmalle.
Lukitus on avattu, kun punainen merk-
kivalo palaa.
Avaa sivukansi painamalla sitä alaspäi.
2 Tarkista, ettei sivukannen sisäpuolella
ole vieraita esineitä.
Jos sivukannen lähellä on vieraita esineitä, kuten nukkaa, karvoja tai hiekkaa, vesi pääsee
vuotamaan sisään aiheuttamaan toimintahäiriöitä.
3 Jos laitteessa on vieraita esineitä, poista ne.
Poista esimerkiksi hiekka kumitiivisteestä erittäin huolellisesti.
Pyyhi mahdollinen neste pois pehmeällä kuivalla kankaalla. Muutoin voi aiheutua vesivuotoja ja
toimintahäiriöitä.
4 Tarkista, onko sivukannen kumitiivisteessä halkemia tai muodonmuutoksia.
Kumitiivisteiden eheys voi huonontua noin 1 vuoden kuluttua käytön ja ikääntymisen vuoksi.
Tiiviste tulee vaihtaa 2 vuoden välein, jotta laitteen pysyvä vaurioituminen vältetään. Pyydä kustan-
nusarvio ja lisätietoja Panasonicin huoltokorjaamosta.
5 Sulje sivukansi huolellisesti.
Sulje sivukansi ja työnnä sitä ylöspäin.
Lu- kitse sivukansi painamalla lukituskyt-
kin oikealle.
Lukitse kunnolla siten, että lukituskytkimen
punainen osa ei enää näy.
Sulje kansi siten, että se napsahtaa kiinni.
Varo, ettei väliin jää nestettä eikä vieraita esineitä, kusen hiekkaa, karvoja tai pölyä.
1 Avaa sivukansi.
Avaa sivukannen lukitus painamalla
lukituskytkin vasemmalle.
Lukitus on avattu, kun punainen merk-
kivalo palaa.
Avaa sivukansi painamalla sitä alaspäin.
2 Tarkista, ettei sivukannen sisäpuolella
ole vieraita esineitä.
Jos sivukannen lähellä on vieraita esineitä, kuten nukkaa, karvoja tai hiekkaa, vesi pääsee
vuotamaan sisään ja voi aiheuttaa toimintahäiriöitä.
3 Jos laitteessa on vieraita esineitä, poista ne.
Poista esimerkiksi hiekka kumitiivisteestä erittäin huolellisesti.
Pyyhi mahdollinen neste pois pehmeällä ja kuivalla kankaalla. Muutoin voi aiheutua vesivuotoja
ja toimintahäiriöitä.
4 Tarkista, onko sivukannen kumitiivisteessä halkemia tai muodonmuutoksia.
Kumitiivisteet saattavat alkaa heikentyä noin 1 vuoden käytön jälkeen. Tiiviste tulee vaihtaa 2
vuoden välein, jotta laitteen pysyvä vaurioituminen vältetään. Pyydä kustannusarvio ja lisätietoja
Panasonicin huoltokorjaamosta.
5 Sulje sivukansi huolellisesti.
Sulje sivukansi ja työnnä sitä ylöspäin.
Lukitse sivukansi painamalla lu-
kituskytkin oikealle.
Lukitse kunnolla siten, että lukituskytkimen
punainen osa ei enää näy.
Sulje kansi siten, että se napsahtaa kiinni.
Varo, ettei väliin jää nestettä eikä vieraita esineitä, kuten hiekkaa, karvoja tai pölyä.
1
1
2
2
B
A
ÖPPNA
8
VQT4X90
Use this unit underwater at a depth of down to 1.5 m with the water temperature between 0 oC
and 35 oC.
Do not use this unit at a depth of over 1.5 m.
Do not use it in hot water over 35 oC (in a bath or hot spring).
Do not use this unit underwater not longer than 30 minutes continuously.
Do not open or close the side cover.
Do not apply shock to this unit underwater. (Waterproof performance may not be maintained, and
there is a chance of water leak.)
Do not dive into the water holding this unit. Do not use this unit in a location where the water will
splash strongly, such as rapid flow or waterfall. (Strong water pressure may be applied, and it may
cause malfunction.)
This unit will sink in the water. Take care not to drop this unit.
1 Rinse with water with the side cover closed.
After use at the seaside or underwater, soak the unit in fresh water pooled in a shallow container
for about 10 minutes.
2 Drain water by holding this unit and shaking it lightly a few times.
After using this unit at the seaside or underwater, or after washing it, water will remain at
the speaker site or mic site of this unit for a while and it may cause lower sound or sound
distortion.
Pay careful attention to prevent this unit from dropping.
3 Wipe off water drops on this unit with a soft, dry cloth and dry this unit in a
shaded area that is well ventilated.
Dry this unit approx. 1 hour or more.
Dry this unit on a dry cloth.
Do not dry this unit with hot air from dryer or similar. It will deteriorate the waterproof performance
or cause failure due to deformation.
Do not use chemicals such as benzine, thinner, alcohol or cleanser, soap or detergents.
4 Confirm that there are no water droplets, open the side cover, and wipe off
any water droplets or sand left inside using a soft, dry cloth.
Water droplets may adhere to the card, etc. when the side cover is opened without thoroughly
drying. Also, water may accumulate in the gap around the card slot or the terminal connector. Be
sure to wipe any water off with a soft, dry cloth.
The water droplets may seep into this unit when the side cover is closed while it is still wet,
causing condensation or failure.
Using this unit underwater
Caring for this unit after using it underwater
Do not open or close the side cover until the sand and dust is removed by rinsing the
camera with water.
Make sure to clean the camera after using it.
Thoroughly wipe off any water droplets, sand, and saline matter on your hands, body, hair, etc.
It is recommended to clean the camera indoors, avoiding places where water spray or sand may fall.
Do not leave this unit uncared for longer than 60 minutes after using it underwater.
Leaving this unit with foreign objects or saline matter on it may cause damage, discolouration,
corrosion, unusual odour, or deterioration of the waterproof performance.
In case water enters this unit, stop the use and consult your dealer.
Malfunctions resulting from water leakage due to wrong handling by customers are not subject to
compensation.
HX-A100_VQT4X90_mst.book 8 ページ 2013年1月22日 火曜日 午後8時8分
Laitteen käyttäminen veden alla
Laitteen hoito vedenalaisen käytön jälkeen
Jos laitteeseen pääsee vettä, lopeta sen käyttäminen ja ota yhteys jälleenmyyjään.
Takuu ei kata virheellisen käsittelyn seurauksena laitteeseen päässeen veden aiheuttamia vaurioita.
Käytä tätä laitetta veden alla enintään 1,5 metrin syvyydessä. Lämpötilan tulee olla 0 °C – 35 °C.
Älä käytä laitetta yli 1,5 metrin syvyydessä.
Älä käytä laitetta vedessä, jonka lämpötila ylittää 35 °C (kylvyssä tai kuumassa lähteessä).
Älä käytä laitetta veden alla pidempään kuin 30 minuuttia kerrallaan.
Älä avaa tai sulje luukkua veden alla.
Älä altista laitetta iskuille veden alla. Tällöin vesitiiviys voi heikentyä ja laitteeseen voi vuotaa vettä.
Älä sukella veteen laitteesta kiinni pitäen. Älä käytä laitetta paikoissa, joissa vesi roiskuu voimak-
kaasti, kuten voimakas virta tai vesiputous. Tällöin voimakas vedenpaine voi aiheuttaa toiminta-
häiriön.
Varo pudottamasta laitetta veteen, sillä se uppoaa.
1 Huuhtele vedellä sivuluukku suljettuna.
Rannalla tai vedessä käyttämisen jälkeen upota laite puhtaaseen veteen laakeassa astiassa noin
10 minuutiksi.
2 Pidä laitteesta kiinni ja kuivaa vesi ravistamalla sitä kevyesti useita kertoja.
Kun laitetta on käytetty rannalla tai veden alla ja kun se on pesty, kaiuttimeen ja mikrofoniin jää
vettä. Tällöin ääni voi kuulua hiljaisena, tai siinä voi olla häiriöitä.
Varo pudottamasta laitetta.
3 Pyyhi vesipisarat laitteesta kuivalla ja pehmeällä kankaalla, ja kuivaa laite
hyvin tuuletetussa varjoisassa paikassa.
Kuivaa noin 1 tunti tai pidempään.
Anna laitteen kuivua vähintään tunnin ajan.
Älä kuivaa laitetta esimerkiksi hiustenkuivaajalla, sillä vesitiiviys saattaa heikentyä ja laitteeseen
saattaa tulla toimintavika.
Älä käytä kemikaaleja, kuten bensiiniä, tinneriä, alkoholia, puhdistusainetta tai saippuaa.
4 Varmista, ettei laitteen sisälle jää vesipisaroita. Avaa sivukansi ja pyyhi pois mahdol-
liset sisäpuolelle jääneet vesipisarat tai hiekka kuivalla ja pehmeällä kankaalla.
Vesipisaroita voi päätyä esimerkiksi korttiin, jos sivukansi avataan kuivaamatta kunnollisesti. Lisäksi
vettä voi kerääntyä korttipaikan ja liittimen ympärille jääviin väleihin. Pyyhi vesi pois pehmeällä ja
kuivalla kankaalla.
Vesipisaroita voi tihkua laitteeseen, kun sivukansi suljetaan sen ollessa vielä märkä. Tällöin vesi
saattaa tiivistyä tai aiheuttaa toimintavian.
Älä avaa tai sulje takaluukkua ennen kuin hiekka tai pöly on poistettu huuhtelemalla laite
vedellä.
Muista puhdistaa laite käytön jälkeen.
Pyyhi huolellisesti kaikki vesipisarat, hiekka ja suolajäämät esimerkiksi käsistäsi, kehostasi ja
hiuksistasi.
On suositeltavaa puhdistaa laite sisätiloissa välttäen paikkoja, joissa voi olla vesiroiskeita tai
hiekkaa.
Muista suorittaa laitteen hoitotoimenpiteet 60 minuutin kuluessa siitä, kun käytit sitä
vedessä.
Laitteen säilyttäminen puhdistamattomana saattaa aiheuttaa vaurioita, värimuutoksia,
syöpymistä, outoa hajua tai vesitiiviyden heikentymistä.
9
VQT4X90
Check the accessories before using this unit.
Keep the accessories out of reach of children to prevent swallowing.
Product numbers correct as of January 2013. These may be subject to change.
Accessories
Earhook*
VYK6C87
(Including Adjuster
(Small))
Adjuster (Large)
Adjuster (Large): VGQ1L74
Adjuster (Small): VGQ1L38
Armband Case
Extended Band
VFC4920
USB cable
K2KYYYY00221
CD-ROM
Software
CD-ROM
Operating Instructions
VFF1187
* Join the earhook parts together before
use.
Slide the adjuster (small) A into the opening
beneath the tabs B and C and push it in until
it clicks into place.
Optional accessories
Multi Mount (VW-MKA100)
HX-A100_VQT4X90_mst.book 9 ページ 2013年1月22日 火曜日 午後8時8分
Varusteet
Tarkista varusteet ennen laitteen käyttämistä.
Pidä varusteet poissa lasten ulottuvilta tukehtumisvaaran välttämiseksi.
Tuotenumerot ovat peräisin tammikuulta 2013, niihin voi tulla muutoksia.
Korvakoukku*
VYK6C87
(mukaan lukien sovitin (pieni))
Sovitin (suuri)
Sovitin (suuri): VGQ1L74
Sovitin (pieni): VGQ1L38
Käsivarsihihna
VFC4920
USB-johto
K2KYYYY00221
CD-ROM
Ohjelmisto
CD-ROM
Käyttöohjeet
VFF1187
* Yhdistä korvakoukun osat toisiinsa
ennen käyttämistä.
Työnnä pieni sovitin aukkoon kielekkeiden
ja alle. Työnnä, kunnes se napsahtaa
paikalleen.
A
B C
Lisävarusteet
Monitoimikiinnike (VW-MKA100)
10
VQT4X90
About recording formats and compatibility of this unit
This unit is an MP4 format (MPEG-4 AVC file standard) Wearable Camera for recording high-
definition motion pictures.
AVCHD and MPEG2 motion pictures are different formats, and are not therefore supported by
this unit.
About the portrait rights
Be sure to pay special attention to the privacy, the portrait rights, etc. of the subject when you use
this unit. Use it at your own risk.
About the clock setting
Make sure to set date and time before recording. (l 22)
For the purposes of these Operating Instructions
Pictures may be slightly different from the original.
Depending on the firmware version you are using, captured screens described in these operating
instructions may differ from the actual screens.
Names, icons, contents and services of applications may be changed with no prior notice. Please
note that they may differ from the descriptions of these operating instructions.
microSD Memory Card and microSDHC Memory Card are referred to as the “microSD card”.
Smartphone and tablet computer are referred to as the “smartphone”.
Pages for reference are indicated by an arrow, for example: l 00
Cards that you can use with this unit
microSD Memory Card and microSDHC Memory Card
Read this first
Indemnity about recorded content
Panasonic does not accept any responsibility for damages directly or indirectly due to any type
of problems that result in loss of recording or edited content, and does not guarantee any
content if recording or editing does not work properly. Likewise, the above also applies in a case
where any type of repair is made to this unit.
HX-A100_VQT4X90_mst.book 10 ページ 2013年1月22日 火曜日 午後8時8分
Lue tämä ensin
n Tallennusmuodot ja laitteen yhteensopivuus
Tämä laite tallentaa suuren erottelukyvyn liikkuvaa kuvaa MP4-muodossa (MPEG-4 AVC).
AVCHD ja MPEG2 ovat erilaisia tiedostomuotoja. Ne eivät ole yhteensopivia laitteen kanssa.
n Kuvattavien henkilöiden oikeudet
Kun käytät laitetta, kiinnitä huomiota kuvattavien kohteiden oikeuksiin. Käytä laitetta omalla
vastuullasi.
n Tallennetun sisällön säilyminen
Panasonic ei vastaa vahingoista, jos tallennettua tai muokattua sisältöä katoaa. Panasonic ei
takaa, että sisältö toimii oikein. Sama koskee laitteeseen tehtävien korjausten seurauksia.
n Kellonajan asettaminen
Aseta päivämäärä ja kellonaika ennen tallentamista. (¨ 22)
n Käyttöohjeiden tarkoitus
Kuvat eivät välttämättä vastaa alkuperäisiä kohteita täydellisesti.
Jos käytät toista laiteohjelmistoversiota, tässä käyttöohjeessa näkyvät näyttökuvat eivät välttämättä
vastaa todellisia näyttöjä täydellisesti.
Nimiä, kuvakkeita, sisältöä ja palveluita voidaan muuttaa ilman ennakkoilmoitusta. Huomaa, että
sisältö voi olla erilainen kuin käyttöohjeessa kuvattu.
microSD- ja microSDHC-muistikorteista käytetään nimitystä microSD-kortti.
Älypuhelimista ja tablet-laitteista käytetään älypuhelin-nimitystä.
Lisätietoja sisältäviin sivuihin viitataan nuolella. Esimerkki: ¨ 00
n Tämän laitteen kanssa yhteensopivat kortit
microSD-muistikortti ja microSDHC-muistikortti
10
VQT4X90
About recording formats and compatibility of this unit
This unit is an MP4 format (MPEG-4 AVC file standard) Wearable Camera for recording high-
definition motion pictures.
AVCHD and MPEG2 motion pictures are different formats, and are not therefore supported by
this unit.
About the portrait rights
Be sure to pay special attention to the privacy, the portrait rights, etc. of the subject when you use
this unit. Use it at your own risk.
About the clock setting
Make sure to set date and time before recording. (l 22)
For the purposes of these Operating Instructions
Pictures may be slightly different from the original.
Depending on the firmware version you are using, captured screens described in these operating
instructions may differ from the actual screens.
Names, icons, contents and services of applications may be changed with no prior notice. Please
note that they may differ from the descriptions of these operating instructions.
microSD Memory Card and microSDHC Memory Card are referred to as the “microSD card”.
Smartphone and tablet computer are referred to as the “smartphone”.
Pages for reference are indicated by an arrow, for example: l 00
Cards that you can use with this unit
microSD Memory Card and microSDHC Memory Card
Read this first
Indemnity about recorded content
Panasonic does not accept any responsibility for damages directly or indirectly due to any type
of problems that result in loss of recording or edited content, and does not guarantee any
content if recording or editing does not work properly. Likewise, the above also applies in a case
where any type of repair is made to this unit.
HX-A100_VQT4X90_mst.book 10 ページ 2013年1月22日 火曜日 午後8時8分
11
VQT4X90
You can enjoy a variety of functions by connecting this unit to a smartphone or an access point.
For detail, refer to the Operating Instructions. (PDF format)
*1 Once you make the settings, you can perform a live broadcast with only the button operation on
this unit from the next time on.
*2 The functions available for the direct connection to the smartphone are also available for the
connection via an access point.
*3 You can record motion pictures or still pictures without connecting to the smartphone.
What you can do with this unit
Image
App
USTREAM
LUMIX CLUB
XXXXX
XXXXX XXXXX
Live broadcasting
*1
Using the “LUMIX CLUB” and
USTREAM services, you can
broadcast live motion pictures.
Playback on DLNA-compatible
devices
You can play back the contents stored in
this unit on the DLNA-compatible
devices.
Live view
Remote control
Playback
Deletion/Copy
Data uploading to web
services
Recording
*3
Facebook
YouTube™, etc.
DLNA-compatible devices
Connecting to Access Point
Connecting direct to the
smartphone
*2
HX-A100_VQT4X90_mst.book 11 ページ 2013年1月22日 火曜日 午後8時8分
Tämän laitteen toiminnot
Käytettävissäsi on erilaisia toimintoja, kun yhdistät laitteen älypuhelimeen tai lähiverkon
yhteyspisteeseen. Lisätietoja on PDF-muotoisessa käyttöohjeessa.
Yhteensopivat DLNA-laitteet
Sovel-
lus
Yhdistäminen
yhteyspisteeseen
Yhdistäminen suoraan
älypuhelimeen
*2
Tallennus
*3
Toisto yhteensopivien DLNA-laittei-
den avulla
Voit toistaa tämän laitteen sisältöä DL-
NA-yhteensopivien laitteiden avulla.
Live-lähetykset
*1
Voit lähettää live-kuvaa LUMIX
CLUB- ja USTREAM-palvelui-
den avulla.
Live-kuva
Kaukosäädin
Toisto
Poistaminen/kopioiminen
Tietojen lataaminen web-palve-
luihin
Facebook
Esimerkiksi
YouTube™
*1 Kun määrität tämän asetuksen, voit lähettää live-kuvaa yhtä painiketta painamalla.
*2 Toiminnot, jotka saadaan käyttöön yhdistettäessä suoraan älypuhelimeen, saadaan käyttöön
myös yhdistettäessä yhteyspisteeseen.
*3 Voit tallentaa videoleikkeitä tai valokuvia ilman laitteen kytkemistä älypuhelimeen.
12
VQT4X90
When removing the camera/main unit from the Armband Case, avoid pulling the camera/main
unit connection cable.
You can use an optional Multi Mount (VW-MKA100) for a variety of scenes.
Preparation
Wearing this unit
Wear the main unit and camera unit.
If you have felt discomfort after a long period of use,
stop the use or loosen the tight fit by slightly
loosening the adjuster, etc.
For the direction of the camera, check the actual
image on the Live view screen.
Preparation
Main unit
Camera unit
Fastening the main unit using the Armband Case
1 Insert so that you can see the
buttons on the main unit.
2 If the band is not long enough,
attach the extended band C.
A: Hook and loop fastener
Attach by passing the tip of the armband
through the buckle portion B of the extended
band.
3 Fasten to your arm.
When fastening the main unit, try not to drop
the camera unit to avoid a shock and try not
to scratch the lens.
About the Armband Case
The Armband Case can be used as a portable
holder.
When fastening to your arm, remove the
camera unit from the armband case.




HX-A100_VQT4X90_mst.book 12 ページ 2013年1月22日 火曜日 午後8時8分
Laitteen käyttäminen
Valmistelu
Pääyksikön ja kameran käyttäminen.
Jos olosi muuttuu epämukavaksi, kun käyttö on
jatkunut pitkään, keskeytä käyttö tai löysennä
esimerkiksi sovitinta.
Näet kameran suunnan tarkistamalla Live-näytössä
näkyvän kuvan.
Kamera
Pääyksikkö
Pääyksikön kiinnittäminen käsivarteen
1
3
2
Aseta pääyksikkö siten, että
näet sen painikkeet.
Kiinnitä käsivarteen.
Jos hihna ei ole riittävän pitkiä,
kiinnitä siihen jatkohihna .
Koukku ja silmukkakiinnitin
Kiinnitä työntämällä käsivarsihihnan
jatkohihnan kärki soljen osan läpi.
Kun kiinnität pääyksikön, älä pudota kameraa
ja vältä naarmuttamasta objektiivia.
Kun irrotat kameran/pääyksikön käsivarsikotelosta, vältä pujottamasta kameraa/pääyksikköä
liitosjohdon alta.
Voit käyttää myös lisävarusteena hankittavaa monitoimikiinnikettä (VW-MKA100).
Kun kiinnität sen käsivarteen, irrota kamerayk-
sikkö käsivarsikotelosta.
n Käsivarsikotelo
Käsivarsikotelo toimii kannettavana telineenä.
A
C
B
13
VQT4X90
Do not touch the lens or pull the cable while attaching or removing.
When you adjust the adjuster, do so slowly without applying too much force.
If the adjustment knob comes off, attach it as indicated
in the right figure.
Attaching the camera unit to the earhook to wear
1 Insert the camera unit until it
clicks into place.
Insert so that the projecting part A of the
camera will face up.
2 Loosen the camera/main unit
connection cable B to the
shape of an ear, and fit it in the
holder C.
3 Hook the earpieces D to ears
so that the camera unit will be
positioned on the left, and
adjust the size.
Adjust by slowly pulling the adjuster E
sideways.
If you adjust in such a way that the camera
unit comes into close contact with the cheek,
you can record less blurry images.
4 Hold the camera attachment
portion F
, and adjust the
direction of the lens.
If the direction of the lens cannot be changed,
loosen the adjustment knob G slightly and
tighten it after adjusting the direction of the
lens.
If the camera unit is shaky, tighten the
adjustment knob G.
How to remove the
camera
Hold the camera attachment
portion as shown in the figure,
and remove the camera unit in
the direction of the arrow.
How to attach the adjuster (Large)
(supplied)
When the earhook is too tight,
remove the adjuster of the earhook,
and replace it with the supplied
adjuster (Large).
1 Press H in the direction
of the arrow using the
supplied adjuster (Large)
to pull out the attached adjuster.
2 Insert the both side of supplied adjuster
(Large) until it clicks into place. (l 9)
UP
L


UP
L




UNLOCK
LOCK
PUSH

HX-A100_VQT4X90_mst.book 13 ページ 2013年1月22日 火曜日 午後8時8分
2 Kiinnitä mukana toimitetun suuren sovittimen molem-
mat puolet, kunnes se napsahtaa paikalleen. (¨ 9)
1
3
2
4
Kiinnitä kamera siten, että se
napsahtaa paikalleen.
Kiinnitä korvakappaleet
korviin siten, että kamerayksik-
kö tulee vasemmalle puolelle.
Säädä koko sopivaksi.
Löysennä kameran/pääyksikön
liitosjohto mukautumaan
korvan muotoon. Kiinnitä se
pitimeen .
Tartu kameran kiinnitysosaan
ja säädä objektiivin suunta.
Aseta kamera siten, että sen ulos työntyvä osa
osoittaa ylöspäin.
Säädä vetämällä sovitinta hitaasti sivusu-
unnassa.
Kun kamerayksikkö on lähempänä poskeasi,
kuvasta tulee selkeämpää.
n Kameran
irrottaminen
Pitele kameran kiinnitysosaa
kuvassa näkyvällä tavalla. Irrota
kamerayksikkö nuolen suuntaan.
n Suuren sovittimen yhdistäminen
(toimitettu mukana)
Jos korvakoukku on liian tiukka, irrota
korvakoukun sovitin ja vaihda sen
tilalle mukana toimitettu suuri sovitin.
1 Paina nuolen suuntaan käyt-
tämällä mukana toimitettua suurta
sovitinta. Vedä sovitin irti.
Jos objektiivin suuntaa ei voi muuttaa,
löysennä säätönuppia . Kiristä se, kun olet
säätänyt objektiivin suunnan.
Jos kamerayksikkö tärisee, kiristä säätönuppia
.
A
E
G
G
H
B
D
F
Kamerayksikön kiinnittäminen korvakoukkuun
AUKI
LUKITTU
PAINA
YLÖS
YLÖS
C
Älä koske objektiiviin tai vedä johdosta, kun yhdistät tai irrotat.
Säädä sovitinta hitaasti. Älä käytä liikaa voimaa.
Jos säätönuppi irtoaa, kiinnitä se oikeanpuoleisessa kuvas-
sa näkyvällä tavalla.
14
VQT4X90
Charging the battery
This unit has a built-in rechargeable lithium-ion battery. Do not remove except when
disposing of this unit. (l 26)
The battery will not be charged if this unit is turned on. Connect it with the PC to charge
the battery after turning it off.
It is recommended to charge the battery in a temperature between 10 oC and 30 oC.
A: LOCK switch
B: USB cable (supplied)
C: Unlocked when the red indicator is visible
1 Slide A to the left to unlock the side cover and slide the side cover
downward to open it.
2 Connect the USB terminal of this unit to a PC with the USB cable B
(supplied).
Insert the USB cable securely all the way.
The Power lamp will flash red at an interval of 2 seconds (approximately 1 second on, 1 second
off), indicating that charging has begun.
It will turn off when the charging is completed.
Do not use any other USB cables except the supplied one. (Operation is not guaranteed with any
other USB cables.)
Do not heat or expose to flame.
Do not leave the unit (including built-in battery) in a car exposed to direct sunlight for a long
period of time with doors and windows closed.
If operating time is short even after fully charging the battery, the battery is worn out and needs to
be replaced. Please contact your dealer.
When the PC is in a power saving mode such as a standby state, the battery may not be charged.
Cancel the power saving mode, and connect this unit again.
Operation is not guaranteed when devices are connected through USB hubs or by using
extension cables.
Operation cannot be guaranteed on all devices having a USB terminal.
Power supply
When this unit is purchased, the battery is not charged. Charge the battery fully before
using this unit for the first time.
B
A
C
HX-A100_VQT4X90_mst.book 14 ページ 2013年1月22日 火曜日 午後8時8分
Yhdistä laitteen USB-liitäntä tietokoneen USB-liitäntään mukana
toimitetulla johdolla .
Virtalähde
Kun laite ostetaan, akkua ei ole ladattu. Lataa akku täyteen ennen sen käyttämistä ensim-
mäistä kertaa.
Laitteessa on sisäinen ladattava litiumioniakku. Irrota se vasta kun laite hävitetään. (¨ 26)
Akku ei lataudu, kun laitteeseen on kytketty virta. Lataa akku yhdistämällä laite tietokonee-
seen, kun siitä on sammutettu virta.
On suositeltavaa ladata akku lämpötilassa 10 °C – 30 °C.
AVAA
: Lukituskytkin
: USB-johto (sisältyy toimitukseen)
: Lukitus on avattu, kun punainen merkkivalo palaa.
A
B
B
C
1
2
Vapauta sivukannen lukitus siirtämällä vasemmalle. Avaa sivu-
kansi painamalla alaspäin.
Työnnä USB-liittimet tiukasti paikoilleen.
Kun lataaminen alkaa, virtamerkkivalo vilkkuu punaisena. Kun merkkivalo sammuu, akku on
latautunut.
Akun lataaminen
A
Älä yhdistä kameraan muuta USB-johtoa kuin sen mukana toimitettu. Muiden USB-johtojen
toimintaa ei taata.
Älä kuumenna tai altista liekeille.
Älä jätä laitetta ja sen sisäistä akkua aurinkoisella säällä suljettuun autoon pitkäksi aikaa, jos
ovet ja ikkunat on suljettu.
Jos akku tyhjenee nopeasti lataamisen jälkeen, se on tullut elinkaarensa päähän, joten se on
vaihdettava uuteen. Ota yhteys jälleenmyyjään.
Akku ei välttämättä lataudu, jos tietokone on esimerkiksi lepotilassa. Poista lepotila käytöstä ja
yhdistä laite tietokoneeseen uudestaan.
Latautuminen ei välttämättä onnistu, jos laitteet on yhdistetty USB-keskittimen avulla tai
käyttämällä jatkojohtoa.
Yhteensopivuutta kaikkien USB-liitännällä varustettujen laitteiden kanssa ei voida taata.
15
VQT4X90
Charging and recording time
Charging/Recording time
Temperature: 25 oC/humidity: 60%RH
These times are approximations.
The indicated charging time is for when the battery has been discharged completely.
Charging time and recordable time vary depending on the usage conditions such as high/
low temperature.
The actual recordable time refers to the recordable time when repeatedly starting/stopping
recording, turning this unit on/off, etc.
The main unit heats up after use or charging. This is not a malfunction.
The power lamp flashes (Flashing with approx. 0.5 second period) when the remaining battery
time becomes low. The remaining battery capacity is displayed on the screen when using Image
App (l 19).
For information about charging with a mobile USB charger or an AC adaptor, check the support
site.
http://panasonic.jp/support/global/cs/e_cam/index.html
(This site is English only.)
Flashing with approx. 0.5 second period (off for approx. 0.25 second, on for approx. 0.25 second):
Check that the USB terminals of this unit or the connecting device, such as PC are not dirty or
covered with a foreign object, and reconnect correctly. If a foreign object or dirt is present, turn off
this unit before removing.
The environment is at an extremely high or low temperature. Wait until the temperature has
returned to an appropriate level and try charging again. If you are still unable to charge, there may
be a fault in this unit or the connecting device.
Flashing with approx. 2 second period (off for approx. 1 second, on for approx. 1 second):
During charging normally (l 14)
Flashing with approx. 4 second period (off for approx. 2 seconds, on for approx. 2 seconds):
When the battery is over discharged or the temperature of the battery is too high or low. It can be
charged, but it may take a few hours to complete the charging normally.
It will flash in approx. 2 second intervals when normal charging resumes. Even in such cases, it
may start flashing in approx. 4 second intervals until charging is completed depending on the
conditions of use.
Charging time Recording mode
Maximum continuous
recordable time
Actual recordable
time
4h30min
1920
k
1080/50p 2 h 1 h
1920
k
1080/25p 2 h 30 min 1 h 15 min
1280
k
720/50p 2 h 20 min 1 h 10 min
1280
k
720/25p 2 h 45 min 1 h 25 min
640
k
360/25p 2 h 55 min 1 h 30 min
1920
k
1080/50fps 2 h 1 h
1280
k
720/100fps 2 h 15 min 1 h 10 min
640
k
360/200fps 2 h 30 min 1 h 15 min
The mains plug is the disconnecting device. Install this unit so that the mains plug can be
unplugged from the socket outlet immediately.
When the Power lamp is flashing during charging
HX-A100_VQT4X90_mst.book 15 ページ 2013年1月22日 火曜日 午後8時8分
Lataamis- ja tallennusaika
n Lataamis- ja tallennusaika
Lämpötila: 25 °C/kosteus: 60 % RH
Ajat ovat arvioita.
Latausaika on ilmoitettu täysin tyhjälle akulle. Lataus- ja tallennusaika voivat vaihdella
olosuhteiden, kuten lämpötilan mukaan.
Todellisessa tallennusajassa otetaan huomioon virrankulutus esimerkiksi tallentamisen
käynnistämisen ja keskeyttämisen sekä laitteen käynnistämisen ja sammuttamisen vuoksi.
Pääyksikkö lämpiää, kun sitä ladataan. Tämä ei ole toimintahäiriö.
Kun akun varaus on tyhjenemässä, virtamerkkivalo vilkkuu noin 0,5 sekunnin välein. Akun varauk-
sen määrä näkyy näytössä, kun käytössä on Image App (→ 19).
Lataamisesta USB-laturin tai muuntajan avulla on lisätietoja tukisivustolla.
http://panasonic.jp/support/global/cs/e_cam/index.html
(Vain englanniksi)
Vilkkuu noin 0,5 sekunnin jaksoissa (palaa noin 0,25 sekuntia, sammuksissa noin 0,25 sekuntia):
Tarkista, että laitteen tai tietokoneen kaltaisen lataavan laitteen USB-liitäntä ei ole likainen ja että
niissä ei ole vieraita esineitä. Yhdistä USB-liittimet tiukasti. Jos laitteen liitännässä on vieras esine
tai likaa, katkaise virta ennen sen poistamista.
Lämpötila on erittäin korkea tai matala. Odota, kunnes lämpötila on oikealla alueella. Yritä ladata
uudelleen. Jos lataaminen ei vieläkään onnistu, tässä tai lataavassa laitteessa voi olla vika.
Vilkkuu noin 2 sekunnin jaksoissa (palaa noin 1 sekuntia, sammuksissa noin 1 sekuntia):
Normaalin lataamisen aikana (→ 14)
Vilkkuu noin 4 sekunnin jaksoissa (palaa noin 2 sekuntia, sammuksissa noin 2 sekuntia):
Akku on ylilatautunut tai liian kuuma tai kylmä. Se voidaan ladata, mutta täyteen lataaminen voi
kestää useita tunteja.
Kun lataaminen muuttuu normaaliksi, merkkivalo vilkkuu noin 2 sekunnin välein. Tällöinkin se voi
alkaa vilkkua noin 4 sekunnin välein, kunnes akku on ladattu täyteen.
Virta katkaistaan irrottamalla pistoke. Aseta muuntaja tai laturi paikkaan, jossa pistokkeen voi
irrottaa pistorasiasta heti.
Latausaika Tallennustila
Pisin jatkuva
tallennusaika
Todellinen
alka
Jos virtamerkkivalo vilkkuu lataamisen aikana
16
VQT4X90
This unit can record motion pictures or still pictures to a microSD card.
Cards that you can use with this unit
Use microSD Memory Card (512 MB/1 GB/2 GB) or microSDHC Memory Card (4 GB/8 GB/
16 GB/32 GB) conforming to Class 4
*2
or higher of the SD Speed Class Rating
*1
for motion
picture recording.
Operation of microSD cards other than described above is not guaranteed.
*2 Use microSD cards conforming to Class 6 or higher of the SD Speed Class Rating for
“Slow motion mode”. If you use microSD cards conforming to Class 4 or less of that, the
recording may stop suddenly.
Keep the Memory Card out of reach of children to prevent swallowing.
Inserting/removing a microSD card
Caution:
Check that the access lamp A has gone off.
When this unit is accessing the microSD card (such as recognition, recording, playback and
deletion), the access lamp lights up.
C: Unlocked when the red indicator is visible
1 Slide the LOCK switch B to the left to unlock the side cover and
slide the side cover downward to open it and then insert (remove)
the microSD card into (from) the card slot.
Face the terminal side D upward and press it straight in as far as it will go.
Press the centre of the microSD card and then pull it straight out.
2
Close the side cover and slide the LOCK switch
B
to the right to lock it.
Close the side cover and slide it upward and then lock it.
Securely close it until it clicks.
Recording to a card
*1 SD Speed Class Rating is the speed standard regarding
continuous writing. Check via the label on the card, etc.
e.g.:
Please check the latest information on the support website below.
http://panasonic.jp/support/global/cs/e_cam/index.html
(This website is in English only.)
A
B
D
C
HX-A100_VQT4X90_mst.book 16 ページ 2013年1月22日 火曜日 午後8時8分
Tallentaminen korttille
Voit tallentaa tämän laitteen avulla videoleikkeitä tai valokuvia microSD-korttille.
Pidä muistikortit poissa lasten ulottuvilta tukehtumisvaaran välttämiseksi.
AVAA
Lukitus on avattu, kun punainen merkkivalo palaa.
Liittimien tulee osoittaa ylöspäin. Paina kortti pohjaan saakka.
Tartu microSD-kortin keskiosasta ja vedä se suoraan ulos.
Sulje sivukansi. Lukitse se työntämällä ylöspäin.
Sulje kansi siten, että se napsahtaa kiinni.
VAROITUS:
Varmista, että -merkkivalo ei pala.
Merkkivalo palaa, kun microSD-korttia käytetään esimerkiksi tallennukseen tai toistamiseen.
Tallenna videoleikkeitä microSD- (512 Mt/1 Gt/2 Gt) tai microSDHC-muistikorttiin (4 Gt/8
Gt/16 Gt/32 Gt), joka täyttää vähintään Class 4
*2
- tai SD Speed Class Rating
*1
-vaatimukset.
Muiden microSD-korttien toimintaa ei taata.
*1 SD Speed Class Rating on jatkuvan tallentamisen nopeusstandardi.
Se näkyy kortissa. Esimerkiksi:
*2 Jos kuvaat hidastettuna, käytä Class 6 -vaatimuksen täyttäviä tai
suuremman SD Speed Class Rating -luokituksen microSD-kortteja.
Jos käytät Class 4 -vaatimuksen täyttäviä hitaampia microSD-kortteja,
tallennus voi keskeytyä.
Tämän laitteen kanssa yhteensopivat kortit
microSD-kortin asettaminen paikoilleen ja irrottaminen
Lisätietoja on tukisivustolla.
http://panasonic.jp/support/global/cs/e_cam/index.html
(Vain englanniksi)
D
1 Vapauta sivukannen lukitus siirtämällä kytkin vasemmalle. Avaa
sivukansi painamalla sitä alaspäin. Aseta microSD-kortti korttipaik-
kaan tai irrota se korttipaikasta.
2 Sulje sivukansi. Lukitse se työntämällä kytkin oikealle.
B
B
A
17
VQT4X90
When the microSD card is removed, a notification sound rings, and the access lamp flashes fast.
(a state in which a microSD card is not inserted)
Do not touch the terminals on the back of the microSD card.
Do not apply strong shocks, bend, or drop the microSD card.
Electrical noise, static electricity or the failure of this unit or the microSD card may damage or
erase the data stored on the microSD card.
Do not expose the terminals of the microSD card to water, dirt or dust.
Do not place microSD cards in the following areas:
j In direct sunlight
j In very dusty or humid areas
j Near a heater
j Locations susceptible to significant difference in temperature (condensation can occur.)
j Where static electricity or electromagnetic waves occur
About disposing of or giving away the microSD card.
(Refer to the Operating Instructions (PDF format))
About the access lamp
When the access lamp is lit, do not:
j Remove the microSD card
j Turn this unit off
j Insert and remove the USB cable
j Expose this unit to vibrations or shock
Performing the above while the lamp is on may result in damage to data/microSD card or this
unit.
Press the power button to turn on this unit.
When using a microSD card not from Panasonic, or one previously used on other equipment, for
the first time on this unit, format the microSD card. When the microSD card is formatted, all of
the recorded data is deleted. Once the data is deleted, it cannot be restored.
Turn this unit on/off
The power lamp is turned on.
To turn off this unit
Hold down the power button until the power
lamp goes off.
Proceed to “Connecting directly with a
smartphone” (l 19) and “Setting up
with Setup Wizard” (l 21) to finish the
setup of this unit.
You can enjoy the functions of this unit
after finishing the setup.
HX-A100_VQT4X90_mst.book 17 ページ 2013年1月22日 火曜日 午後8時8分
Jos käytät muun kuin Panasonicin valmistamaa tai toisessa laitteessa käytettyä microSD-korttia,
alusta se ennen ensimmäistä käyttökertaa. Kun alustat microSD-kortin, kaikki tiedot poistetaan.
Poistettuja tietoja ei voi palauttaa.
Kun microSD-kortti irrotetaan, kuuluu äänimerkki ja merkkivalo välähtää sen merkiksi, että mi-
croSD-kortti ei ole paikallaan.
Älä koske microSD-kortin liittimiin.
Älä taivuta tai pudota microSD-korttia äläkä altista sitä voimakkaille iskuille.
Sähköinen kohina, staattinen sähkö tai laitteen tai microSD-kortin käyttövirhe voi aiheuttaa kortin
sisältämien tietojen vaurioitumisen tai pyyhkiytymisen pois.
Älä altista microSD-kortin liittimiä vedelle, lialle tai pölylle.
Älä aseta microSD-korttia
- suoraan auringonpaisteeseen
- erittäin pölyiselle tai kostealle alueelle
- lämmönlähteen lähelle
- paikkaan, jossa voi esiintyä voimakkaita lämpötilanvaihteluita, koska kosteus voi tiivistyä
- paikkaan, jossa esiintyy staattista sähköä tai sähkömagneettista säteilyä.
microSD-kortin hävittämisestä tai luovuttamisesta on lisätietoja PDF-muotoisessa käyttöohjeessa.
n Merkkivalo
Kun merkkivalo palaa, älä
– poista microSD-korttia
– katkaise laitteesta virtaa
– yhdistä tai irrota USB-johtoa
– altista laitetta tärinälle tai iskuille.
Muutoin tiedot, microSD-kortti tai tämä laite voivat vaurioitua.
Viimeistele laitteen asetusten määrit-
täminen jatkamalla seuraaviin lukuihin:
Yhdistäminen suoraan älypuhelimeen
(→ 19) ja Asetusten määrittäminen
ohjatun toiminnon avulla (→ 21).
Voit käyttää laitteen toimintoja, kun
asetukset on määritetty.
Virran katkaiseminen
Pidä virtapainike painettuna, kunnes
virtamerkkivalo sammuu.
Virran merkkivalo syttyy.
Käynnistä laite painamalla virtapainiketta.
Laitteen käynnistäminen ja
sammuttaminen
18
VQT4X90
Use this unit as a wireless LAN device
When using equipment or computer systems that require more reliable security than wireless LAN
devices, ensure that the appropriate measures are taken for safety designs and defects for the
systems used. Panasonic will not take any responsibility for any damage that arises when using the
camera for any purpose other than as a wireless LAN device.
Use of the Wi-Fi
®
function of this unit is presumed to be in countries
where this unit is sold
There is the risk that this unit violates the radiowave regulations if used in countries other than those
where this unit is sold, and Panasonic takes no responsibility for any violations.
There is the risk that data sent and received via radio waves may be
intercepted
Please note that there is the risk that data sent and received via radio waves may be intercepted by
a third party.
Do not use the camera in areas with magnetic fields, static electricity
or interference
Do not use this unit in areas with magnetic fields, static electricity or interference, such as near
microwave ovens. Radio waves may not reach the camera.
Using the camera near devices such as cordless telephones or any other wireless LAN device
that use the 2.4 GHz radio wave band may cause a decrease in performance in both devices.
Do not connect to the wireless network you are not authorised to use
Do not attempt to connect to the wireless networks that you are not authorised to use (SSID*) as it
may be considered as unauthorised access.
* SSID refers to the name of device that is used to identify a network over a wireless LAN
connection. If the SSID matches for both devices, transmission is possible.
Before use
To use a Wi-Fi function with this unit, you need an access point or destination device equipped with
a wireless LAN function.
Do not connect to the wireless LAN connection via unknow wireless access point.
Use a IEEE802.11b, IEEE802.11g or IEEE802.11n compatible device when using an access
point.
When using an access point, we strongly recommend that you set a encryption to maintain
information security.
Before sending motion pictures or still pictures, we recommend you charge the battery fully.
When sending data on a mobile network or tethering, high packet communication fees may be
incurred depending on the details of your contract.
This unit may not connect to an access point depending on the radio wave condition.
When using the Wi-Fi function, do not cover the Wi-Fi transmitter with your hand.
The Wi-Fi transmitter may become warm when using the Wi-Fi function; however this is not a sign
of a malfunction.
Wi-Fi
®
function
HX-A100_VQT4X90_mst.book 18 ページ 2013年1月22日 火曜日 午後8時8分
Wi-Fi
®
-toiminto
n Laitteen käyttäminen langattomana lähiverkkolaitteena.
Jos käytät laitteita tai tietokonejärjestelmiä, jotka edellyttävät tiukempaa tietoturvaa kuin lan-
gattomat lähiverkkolaitteet, varmista riittävät turvatoimet. Panasonic ei vastaa vahingoista, jotka
aiheutuvat kameran käyttämisestä muihin tarkoituksiin kuin langattomana lähiverkkolaitteena.
n Wi-Fi
®
-toiminto on tarkoitettu käytettäväksi maassa, jossa tämä laite
on myyty.
Jos laitetta käytetään muualla kuin sen ostomaassa, on mahdollista, että radiolähetyksiä koskevia
säännöksiä rikotaan. Panasonic ei vastaa seurauksista.
n Radioaaltojen avulla lähetetyt tiedot voivat joutua asiattomien haltuun.
Huomaa, että radioaaltojen avulla lähetetyt tiedot voivat joutua kolmannen osapuolen haltuun.
n Älä käytä kameraa alueilla, joilla esiintyy magneettisia kenttiä, staat-
tista sähköä tai häiriöitä.
Älä käytä kameraa alueilla, joilla esiintyy magneettisia kenttiä, staattista sähköä tai häiriöitä, kuten
mikroaaltouunin lähellä. Kamera ei ehkä pysty vastaanottamaan radioaaltoja tällaisessa paikassa.
Jos kameraa käytetään langattomien puhelinten tai muiden langattomien verkkolaitteiden lähellä,
jotka käyttävät 2,4 GHz:n aaltoaluetta, laitteiden teho saattaa heikentyä.
n Älä yhdistä laitetta langattomaan verkkoon, jonka käyttämiseen sinul-
la ei ole lupaa.
Älä yhdistä laitetta langattomaan verkkoon, jonka käyttämiseen sinulla ei ole lupaa (SSID-tunnus
puuttuu). Muutoin voi olla kyse luvattomasta käyttämisestä.
* SSID on langattoman lähiverkon tunnus. Verkon käyttäminen edellyttää, että SSID-tunnus on
tiedossa.
n Ennen käyttöä.
Tämän laitteen Wi-Fi-toimintojen käyttäminen edellyttää, että käytettävissä on langattoman verkon
yhteyspiste.
Älä muodosta yhteyttä langattomaan lähiverkkoon tuntemattoman yhteyspisteen kautta.
Muodosta yhteys IEEE802.11b-, IEEE802.11g- tai IEEE802.11n-yhteensopivaan laitteeseen.
On suositeltavaa salata liikenne yhteyspisteeseen.
Ennen videoleikkeiden tai valokuvien lähettämistä on suositeltavaa ladata akku täyteen.
Jos käytät matkaviestinverkkoa, siitä voi aiheutua kustannuksia.
Lisätietoja on liittymäsopimuksessasi.
Radioyhteyden ominaisuudet voivat estää tämän laitteen yhdistämisen yhteyspisteeseen.
Kun Wi-Fi-toimintoa käytetään, älä peitä Wi-Fi-antennia kädelläsi.
Kun Wi-Fi-toimintoa käytetään, Wi-Fi-lähetin voi kuumentua. Tämä on normaalia.
19
VQT4X90
Installing Image App
The Image App is an application for the smartphone provided by Panasonic.
The service may not be able to be used properly depending on the type of smartphone being
used. For compatible devices, see the following support site.
http://panasonic.jp/support/global/cs/e_cam/index.html (This Site is English only.)
1 Connect your device (Android or iOS) to a network.
2 Android device: Select “Play Store”.
iOS device: Select “App Store
SM
”.
3 Enter “Panasonic Image App” into the search box.
4 Select “Image App” and install it.
The icon will be added to the menu.
Connecting this unit with a smartphone
Please read the manual of your smartphone and check if the smartphone is compatible with WPS*.
If your smartphone is not compatible with WPS, connect this unit with the smartphone according
to “Selecting SSID of this unit to connect with a smartphone”. (l 20)
* WPS stands for “Wi-Fi Protected Setup
TM
”.
1 Press the Wi-Fi/WPS button continuously to
change the Wi-Fi mode lamp to [ ].
The Wi-Fi mode lamp [ ] flashes.
2 Set the Wi-Fi function to ON on the smartphone
setup menu.
Refer to the manual of your smartphone.
3 Press and hold the Wi-Fi/WPS button for 3 seconds or more.
The Wi-Fi mode lamp [ ] flashes faster.
4 Select the connection using the WPS button (or WPS function) in the
Wi-Fi settings of the smartphone within 3 minutes.
Wi-Fi mode lamp [ ] will turn on when the connection is completed.
Connecting directly with a smartphone
Required Operating Systems for Image App
The following Operating Systems of the smartphone are supported.
Android
TM
device:
iOS device:
Android 2.2 to Android 4.2
iOS 4.3 to iOS 6.0
Connecting with a WPS-compatible smartphone
HX-A100_VQT4X90_mst.book 19 ページ 2013年1月22日 火曜日 午後8時8分
Yhdistäminen suoraan älypuhelimeen
Image-sovelluksen asentaminen
Laitteen yhdistäminen älypuhelimeen
Image on Panasonicin älypuhelinsovellus.
Palvelu ei ehkä toimi oikein kaikissa älypuhelimissa.
Tukisivustolla on luettelo yhteensopivista laitteista:
http://panasonic.jp/support/global/cs/e_cam/index.html (Vain englanniksi)
Image-sovelluksen edellyttämä käyttöjärjestelmä
Tuetut älypuhelinten käyttöjärjestelmät:
Android™-laitteet: Android 2.2 – Android 4.2
iOS-laitteet: iOS 4.3 – iOS 6.0
Kuvake lisätään valikkoon.
Tarkista älypuhelimen käyttöohjeesta, onko puhelin WPS-yhteensopiva*.
Jos älypuhelimesi ei ole WPS-yhteensopiva, yhdistä laite älypuhelimeen Tämän laitteen SSID-
tunnuksen valitseminen älypuhelimeen yhdistämiseksi -kohdassa kuvatulla tavalla. (→ 20)
* WPS on lyhenne sanoista “Wi-Fi Protected Setup™”.
1 Pidä Wi-Fi/WPS-painiketta painettuna. Wi-Fi-ti-
lan merkkivalo palaa [q].
tilan merkkivalo [q] vilkkuu.
2 Ota Wi-Fi-toiminto käyttöön älypuhelimen
asetusvalikossa.
Lisätietoja on älypuhelimen käyttöohjeessa.
3 Pidä Wi-Fi/WPS-painiketta painettuna vähintään 3 sekuntia.
Wi-Fi-tilan merkkivalo [q] vilkkuu nopeammin.
4 Valitse yhteys käyttämällä älypuheminen Wi-Fi-asetusten WPS-
painiketta tai WPS-toimintoa 3 minuutin kuluessa.
Wi-Fi-tilan merkkivalo [q] palaa, kun yhteys on muodostettu.
1 Yhdistä laite (Android tai iOS) verkkoon.
2 Android-laitteet: Valitse Play Store.
iOS-laitteet: Valitse “App Store
SM
”.
3 Kirjoita hakuruutuun Panasonic Image App.
4 Valitse Image App ja asenna se.
Yhdistäminen WPS-yhteensopivaan älypuhelimeen
20
VQT4X90
Select this unit's SSID (Wireless network name) on a smartphone and enter password to connect
with the smartphone.
Change the default SSID and password after completing the first setting. (l 21)
1 Press the Wi-Fi/WPS button continuously to change
the Wi-Fi mode lamp to [ ].
The Wi-Fi mode lamp [ ] flashes.
2 Set the Wi-Fi function to ON on the smartphone
setup menu.
Refer to the manual of your smartphone.
3 Tap the SSID of this unit (below) on the Wi-Fi network screen of the
smartphone
.
Password entry screen is displayed.
4 Enter password (below).
Wi-Fi mode lamp [ ] will turn on when the connection is completed.
Wi-Fi mode and Wi-Fi mode lamp will turn off if this unit cannot be connected with the
smartphone in approx. 30 minutes. Retry the connection setting from the Step1.
If this unit and the smartphone are too far apart from each other when making the settings, the
connection may not be established. Move the devices closer to each other before making the
settings.
Even if you have changed the SSID/password, the default SSID/password (above) are restored
when you initialise the network settings. We recommend you keep this manual in a safe place.
Starting Image App
Start Image App.
When the [Date & time] screen appears, perform the clock setting. (l 22)
Selecting SSID of this unit to connect with a smartphone
Default setting
SSID:
Password:
A100-wearable
paR9We58n
HX-A100_VQT4X90_mst.book 20 ページ 2013年1月22日 火曜日 午後8時8分
Laitteen SSID-tunnuksen valitseminen älypuhelimeen yhdistämiseksi
Valitse laitteen SSID (langattoman verkon nimi) älypuhelimessa. Muodosta yhteys älypuhelimeen
kirjoittamalla salasana.
Vaihda oletus-SSID ja salasana ensimmäisen käyttökerran jälkeen. (→ 21)
Jos laite ei voi muodostaa yhteyttä älypuhelimeen noin 30 minuutin kuluessa, Wi-Fi-tila poistuu
käytöstä ja Wi-Fi-merkkivalo sammuu. Yritä muodostaa yhteys uudelleen vaiheesta 1 alkaen.
Jos tämä laite ja älypuhelin ovat liian kaukana toisistaan, yhteys ei ehkä muodostu. Siirrä laitteet
lähemmäs toisiaan.
Vaikka olet vaihtanut SSID-tunnuksen ja salasanan, yllä näkyvä SSID ja salasana otetaan
käyttöön, kun alustat verkon asetukset. On suositeltavaa säilyttää tämä käyttöohje turvallisessa
paikassa.
Image-sovelluksen käynnistäminen.
Kun [Date & time] -ikkuna tulee näkyviin, aseta kello aikaan. (→ 22)
1 Pidä Wi-Fi/WPS-painiketta painettuna. Wi-Fi-tilan
merkkivalo palaa: [q].
Wi-Fi-tilan merkkivalo [q] vilkkuu.
2 Ota Wi-Fi-toiminto käyttöön älypuhelimen asetusva-
likossa.
Lisätietoja on älypuhelimen käyttöohjeessa.
3 Napauta laitteen alla näkyvää SSID-tunnusta älypuhelimen Wi-Fi-
verkkoruudussa.
Salasanan syöttönäyttö tulee näkyviin.
4 Kirjoita alla näkyvä salasana.
Wi-Fi-tilan merkkivalo [q] palaa, kun yhteys on muodostettu.
Oletusasetus
SSID: A100-wearable
Salasana: paR9We58n
Image-sovelluksen käynnistäminen
25
VQT4X90
microSD cards are only mentioned with their main memory size.
The default setting is [1920k1080/25p] Mode.
The stated times are the approximate recordable times for continuous recording.
The recordable time may be reduced if recording with a lot of action is recorded or recording of
short scene is repeated.
Maximum continuously recordable time: 6 hours
The recording is paused once when the continuous recording time exceeds 6 hours, and the
recording will automatically resume after a few seconds.
A: Favours image quality, B: Favours Recording time
Slow motion mode
The number of recordable pictures depends on the subject being recorded.
Others
Recordable time/Number of recordable pictures
Recording modes/approximate recordable time
Normal shooting
mode
Picture size/
Frame rate
1920k1080/
50p
1920k1080/
25p
1280k720/
50p
1280k720/
25p
640k360/25p
Transfer rate (VBR)
Max.28 Mbps Average 15Mbps Average 15Mbps Average 9Mbps Average 3Mbps
microSD card
4 GB 19 min 35 min 35 min 1 h 3 h
8 GB 40min 1h10min 1h10 min 2h 6h
16 GB 1h20min 2h20min 2h20min 4h10min 12h
32 GB 2h40min 4h40min 4h40min 8h20min 25h
Picture size/
Frame rate
1920k1080/50fps 1280k720/100fps 640k360/200fps
Transfer rate (VBR)
Average 15Mbps Average 9Mbps Average 3Mbps
microSD card
4 GB 15 min 13 min 21 min
8 GB 30 min 27 min 45 min
16 GB 1h 55min 1h30min
32 GB 2h 1h50min 3h
Approximate number of recordable pictures
Picture size
microSD card
4 GB 8 GB 16 GB 32 GB
5.3M (3072k1728) 1100 2200 4500 8500
3M (2304k1296)
1600 3400 6500 13500
Oth ers
HX-A100_VQT4X90_mst.book 25 ページ 2013年1月22日 火曜日 午後8時8分
Tallennusaika ja valokuvien määrä
Muut toiminnot
Tallennustilat / arvio tallennusajasta
Tallennettavien kuvien määrä (arvio)
microSD-korttien kapasiteettina ilmoitetaan vain niiden pääasiallinen koko.
Kuvattava aihe vaikuttaa tallennettavien kuvien määrään.
Oletusasetus on [1920k1080/25p].
Ilmoitettu aika on arvio tallennusajasta, kun tallennetaan jatkuvasti.
Tallennusaika voi olla lyhyempi, jos toimintoja käytetään ahkerasti tai jos tallennetaan useita lyhyitä
videoleikkeitä.
Pisin jatkuva tallennusaika: 6 tuntia
Tallennukseen tulee tauko, jos jatkuva tallennusaika ylittää 6 tuntia. Tallennusta jatketaan au-
tomaattisesti muutaman sekunnin kuluttua.
Kuvan laatua painotetaan. Tallennusaikaa painotetaan.
Normaali
kuvaustila
Hidastustila
Kuvakoko/
ruutunopeus
Bildeformat/
Antall
Enintään 28 Mt/s
Keskiarvo 15 Mt/s Keskiarvo 9 Mt/s Keskiarvo 3 Mt/s
Keskiarvo 15 Mt/s Keskiarvo 15 Mt/s Keskiarvo 9 Mt/s Keskiarvo 3 Mt/s
Kuvakoko/
ruutunopeus
microSD-
kortti
Siirtonopeus (VBR)
A B
Siirtonopeus (VBR)
microSD-
kortti
microSD-kortti
Kuvakoko
  • Page 1 1
  • Page 2 2
  • Page 3 3
  • Page 4 4
  • Page 5 5
  • Page 6 6
  • Page 7 7
  • Page 8 8
  • Page 9 9
  • Page 10 10
  • Page 11 11
  • Page 12 12
  • Page 13 13
  • Page 14 14
  • Page 15 15
  • Page 16 16
  • Page 17 17
  • Page 18 18
  • Page 19 19
  • Page 20 20
  • Page 21 21
  • Page 22 22
  • Page 23 23
  • Page 24 24
  • Page 25 25
  • Page 26 26
  • Page 27 27
  • Page 28 28
  • Page 29 29
  • Page 30 30
  • Page 31 31
  • Page 32 32
  • Page 33 33
  • Page 34 34
  • Page 35 35
  • Page 36 36
  • Page 37 37
  • Page 38 38
  • Page 39 39
  • Page 40 40
  • Page 41 41
  • Page 42 42
  • Page 43 43
  • Page 44 44
  • Page 45 45
  • Page 46 46
  • Page 47 47
  • Page 48 48
  • Page 49 49
  • Page 50 50
  • Page 51 51
  • Page 52 52
  • Page 53 53
  • Page 54 54
  • Page 55 55
  • Page 56 56
  • Page 57 57
  • Page 58 58
  • Page 59 59
  • Page 60 60
  • Page 61 61
  • Page 62 62
  • Page 63 63
  • Page 64 64
  • Page 65 65
  • Page 66 66
  • Page 67 67
  • Page 68 68
  • Page 69 69
  • Page 70 70
  • Page 71 71
  • Page 72 72
  • Page 73 73
  • Page 74 74
  • Page 75 75
  • Page 76 76
  • Page 77 77
  • Page 78 78
  • Page 79 79
  • Page 80 80
  • Page 81 81
  • Page 82 82
  • Page 83 83
  • Page 84 84
  • Page 85 85
  • Page 86 86
  • Page 87 87
  • Page 88 88
  • Page 89 89
  • Page 90 90
  • Page 91 91
  • Page 92 92
  • Page 93 93
  • Page 94 94
  • Page 95 95
  • Page 96 96
  • Page 97 97
  • Page 98 98
  • Page 99 99
  • Page 100 100
  • Page 101 101
  • Page 102 102
  • Page 103 103
  • Page 104 104
  • Page 105 105
  • Page 106 106
  • Page 107 107
  • Page 108 108
  • Page 109 109
  • Page 110 110
  • Page 111 111
  • Page 112 112
  • Page 113 113
  • Page 114 114
  • Page 115 115
  • Page 116 116
  • Page 117 117
  • Page 118 118
  • Page 119 119
  • Page 120 120
  • Page 121 121
  • Page 122 122
  • Page 123 123
  • Page 124 124

Panasonic HXA100E Pikaopas

Tyyppi
Pikaopas

muilla kielillä