Yamaha MOTIF 6 Omistajan opas

Tyyppi
Omistajan opas
1
TOOLS for MOTIF6/MOTIF7/MOTIF8
Installation Guide/Installationshandbuch/Manuel d’installation
SPECIAL NOTICES
The software and this Installation Guide are exclusive copyrights of Yamaha Corporation.
Use of the software and this guide is governed by the SOFTWARE LICENSING AGREEMENT which the purchaser fully agrees to upon breaking the
seal of the software packaging. (Please read carefully the AGREEMENT at the end of this guide before installing the application.)
Copying of the software or reproduction of this guide in whole or in part by any means is expressly forbidden without the written consent of the
manufacturer.
•Yamaha makes no representations or warranties with regard to the use of the software and documentation and cannot be held responsible for the
results of the use of this guide and the software.
Copying of the commercially available music data is strictly prohibited except for your personal use.
The company names and product names in this Installation Guide are the trademarks or registered trademarks of their respective companies.
Future upgrades of application and system software and any changes in specifications and functions will be announced separately.
BESONDERE HINWEISE
Dieses Programm und diese Installationsanleitung sind im Sinne des Urheberrechts alleiniges Eigentum der Yamaha Corporation.
Die Benutzung des Programms und dieser Anleitung unterliegt der SOFTWARE-LIZENZVEREINBARUNG, mit der sich der Erwerber durch Öffnen
des Siegels der Programmverpackung uneingeschränkt einverstanden erklärt. (Bitte lesen Sie die VEREINBARUNG am Ende dieser Anleitung vor
Installation der Anwendung sorgfältig durch.)
Das Kopieren der Software und die Reproduktion dieser Anleitung, in welcher Form auch immer, in Teilen oder als Ganzes, sind nur mit schriftlicher
Genehmigung des Herstellers erlaubt und sonst ausdrücklich verboten.
•Yamaha leistet keinerlei Garantie hinsichtlich der Benutzung des Programms und der zugehörigen Dokumentation und übernimmt keine
Verantwortung für die Ergebnisse der Benutzung dieser Anleitung oder des Programms.
Das Kopieren im Handel erhältlicher Musikdaten ist nur für Ihren Privatgebrauch zulässig und sonst streng untersagt.
Die in dieser Installationsanleitung erwähnten Firmen- und Produktnamen sind Warenzeichen bzw. eingetragene Warenzeichen der betreffenden
Firmen.
Zukünftige Aktualisierungen von Anwendungs- und Systemsoftware sowie jede Änderung der technischen Daten und Funktionen werden separat
bekanntgegeben.
REMARQUES PARTICULIERES
Les droits d’auteurs (copyright) de ce logiciel et de ce manuel d’installation appartiennent exclusivement à Yamaha Corporation.
•L’usage de ce logiciel et de ce manuel est défini par l’accord de licence auquel l’acheteur déclare souscrire sans réserve lorsqu’il ouvre le sceau de
l’emballage du logiciel. (Veuillez donc lire attentivement l’accord de licence du logiciel situé à la fin de ce manuel avant d’installer le logiciel.)
•Toute copie du logiciel et toute reproduction totale ou partielle de ce manuel, par quel moyen que ce soit, est expressément interdite sans l’autorisation
écrite du fabricant.
•Yamaha n’offre aucune garantie en ce qui concerne l’utilisation du logiciel et de la documentation. Yamaha ne peut en aucun cas être tenu responsable
des dommages éventuels résultant de l’utilisation de ce manuel et de ce logiciel.
•Toute copie de données musicales commercialisées est formellement interdite, sauf pour usage personnel.
Les noms des firmes et des produits apparaissant dans ce manuel d’installation sont des marques commerciales ou des marques déposées appartenant à
leurs détenteurs respectifs.
Les remises à jour du programme et du système ainsi que toute modification des caractéristiques et fonctions seront annoncées séparément.
EnglishDeutschFrançais
2
Important Notices about the CD-ROM
Data Types
This CD-ROM includes two types of data: application software and sampled audio data. Please refer to pages 4 (Windows) and 9 (Macintosh) for software
installation instructions, and page 14 for the audio contents.
These applications allow you to edit MOTIF data and transfer data between your computer and the MOTIF.
You can import the audio data from an audio CD player (or any CD playing/ripping function on your computer) to the MOTIF via its INPUT jacks. For detailed
information, refer to the MOTIF Owner’s manual.
The application software is contained on track 1 (as recognized on an audio CD player), and the sampled audio data is contained in the subsequent tracks.
Never attempt to play back track 1 (containing the application software) on an audio CD player. Doing so may result in damage to your hearing as well
as to your CD player/audio speakers.
Operating System (OS)
The applications in this CD-ROM are provided in versions for both Windows and Macintosh operating systems. The installation procedure and the applications
themselves differ depending on the operating system that you are using. Please refer to the appropriate installation instructions.
Windows Read page 4.
Macintosh Read page 9.
Media format
The MOTIF6/MOTIF7/MOTIF8 and the File Utility software are compatible with the following format media.
• MS-DOS • CD-ROM with ISO9660
n
The MOTIF and File Utility cannot copy contents of CD-ROM supplied with Yamaha A5000/4000/3000.
n
I
f a read-only file is copied to the Memory card in the MOTIF’s card slot or the SCSI device connected to the MOTIF, the file cannot be deleted from the MOTIF.
n
The MOTIF cannot directly read the contents of the included CD-ROM. The CD-ROM is intended for use only with a computer.
For Windows Users
Contents of the CD-ROM
The CD-ROM contains a variety of applications (with installers) and data in the following folders.
* Unfortunately, Yamaha makes no guarantee concerning the stability of these programs (marked with *) nor can it offer user support for them.
All the applications listed above are supplied with online/PDF manuals.All the applications listed above are supplied with online/PDF manuals.
•You can start the Voice Editor for MOTIF6/MOTIF7/MOTIF8 or File Utility software as either a stand-alone software or a plug-in application in the Open Plug-in Technology compatible application.
Refer to the owner’s manual of the client application (sequencer, etc.) for details on using the Voice Editor for MOTIF6/MOTIF7/MOTIF8 or File Utility as a plug-in software.
Folder Name Application Name Contents
Acroread_ Acrobat Reader* PDF (Portable Document Format) viewer. Enables you to view each PDF manual for the
applications.
Tools VEMOT_ Voice Editor for MOTIF6/MOTIF7/MOTIF8 Enables you to edit the MOTIF voices on your computer.
FU_ File Utility Enables you to manage files in the Memory card in the card slot on the MOTIF or in the SCSI
device connected to the MOTIF.
TWE YAMAHA Wave Editor TWE V2.3 Enables you to edit the audio (wave) data on your computer and transfer it between the computer
and the MOTIF.
USBdrv_ YAMAHA USB MIDI Drivesr (for Win 98, Me) Enables your computer to communicate with the MOTIF when your computer and the MOTIF
are connected using a USB cable.
USBdrv2k_ YAMAHA USB MIDI Driver
(for Win 2000, XP)
Enables your computer to communicate with the MOTIF when your computer and the MOTIF
are connected using a USB cable.
Seq_Demo Cubase VST/32 Demo Version* Demo version of the sequence software Cubase VST/32.
Folder Name File Name Contents
Remote Cubase Setup file for Cubase Contains settings for controlling Cubase on your computer from the MOTIF.
Logic Setup file for Logic Contains settings for controlling Logic on your computer from the MOTIF.
Sonar Setup file for SONAR/Cakewalk ProAudio Contains settings for controlling SONAR and Cakewalk on your computer from the MOTIF.
Voice List Normal Voice List Normal Voice List for the MOTIF
Drum Voice List Drum Voice List for the MOTIF
Performance List Performance List for the MOTIF
English
3
Using an Audio CD Player
Track 1:
Applications mentioned above; NEVER attempt to play back this track.
Never attempt to play back track 1 (containing the application software) o n an audio CD player. Doing so may result in damage to your hearing as well
as to your CD player/audio speakers.
Track 2 - 40:
Sampled audio data; prepared for recording on the MOTIF6/MOTIF7/MOTIF8.
About Open Plug-in Technology
You can start the Voice Editor for MOTIF or the File Utility software as either a stand-alone software or a plug-in application in the Open Plug-in Technology
compatible application.
Open Plug-in Technology (OPT) is a newly developed software format that allows control over MIDI devices from a music software sequencer. For example, this
allows you to start up and operate various parts of your music system, such as plug-in board editors, and mixing control editors – directly from an OPT-compatible
sequencer, without having to use each separately. This also makes it unnecessary to set MIDI drivers for each application, streamlining your music production
system and making all operations more convenient and seamless.
About the OPT Le
vels
The client application and its compatibility with OPT can be divided into three levels, as shown below.
Level 1
– OPT Panels provides basic support for opening and displaying OPT control panels that can transmit data via the clients’ external MIDI ports.
Typically this will allow basic hardware editor control panels to operate properly.
Level 2
OPT Processors provides support for real-time MIDI processors and panel automation. Typically this will allow both real-time and offline MIDI
effects (e.g. Arpeggiators, transposers etc.) to operate properly and supply automation to OPT panels.
Level 3
– OPT Views provides support for edit views and MIDI processors/panels that require direct access to client sequencer storage structures. Typically
this will allow sophisticated MIDI edit views to be supported (e.g. List editors, Auto Accompaniment, Data Checkers etc.).
OPT Level Implementation for the Voice Editor
This chart shows the OPT-compatibility of the Voice Editor for MOTIF.
n
Certain operations may not work as expected if there is no corresponding function in the client application (sequencer, etc.). The highest level of implementation for the client application is
indicated in the OPT logo (which appears along with the version information in the application).
OPT Level Implementation for the File Utility
This chart shows the OPT-compatibility of the File Utility.
n
Certain operations may not work as expected if there is no corresponding function in the client application (sequencer, etc.). The highest level of implementation for the client application is
indicated in the OPT logo (which appears along with the version information in the application).
OPT levels of the client application
Voice Editor for MOTIF operation
Operation support Operation limits
VIEWS (Level3) Yes None
PROCESSORS (Level2) Yes None
PANELS (Level1) Yes (with limitations) Bulk reception
OPT levels of the client application
File Utility operation
Operation support Operation limits
VIEWS (Level3) Yes None
PROCESSORS (Level2) Yes None
PANELS (Level1) No
English
4
Minimum System Requirements
The system requirements below may differ slightly depending on the particular
operating system.
Voice Editor for MOTIF6/MOTIF7/MOTIF8
OS:
Windows 95/98/Me/NT4.0/2000/
XP Home Edition/XP Professional
Computer:
166 MHz or higher;
Intel Pentium/Celeron processor
Available Memory:
32 MB or more
Hard Disk:
12 MB or more
Display:
640 x 480, High Color (16 bit)
File Utility
OS:
Windows 98/Me/2000/XP Home Edition/
XP Professional
Computer:
166 MHz or higher;
Intel Pentium/Celeron processor
Available Memory:
32 MB or more
Hard Disk:
6 MB or more
Display:
640 x 480, High Color (16 bit)
TWE V2.3
OS:
Windows 95/98/Me
Computer:
166 MHz or higher;
Intel Pentium/Celeron processor
Available Memory:
24 MB or more
Hard Disk:
Average access time 30 ms or less
Display:
800 x 600, 256 colors or more
USB MIDI Driver
OS:
Windows 98/Me/2000/XP Home Edition/
XP Professional
Computer:
166 MHz or higher;
Intel Pentium/Celeron processor
Available Memory:
32 MB or more
(64 MB or more is recommended)
Hard Disk:
2 MB or more
For details about the application software contained in the “Seq_Demo” folder,
refer to the owner’s manual of each software.
Software Installation
Uninstall (Removing the installed applictaion)
You can remove the installed applictaion software.
Select [START]
[Settings]
[Control Panel]
[Add/Remove
Programs]
[Install/Uninstall], then select the application to be
removed and click [Add/Remove...].
Follow the on-screen instructions to uninstall the application.
n
The button names or menus may differ depending on the computer OS.
Acrobat Reader
In order to view the electronic (PDF) manuals included with each application,
you’ll need to install Acrobat Reader.
n
If an older version of Acrobat Reader is installed on your PC, you’ll need to uninstall it
before proceeding.
1
Double-click on the “Acroread_” folder.
Four different language folders will be displayed.
2
Select the language you want to use and double-click on its folder.
The file “ar***.exe” file will be displayed. (“***” indicates the selected
language.)
3
Double-click on “ar***.exe.”
Acrobat Reader Setup Dialog box will be displayed.
4
Execute the installation by following the on-screen directions.
After installation is complete, the Acrobat folder appears on your PC (in
Program Files, as the default).
For information on using the Acrobat Reader, refer to the Reader Guide in the
Help menu.
USB MIDI Driver
To operate the MOTIF from your computer via USB, you’ll need to install the
appropriate driver software.
The USB-MIDI driver is software that transfers MIDI data back and forth
between sequence software and the MOTIF via a USB cable.
Windows 98/Me users See below.
Windows 2000 users See page 5.
Windows XP users See page 6.
Installing the driver on a Windows 98/Me
system
1 Start the computer.
2 Insert the included CD-ROM into the CD-ROM drive.
3 Make sure the POWER switch on the MOTIF is set to OFF and use the USB
cable to connect the USB terminal of the computer (or the USB hub) to the
USB terminal of the MOTIF. When the MOTIF is turned on, the computer
automatically displays the “Add New Hardware Wizard.” If the Add New
Hardware Wizard does not appear, click “Add New Hardware” in the
Control Panel.
n
For Windows Me users, check the radio button to the left of “Automatic search for a
better driver (Recommended)” and click [Next]. The system automatically starts
searching and installing the driver. Proceed to Step 8. If the system does not detect the
driver, select “Specify the location of the driver (Advanced)” and specify the CD-ROM
drive’s “USBdrv_” folder to install the driver.
1
2
Computer
MOTIF
USB cable
Driver
Sequence
Software
Windows 98
Windows Me
English
5
4 Click [Next].
The window below enables you to select the search method.
5 Check the radio button to the left of “Search for the best driver for your
device. (Recommended).” Click [Next]. The window below enables you to
select a location in which to install the driver.
6 Check the “CD-ROM drive” box and uncheck all other items. Click [Next].
n
The system may ask you to insert a Windows CD-ROM while it checks for the driver.
Specify the USBdrv_ directory of the CD-ROM drive (such as D:\USBdrv_\) and
continue the installation.
nWhen using the Windows 98, specify the USBdrv_ directory of the CD-ROM drive
(such as D:\USBdrv_\) and continue the installation.
7 When the system detects the driver on the CD-ROM and is ready for
installation, it displays the following screen.
Make sure that the “YAMAHA USB MIDI Driver” is listed, and click
[Next]. The system starts the installation.
8 When the installation is complete, the following screen appears. Click
[Finish].
n
Some computers may take about ten seconds to show this screen after the installation
is complete.
The driver has been installed.
Installing the driver on a Windows 2000
system
1 Start the computer and use the “Administrator” account to log into
Windows 2000.
2 Select [My Computer | Control Panel | System | Hardware | Driver Signing |
File Signature Verification], and check the radio button to the left of “Ignore
-Install all files, regardless of file signature” and click [OK].
3 Insert the included CD-ROM into the CD-ROM drive.
4 Make sure the POWER switch on the MOTIF is set to OFF and use the USB
cable to connect the USB terminal of the computer (or the USB hub) to the
USB terminal of the MOTIF. When the MOTIF is turned on, the computer
automatically displays the “Found New Hardware Wizard.” Click [Next].
5 Check the radio button to the left of “Search for a suitable driver for my
device. (Recommended).” Click [Next].
The window that appears enables you to select a location in which to install
the driver.
6 Check the “CD-ROM drives” box and uncheck all other items. Click [Next].
n
The system may ask you to insert a Windows CD-ROM while it checks for the driver.
Specify the “USBdrv2k_” directory of the CD-ROM drive (such as D:\USBdrv2k_\)
and continue the installation.
7 When the installation is complete, the system displays “Completing the
Found New Hardware Wizard.” Click [Finish].
n
Some computers may take about ten seconds to show this screen after the installation
is complete.
8 Restart the computer.
The driver has been installed.
Windows 98
Windows Me
English
6
Installing the driver on a Windows XP system
1 Start the computer.
2 Select [Start] [Control Panel].
If the control panel appears as shown below, click “Switch to Classic View”
in the upper left of the window.
All control panels and icons will be displayed.
3 Go to [System] [Hardware] [Driver Signing] [File Signature
Verification], and check the radio button to the left of “Ignore -Install all
files, regardless of file signature” and click [OK].
4 Click the [OK] button to close System Properties, and then click “X” in the
upper right of the window to close the Control Panel.
5 Insert the included CD-ROM into the CD-ROM drive.
6 Make sure the POWER switch on the MOTIF is set to OFF and use the USB
cable to connect the USB terminal of the computer (or the USB hub) to the
USB terminal of the MOTIF. When the MOTIF is turned on, the computer
automatically displays the “Found New Hardware Wizard.”
7 Check the radio button to the left of “Search for a suitable driver for my
device. (Recommended).” Click [Next].
The system starts the installation.
8 When the installation is complete, the system displays “Completing the
Found New Hardware Wizard.” Click [Finish].
n
Some computers may take about ten seconds to show this screen after the installation
is complete.
9 Restart the computer.
The driver has been installed.
Voice Editor, File Utility
Once you‘ve installed these software programs, you can use your computer to
edit the voices of the MOTIF as well as access and organize data stored to media
connected to the MOTIF (Memory card and SCSI devices).
1
Double-click on the “Tools” folder in the CD-ROM.
The “VEMOT_” folder, “FU_” folder and “TWE” folder will be displayed.
2
Double-click on the “VEMOT_” folder or “FU_” folder.
“setup.exe” file will be displayed.
3
Double-click on the “setup.exe” file.
The Voice Editor or the File Utility Tools setup dialog will be displayed.
4
Execute the installation by following the on-screen directions.
n
When installing the above software, make sure to install the MIDI Setup program first.
For details, refer to the each on-line Help or the each PDF owner’s manual.
TWE
With the TWE audio editing software, you can edit wave data directly on your
computer.
1 Double-click on the “TWE” folder.
Four different language folders will be displayed.
2 Select the language that you want to use and double-click on its folder.
The “YAMAHA TWE” folder will be displayed.
3 Copy the “YAMAHA TWE” folder onto the desktop of your computer.
For details on operation, refer to the PDF manual provided in the folder.
Setup Files for remote control of sequencing
software
To use these files, the appropriate sequencing software should be installed to
your computer.
Setup Files for Cubase
1 Start Cubase.
2 Select Option from the menu bar and select Setup in Remote Setup.
3 Set the value in the VST Remote window called up via step #2 as illustrated
below, and click the [OK] button.
n
If the MOTIF is connected to the computer via MIDI, set the port to 1.
4 Click the [EDIT] button in the Generic Remote window called up via
step#3.
5 Click the [Import] button in the Generic Remote Setup called up via step#4.
6 Select the Setup file for remote control of Cubase (Yamaha MOTIF
Remote.xml) in the dialog opened via step #5 and click the [Open] button.
7 Close the Generic Remote Setup window.
Remote: Generic Remote
Input: YAMAHA USB IN 0-3
Output: YAMAHA USB OUT 0-3
English
7
Preference File for Logic
1 Start Logic.
2 Select Key Commands... in Settings from the Option menu.
3 Select Import Key Commands... from the Option menu in the “Key
Commands” window called up via step #2.
4 In the dialog window called up via step #3, select a preference file for Logic
named “Logic32.prf” in the included CD-ROM and click [Open].
After importing the file, the following setup appears.
Please note that the Key Command settings are replaced with the selected
preference file.
Template for SONAR/SONAR2/Cakewalk
ProAudio (Installation)
1 Copy the template file from the CD-ROM to the folder where the SONAR/
SONAR2/Cakewalk ProAudio are installed.
2 Start SONAR/SONAR2/Cakewalk ProAudio.
3 Select Option from the menu bar and select Audio. The “Direct” Show
Audio (Cakewalk Direct Show Audio)” dialog will be displayed.
4 Set the text box Number of Aux Busses to 3 (default setting is 2.) and click
[OK].
The setup for loading a template has been installed.
Template for SONAR/SONAR2/Cakewalk
ProAudio (Importing)
1 Start SONAR/SONAR2/Cakewalk ProAudio.
2 Select “Open (SONAR)/New (Cakewalk)” from the File menu.
The Open/New Project File dialog will be displayed.
3 Select the “Cakewalk Template” from the “Files of type” menu (when you
are using the SONAR), then select “Yamaha MOTIF Synthesizer” from the
dialog list and click [OK].
The template will be imported and the three windows (Track window,
Control window, and Panel window) will be displayed.
The setup has been completed and you can control SONAR/SONAR2/
Cakewalk ProAudio from the MOTIF.
n
Select “MIDI Devices...” from the Option menu to open the MIDI Ports window. From
this window, set Input Ports to “YAMAHA USB IN 0-3.” If the MOTIF is connected
to the computer via MIDI, set Input Ports to 1 (for example, “IN 0-1”).
When you change the track structure from the template setting...
1 Click the [CONFIG] button in the Panel window (above).
2 Set the first track number of the MIDI tracks by using the [SET MIDI First
Track] knob.
When this template is used, the MIDI tracks should be arranged in numerical
order. Otherwise, you cannot control Cakewalk ProAudio from the MOTIF.
If you set the first track number to an unused track number, the knobs,
buttons, and sliders on the window may be grayed out. In this case, set the
first track number to the first available track containing data.
Pro Tools
The special setup file is not necessary for using Pro Tools. You can control Pro
Tools from the MOTIF by changing settings on the Pro Tools. The method for
setting up is the same as on the Macintosh. See page 11.
Cubase VST/32 Demo version
1 Double-click on the “Seq_Demo” folder.
The “Cubase” folder will be displayed.
2 Double-click on the “Cubase” folder.
The “Cubase_VST/32_Demo_50.exe” file will be displayed.
3 Double-click on the “Cubase_VST/32_Demo_50.exe” file.
4 Execute the installation by following the on-screen directions.
MIDI port setting
(when starting the software as
a stand-alone application)
Before setting the MIDI port on the Voice Editor or File Utility, you should set
the MIDI port from the MIDI SETUP toolbar.
n
When you start the Voice Editor or File Utility as a plug-in application in the Open Plug-in
Technology compatible application, refer to the the PDF manual for the respective
software.
1 Start the Voice Editor or File Utility.
2
Click the MIDI Setup button in the Toolbar called up via step #1.
3 In the MIDI Setup window called up via step#2, click the [] button at the
right end of each box and make the port settings as shown.
n
In order for MIDI ports to be available here, you’ll need to select the relevant MIDI
port within each application software (Voice Editor or File Utility). This is the port
that you’ll use in the various software. For details on setting the MIDI port, refer to the
on-line manual of each software.
MIDI Setup button
English
8
For Macintosh Users
Contents of the CD-ROM
The CD-ROM includes two folders: “International” and “Japanese.” Double-click on the “International” folder to open it. A variety of applications (with installers)
and data are contained in the following folders.
* Unfortunately, Yamaha makes no guarantee concerning the stability of these programs (marked with *) nor can it offer user support for them.
All the applications listed above are supplied with online/PDF manuals.
OMS® and are trademarks of Opcode Systems, Inc.
Using an Audio CD Player
Track 1: Applications mentioned above; NEVER attempt to play back this track.
Never attempt to play back track 1 (containing the application software) on an audio CD player. Doing so may result in damage to
your hearing as well as to your CD player/audio speakers.
Track 2 - 40: Sampled audio data; prepared for recording on the MOTIF6/MOTIF7/MOTIF8.
Folder Name Application Name Contents
ACROBATAcrobat Reader* PDF (Portable Document Format) viewer. Enables you to view each PDF manual for
the applications
OMS Open Music System (OMS)* Enables you to use several MIDI applications on the Mac OS.
OMS Setup for YAMAHA Contains the OMS Setup files for the Yamaha MOTIF.
USBdrv_ YAMAHA USB MIDI Driver Enables your computer to communicate with the MOTIF when your computer and the
MOTIF are connected using a USB cable.
Tools Voice Editor for MOTIF6/MOTIF7/MOTIF8 Enables you to edit the MOTIF voices on your computer.
File Utility Enables you to manage files in the Memory card in the card slot on the MOTIF or in the
SCSI device connected to the MOTIF.
YAMAHA Wave Editor TWE V2.3 Enables you to edit the audio (wave) data on your computer and transfer it between the
computer and the MOTIF.
Seq_Demo Cubase VST 5.0 Demo Version*
Logic Audio Platinum 4.6 Demo*
Demo version of the sequence software Cubase VST 5.0.
Demo version of the sequence software Logic Audio Platinum 4.6.
Folder Name File Name Contents
Remote Setup file for Cubase Contains settings for controlling Cubase on your computer from the MOTIF.
Setup file for Logic Contains settings for controlling Logic on your computer from the MOTIF.
Voice List Normal Voice List Normal Voice List for the MOTIF
Drum Voice List Drum Voice List for the MOTIF
Performance List Performance List for the MOTIF
English
9
Minimum System Requirements
The system requirements below may differ slightly depending on the particular operating system.
Voice Editor for MOTIF6/MOTIF7/MOTIF8
OS: Mac OS 8.6 through OS 9.22 (Mac OS X is not supported)
Computer: A Macintosh computer with a PowerPC or later CPU
Available Memory: 16 MB or more
Hard Disk: 40 MB or more
Display: 800 x 600, 32,000 colors or more
File Utility
OS: Mac OS 8.0 through OS 9.22 (Mac OS X is not supported)
Computer: A Macintosh computer with a PowerPC or later CPU
Available Memory: 6 MB or more
Hard Disk: 4 MB or more (except for OMS)
Display: 640 x 480, 256 colors or more
Other: OMS 2.3.8 (included in the CD-ROM in the package)
TWE V2.3
OS: Mac OS 7.6.1 through OS 9.22 (Mac OS X is not supported)
Computer: A Macintosh computer with a PowerPC or later CPU
Available Memory: 8 MB or more
Hard Disk: Average access time 30 ms or less
Display: 640 x 400, 256 colors or more
USB MIDI Driver
OS: Mac OS 8.5 through OS 9.22 (Mac OS X is not supported)
Computer: A Macintosh computer with a USB connector and a PowerPC or later CPU
Memory: 64 MB or more (128 MB or more is recommended)
nTurn off virtual memory.
Hard disk: 2 MB or more
Other: OMS 2.3.8 (included in the CD-ROM in the package)
Software Installation
Acrobat Reader
In order to view the electronic (PDF) manuals included with each application,
you’ll need to install Acrobat Reader.
1
Double-click on the “ACROBAT” folder.
Three different language folders will be displayed: English, German and
French.
2
Select the language you want to use and double-click on its folder.
“Reader Installer” will be displayed.
The Installer name may differ depending on the language you select.
3
Double-click on the “Reader Installer.”
Acrobat Reader Setup Dialog will be displayed.
4
Execute the installation by following the directions appearing on the screen.
After installation is complete, the Acrobat folder appears on your computer
(in Hard Disk, as the default).
For information on using the Acrobat Reader, refer to the Reader Guide in
the Help menu.
Open Music System (OMS) 2.3.8
OMS allows you to use several MIDI applications on the Mac OS at the same
time.
1 Double-click on the “OMS” folder (English version only).
“Install OMS 2.3.8” will be displayed.
2 Double-click on “Install OMS 2.3.8.”
OMS Setup Dialog will be displayed.
3 Execute the installation by following the on-screen directions.
After the installation, select “Restart.”
n
After the installation is complete, you may possibly encounter an error message
warning that the installer did not close. In this case, go to the “File” menu and select
“Quit” to close the installer. Then reboot the computer.
After restarting the Macintosh, you will find the “Opcode”/“OMS
Applications” folder on your computer (Hard Disk, as the default).
4 Copy the “OMS_2.3_Mac.pdf” in the CD-ROM to the “OMS Applications”
folder (drag-and-drop it to the folder).
Refer to the “OMS_2.3_Mac.pdf” (English version only) how to use the
application.
5 Copy the “OMS Setup for YAMAHA” in the CD-ROM to the “OMS
Applications” folder (drag-and-drop it to the folder).
In the “OMS Setup for YAMAHA” folder you will find the OMS Setup files
for the Yamaha tone generators, which can be used as templates.
English
10
USB MIDI Driver
To operate the MOTIF from your computer via USB, you’ll need to install the
appropriate driver software.
The USB-MIDI driver is software that transfers MIDI data back and forth
between sequence software and the MOTIF via a USB cable.
First install OMS before you install the USB-MIDI driver. Also, after installing
the driver, you will need to set up OMS (above).
1
Start the computer.
2
Insert the included CD-ROM into the CD-ROM drive. The system displays
the CD-ROM icon on the desktop.
3
Double-click the CD-ROM icon and double-click the “Install USB Driver”
icon in the “USBdrv_” folder to display the following installation screen.
4
The “Install Location” box displays the destination of the installation. If you
wish to change the destination disk or folder, use the [Switch Disk] button
and the pop-up menu to specify the desired destination.
n
This box usually displays the start-up disk as the destination.
5
Click the [Install] button. The system displays the following message: “This
installation requires your computer to restart after installing this software.
Click Continue to automatically quit all other running applications.” Click
[Continue].
n
To cancel the installation, click [Cancel].
6
The installation starts. If the driver has already been installed, you will
receive the following message. To return to step 3, press [Continue]. To
complete the installation, click [Quit].
7
When the installation is complete, the system displays the following
message: “Installation was successful. You have installed software which
requires you to restart your computer.” Click [Restart]. The computer
automatically restarts. You can locate the installed files in the following
locations:
System Folder | Control Panels | YAMAHA USB MIDI Patch
System Folder | Extensions | USB YAMAHA MIDI Driver
System Folder | OMS Folder | YAMAHA USB MIDI OMS Driver
Voice Editor, File Utility, MIDI Setup
Once you‘ve installed these software programs, you can use your computer to
edit the voices of the MOTIF as well as access and organize data stored to media
connected to the MOTIF (Memory card and SCSI devices).
1 Double-click on the “Tools” folder in the CD-ROM.
“Motif” folder and “TWE” folder will be displayed.
2 Double-click on the “Motif” folder.
“Install File Utility” and “Install Voice Editor for MOTIF6” file will be
displayed.
3 Double-click on the “Install File Utility” file.
The File Utility installation dialog will be displayed. Execute the installation
by following the on-screen directions.
4 After installing the File Utility, double-click on the “Install Voice Editor for
MOTIF6” file.
The Voice Editor installation dialog will be displayed. Execute the
installation by following the on-screen directions.
5 After installing, restart the computer.
For details, refer to the on-line Help or the PDF owner’s manual.
TWE
With the TWE audio editing software, you can edit wave data directly on your
computer.
1 Double-click on the “TWE” folder.
Four different language folders will be displayed.
2 Select the language that you want to use and double-click on its folder.
The “YAMAHA TWE” folder will be displayed.
3 Copy the “YAMAHA TWE” folder to the hard disk of your computer.
For details on how to use TWE, refer to the on-line manual provided in the
folder.
PLG 2
A
B
C
D
E
F
G
H
15
CATEGORY
SEARCH
OCTAVE
DOWN
UP
KNOB
CONTROL
FUNCTION
PAN
REVERB
CHORUS
TEMPO
ATTACK RELEASECUTOFF
RESONANCE
ASSIGN A ASSIGN B ASSIGN 1 ASSIGN 2
KN 1 KN 2 KN 3 KN 4
MEQ LOW
MEQ HI MIDMEQLOWMID MEQ HIGH
REMOTE
CONTROL
ON/OFF
EFFECT BYPASS
ARPEGGIO
INSERTION
SYSTEM
ON/OFF
MASTER
VOLUME
VOLUME 1 VOLUME 2 VOLUME 3 VOLUME 4
CS 1 CS 2 CS 3 CS 4
ZONE 1 ZONE 2 ZONE 3 ZONE 4
SEQ TRANSPORT
LOCATE
1
2
REC
MODE
VOICE PERFORM MASTER
SEQUENCER
SONG
PATTERN
FILE
INTEGRATED
SAMPLING
MIXING
UTILITY
EDIT
JOB
STORE
COMPARE
SCENE STORE
SET LOCATE
SONG SCENE
SF 1SF 2SF 3SF 4SF 5
F1 F2 F3 F4 F6F5
INFORMATION
DEC/NO INC/YES
EXIT
ENTER
EXECUTE
MUSIC
PRODUCTION
SYNTHESIZER
Integrated
Sampling
Sequencer
Real-timeExternalControl
Surface
Modular
SynthesisPlug-in
System
DRUM KITS
FAVORITES
SLOT 1 SLOT 2 SLOT 3
PRE 1
PRE 2
PRE 3
GM
USER PLG 1
PLG 3
A. PIANO
KEYBOARD
ORGAN
GUITAR/
PLUCKED
BASS
STRINGS
BRASS
REED/PIPE
SYN LEAD SYN PAD/
CHOIR
SYN COMP CHROMATIC
PERCUSSION
DRUM/
PERCUSSION
SE
MUSICAL FX COMBI
1
2
3
4
5
6
7
8
9
10
11
12
13
14
16
SECTION
TRACK
SELECT
MUTE
SOLO
BANK
GROUP
NUMBER
COMMON
ELEMENT/PERF.PART/ZONE
Computer
Sequence
Software
OMS
Driver
USB cable
MOTIF
English
11
Setup Files for remote control of sequencing
software
To use these files, the appropriate sequencing software should be installed to
your computer.
Setup Files for Cubase
Same as for Windows. See page 7.
Preference File for Logic
1
Start Logic.
2
Select Key Commands... in Settings from the Option menu.
3
Select Import Key Commands... from the Option menu in the “Key
Commands” window called up via step #2.
4
In the dialog window called up via step #3, select the preference file for
Logic named “Logic Preferences” in the included CD-ROM and click
[Open].
After importing the file, the following setup appears.
Please note that the Key Command settings are replaced with the preference
file.
Pro Tools
The special setup file is not necessary for using Pro Tools.
1
Select Peripherals... from the “Setup” menu.
2
Click the [MIDI Controllers] button in the “Peripherals” windows called up
via step #1.
The MIDI Controllers window appears and set as follows.
n
If the MOTIF is connected to the computer via MIDI, set the port to 1.
The setup has been completed and you can control Pro Tools from the
MOTIF.
Cubase VST 5.0 Demo version
1 Double-click on the “Seq_Demo” folder.
The “Cubase” folder will be displayed.
2 Double-click on the “Cubase” folder.
The “Cubase VST 5.0 DEMO Installer” will be displayed.
3 Double-click on the “Cubase VST 5.0 DEMO installer” file.
4 Execute the installation by following the on-screen directions.
Logic Audio Platinum 4.6 Demo
1 Double-click on the “Seq_Demo” folder.
The “Logic” folder will be displayed.
2 Copy the “Logic” folder to the hard disk on your computer.
Setting up OMS
The OMS studio setup file for the MOTIF is contained in the included CD-
ROM. This studio setup file is used for setting up OMS.
n
Before performing the following procedure, the OMS and USB MIDI Driver should be
installed.
1 Use a USB cable to connect the USB terminal of the computer (or the USB
hub) to the USB terminal of the MOTIF and turn the MOTIF’s power on.
2 Start the computer.
3 Insert the included CD-ROM into the CD-ROM drive of your Macintosh
computer. The CD-ROM icon appears on the desktop.
4 Double-click on the CD-ROM icon, “International”, “OMS”, and “OMS
Setup for YAMAHA.”
The two files “MOTIF-USB” and “MOTIF-USB_multi” appear. Copy these
to the hard disk on your computer.
5 Double-click on the “MOTIF-USB” or “MOTIF-USB_multi” file to start the
OMS Setup. Each studio setup file is as follows.
MOTIF-USB
This is used when connecting a single MOTIF to the computer and using
one port (up to 16 MIDI channels).
MOTIF-USB_multi
This is used when connecting several MOTIFs to the computer and using
up to eight ports (up to 128 MIDI channels). Note that one MOTIF can
handle up to three ports (up to 48 MIDI channels).
n
Use of a USB hub is necessary when several MOTIFs are connected to the computer.
nBe sure to select [MOTIF-USB_multi] when using the Remote Control function of the
MOTIF via the USB cable, since Port 3 is used in this case.
Type Receive From Send to #ch’s
#1 CS-10 YAMAHA USB IN 0-3 YAMAHA USB OUT 0-3 16
English
12
6 After starting the OMS Setup, the Studio setup file double-clicked in step #5
opens.
n
If “ ” is not indicated at the right of the setup file name, select “Make Current” from
the “File” menu and execute the save operation.
The OMS studio setup has been completed.
n
After the OMS studio setup above has been completed, your computer will recognize
only the MOTIF as a MIDI instrument. If you use another MIDI instrument in
addition to the MOTIF or you add a second MOTIF to the existing system, you should
create an original Studio Setup file. For details, refer to the on-line manual supplied
with the OMS.
nThe included OMS studio setup file may not function even if you follow the above
procedure, depending on your Macintosh/Mac OS version. (MIDI data cannot be
transmitted/received even if the setup becomes available.)
In this situation, connect your Macintosh to the MOTIF via the USB cable and follow
the procedure below to re-create the setup file.
1 Start OMS Setup and select “New Setup” from the “File” menu.
2 The “OMS Driver Search” dialog appears. Remove the check from the “Modem” and
“Printer” check boxes, and click [Search] to execute the device search.
If the Search operation has been completed successfuly, the [USB-MIDI] device is
displayed in the OMS driver setting dialog.
3 Click the [OK] button to search for ports. Port 1, Port 2 ... appears in the dialog.
Mark the appropriate checkbox of the port and click the [OK] button to store the
setting.
For details about how to use OMS, refer to “OMS2.3J_Manual.pdf” supplied
with OMS.
For Windows/
Macintosh Users
About USB Driver Setup
window
From this window, you can change the MIDI port number transmitted to the
MOTIF from the one set in the computer sequence software.
The default settings are as follows.
* This is actually the MIDI port number set from the MIDI/OTHER display in
the Utility mode.
Indicates this setup is available
When opening “MOTIF-USB_multi”:
Port number MIDI OUT terminal
(Thru Port number*)
MIDI IN terminal (Track
Port number)
1 MIDI OUT (1) MIDI IN (1)
2 MIDI OUT (2) MIDI IN (2)
3 MIDI OUT (3) MIDI IN (3)
4 MIDI OUT (4) -
5 MIDI OUT (5) -
6 MIDI OUT (6) -
7 MIDI OUT (7) -
8 MIDI OUT (8) -
English
13
Troubleshooting
The driver cannot be installed.
Is the USB cable connected correctly?
Check the USB cable connection.
Disconnect the USB cable, then connect it again.
[Windows] Is the USB function enabled on your computer?
When you connect the MOTIF to the computer for the first time, if the
“Add New Hardware Wizard” does not appear, the USB function on the
computer may be disabled. Perform the following steps.
1 Double-click “System” in the Control Panel to open the System
Properties window.
2 Double-click the “Device Manager” tab and make sure that no “!” or
“x” marks appear at “Universal serial bus controller” or “USB Root
Hub.” If you see an “!” or “x” mark, the USB controller is disabled.
For more information, refer to the owner’s manual of your computer.
[Windows] Is any unknown device registered?
If driver installation fails, the MOTIF will be marked as an “Unknown
device,” and you will not be able to install the driver. Delete the
“Unknown device” by following the steps below.
1 Double-click “System” in the Control Panel to open the System
Properties window.
2 Double-click the “Device Manager” tab. With the “View devices by
type” check box checked, look for “Other devices.”
3 If you find “Other devices,” double-click it to extend the tree to look
for “Unknown device.” If one appears, select it and click the
[Remove] button.
4 Remove the USB cable from the MOTIF, and make the connection
again.
5 Install the driver again.
When controlling the MOTIF from your computer
via USB, the MOTIF does not operate correctly or
no sound is heard.
Did you install the driver?
Is the USB cable connected correctly?
•Are the volume settings of the tone generator, playback device, and
application program set to the appropriate levels?
•Have you selected an appropriate port in the sequence software?
Check whether the MIDI IN/OUT setting in the Utility mode corresponds to
the actually used cable (USB or MIDI).
Playback response is delayed.
Does your computer satisfy the system requirements?
Is any other application or device driver running?
[Macintosh]
Turn off virtual memory.
Disable AppleTalk.
Cannot suspend or resume the computer correctly.
Do not suspend the computer while the MIDI application is running.
If you are using Windows 2000, you may not be able to suspend/resume
normally, depending on the particular environment (USB Host Controller,
etc.). Even so, simply disconnecting and connecting the USB cable will allow
you to use the MOTIF functions again.
How can I delete or re-install the driver?
[Windows Me/98]
1 When the MOTIF is recognized correctly, double-click “System” in
the Control Panel to open the System window.
2 Double-click the “Device Manager” tab, select “YAMAHA USB
MIDI Driver” and delete it.
3 Use the MS-DOS prompt or Explorer to delete the following three
files.
n
To delete these files using Explorer, select “Folder Options” from the
Tool (View) menu, and select “Show all files (and folders).”
• \WINDOWS\INF\OTHER\YAMAHAMOTIF6.INF
• \WINDOWS\SYSTEM\Xgusb.drv
• \WINDOWS\SYSTEM\Ymidusb.sys
4 Disconnect the USB cable.
5 Restart the computer.
6 Re-install the driver.
[Macintosh]
1 Delete the files in the following locations:
• System Folder | Control Panels | YAMAHA USB MIDI Patch
• System Folder | Extensions | USB YAMAHA MIDI Driver
• System Folder | OMS Folder | YAMAHA USB MIDI OMS
Driver
2 Restart the computer.
3 Install the driver and set up OMS.
English
2
Wichtige Hinweise zu CD-ROM
Datentypen
Diese CD-ROM enthält zwei verschiedene Datentypen: Anwendungssoftware und digitalisierte Audiodaten (Samples).
Informationen zur Software-Installation finden Sie auf den Seiten 4 (Windows) und 9 (Macintosh). Informationen über die enthaltenen Audiodaten finden Sie auf
Seite 14. Die Anwendungen erlauben Ihnen die Übertragung von Daten zwischen dem MOTIF und Ihrem Computer sowie die Bearbeitung der Daten auf dem
Computer.
Die Audiodaten können Sie mit Hilfe eines Audio-CD-Players (oder einer entsprechenden Abspiel- oder Ripping-Funktion Ihres Computers) über seine
Audioeingänge in den MOTIF importieren. Für weitere Informationen hierzu schlagen Sie bitte in der Bedienungsanleitung des MOTIF nach.
Die Anwendungssoftware befindet sich auf Track 1 (als solcher wird der Datentrack von einem Audio-CD-Player erkannt) der CD, die Audiodaten befinden sich
auf den darauffolgenden Tracks.
Spielen Sie NIEMALS Track 1 (enthält die Softwaredaten) auf einem Audio-CD-Player ab. Sie können dadurch sowohl Ihrem Gehör als auch Ihrem CD-
Player und Ihren Lautsprechern schwere Schäden zufügen.
Betriebssysteme
Die Anwendungen auf dieser CD-ROM liegen sowohl in einer Version für das Windows- als auch in einer Version für das Macintosh-Betriebssystem vor. Der
Installationsvorgang und die Anwendungen selbst sind je nach verwendetem Betriebssystem unterschiedlich. Befolgen Sie daher die für Ihr Betriebssystem richtige
Installationsanleitung.
Windows Siehe Seite 4.
Macintosh Siehe Seite 9.
Medienformate
Der MOTIF 6 / MOTIF 7 / MOTIF 8 und die File Utility-Software sind kompatibel mit den folgenden Medienformaten.
MS-DOS • ISO9660-CD-ROM
Der MOTIF und das File Utility können keine Inhalte von CD-ROMs für den Yamaha A5000/4000/3000 kopieren.
Falls eine Nur-Lese-Datei auf eine im MOTIF eingesteckte Speicherkarte oder ein am MOTIF angeschlossenes SCSI-Gerät kopiert wird, kann sie nicht durch den MOTIF gelöscht werden.
Der MOTIF kann den Inhalt der mitgelieferten CD-ROM nicht direkt lesen. Die CD-ROM ist exklusiv für die Verwendung mit einem Computer gedacht.
Für Windows-Benutzer
Inhalt der CD-ROM
Die CD-ROM enthält eine Reihe von Anwendungen (mit Installationsprogrammen), die Daten befinden sich in den folgenden Ordnern.
* Yamaha gibt keine Garantie für die Stabilität dieser Programme (markiert mit einem Stern) und kann den Anwendern auch keine technische Unterstützung anbieten.
Alle oben aufgelisteten Programme werden mit Online-Handbüchern/PDF-Anleitungen ausgeliefert.
Sie können das File Utility oder den Voice Editor für MOTIF6/MOTIF7/MOTIF8 entweder als Stand-alone-Software oder als Plug-in-Anwendung in Programmen verwenden, die mit der Open-Plug-in-
Technologie kompatibel sind. Weitere Informationen über die Verwendung des File Utility oder des Voice Editor für den MOTIF6/MOTIF7/MOTIF8 als Plug-In-Software finden Sie in der
Bedienungsanleitung der Client-Anwendung (Sequenzer, usw.).
Verzeichnis-Name Name der Anwendung Inhalt
Acroread_ Acrobat Reader* Anzeigeprogramm für PDF-Dateien (Portable Document Format). Dient zum Anzeigen der
Anwendungshandbücher im PDF-Format.
Tools VEMOT_ Voice Editor for MOTIF6/MOTIF7/MOTIF8 Ermöglicht Ihnen die Bearbeitung der MOTIF-Voices auf Ihrem Computer.
FU_ File Utility Ermöglicht Ihnen die Verwaltung der Dateien auf der in den MOTIF eingesteckten Speicherkarte oder auf
einem SCSI-Gerät, das an den MOTIF angeschlossen ist.
TWE YAMAHA Wave Editor TWE V. 2.3 Ermöglicht Ihnen die Bearbeitung von Audio-(Wave-)daten auf Ihrem Computer und die Übertragung der
Daten zwischen Ihrem Computer und dem MOTIF.
USBdrv_ YAMAHA USB-MIDI-Treiber (für Win98, Me) Ermöglicht die Kommunikation zwischen Ihrem Computer und dem MOTIF, wenn sie über ein USB-Kabel
miteinander verbunden sind.
USBdrv2k_ YAMAHA USB-MIDI-Treiber(für Windows 2000/XP) Ermöglicht die Kommunikation zwischen Ihrem Computer und dem MOTIF, wenn sie über ein USB-Kabel
miteinander verbunden sind.
Seq_Demo Cubase VST/32 Demo-Version* Demo-Version des Sequenzerprogramms Cubase VST/32.
Name des Ordners Dateiname Inhalt
Remote Cubase Setup-Datei für Cubase Enthält die Einstellungen zur Steuerung von Cubase durch den MOTIF.
Logic Setup-Datei für Logic Enthält die Einstellungen zur Steuerung von Logic durch den MOTIF.
Sonar Setup-Datei für SONAR/Cakewalk ProAudio
Enthält die Einstellungen zur Steuerung von SONAR und Cakewalk auf Ihrem Computer durch den MOTIF.
Liste der
Voices
Liste der Normal Voices Eine Liste der Normal Voices (tonal spielbaren Voices) des MOTIF
Liste der Drum Voices Eine Liste der Drum Voices (Schlaginstrument-Voices) des MOTIF
Liste der Performances Eine Liste der „Performances“ des MOTIF
Deutsch
3
Verwenden eines Audio-CD-Players
Track 1:
Enthält die Daten der oben erwähnten Anwendungen; Spielen Sie diesen Track NIEMALS auf Ihrem Audio-CD-Player ab!
Spielen Sie NIEMALS Track 1 (enthält die Softwaredaten) auf einem Audio-CD-Player ab. Sie können dadurch sowohl Ihrem Gehör als auch Ihrem
CD-Player und Ihren Lautsprechern schwere Schäden zufügen.
Track 2 - 40:
Digitalisierte Audiodaten (Samples), die optimal für die Aufnahme mit dem MOTIF 6 / MOTIF 7 / MOTIF 8 vorbereitet sind.
Über die Open-Plug-in-Technologie
Sie können das File Utility oder den Voice Editor für den MOTIF entweder als Stand-alone-Software oder als Plug-in-Anwendung in Programmen verwenden, die
mit der Open-Plug-in-Technologie kompatibel sind.
Die „Open Plug-in Technology“ (OPT) ist ein neu entwickeltes Software-Format, das die Steuerung von MIDI-Geräten von einem Software-Sequenzer aus
ermöglicht. Sie können in diesem System zum Beispiel verschiedene Bereiche Ihres Musiksystems starten und bedienen, z.B. Editoren für Plug-in-
Erweiterungskarten und Mixer-Software – direkt von einem OPT-kompatiblen Sequenzer aus, ohne sie einzeln bedienen zu müssen. Dadurch ist es nicht mehr
erforderlich, MIDI-Treiber für jedes Programm einzustellen – Ihr Musikproduktionssystem ist einfacher und bequemer zu bedienen, alles greift nahtlos ineinander.
Über die OPT Le
vels
Die Client-Anwendung und deren Kompatibilität mit OPT kann wie folgend gezeigt in drei Levels eingeteilt werden.
Level 1
– OPT-Bedienfelder bieten eine einfache Unterstützung beim Öffnen und für die Darstellung von OPT-Bedienfeldern, die Daten über die
externen MIDI-Ports des Client übertragen können. Dieser Level ermöglicht normalerweise den vollwertigen Betrieb einfacher Bedienfelder von
Hardware-Editoren.
Level 2
OPT-Prozessoren bieten Unterstützung für MIDI-Berechnungen in Echtzeit und für die Automation von Bedienfeldern. Dieser Level ermöglicht
normalerweise den vollwertigen Betrieb von MIDI-Effekten (z.B. Arpeggiatoren, Transposern usw.) in Echtzeit oder Offline und zusätzlich die Automation
von OPT-Bedienfeldern.
Level 3
– „OPT Views“ bietet Unterstützung für verschiedene Ansichten für Editoren und MIDI-Prozessoren/-Bedienfelder, die den direkten Zugriff auf die
Speicherstrukturen des Client-Sequenzers erfordern. Dieser Level ermöglicht normalerweise ausgefeilte MIDI-Editoransichten (z.B. Listendarstellungen,
Automatische Begleitung, spezielle Editoren usw.).
Implementation des OPT Level für den Voice Editor
Diese Tabelle zeigt die OPT-Kompatibilität des Voice Editors für MOTIF.
Bestimmte Funktionen arbeiten nicht erwartungsgemäß, wenn es in der Client-Anwendung (Sequenzer usw.) keine entsprechende Funktion gibt. Die höchste Stufe (Level) der Implementation
für die Client-Anwendung ist im OPT-Logo zu erkennen (die zusammen mit der Versionsinformation im Programm erscheint).
Implementation des OPT-Levels für das Datei-Dienstprogramm (File Utility)
Diese Tabelle zeigt die OPT-Kompatibilität für das File Utility.
Bestimmte Funktionen arbeiten nicht erwartungsgemäß, wenn es in der Client-Anwendung (Sequenzer usw.) keine entsprechende Funktion gibt. Die höchste Stufe (Level) der Implementation
für die Client-Anwendung ist im OPT-Logo zu erkennen (die zusammen mit der Versionsinformation im Programm erscheint).
OPT Levels der Client-Anwendung
Voice Editor für die Bedienung des MOTIF
Funktionsunterstützung Funktionsgrenzen
VIEWS (Level3) Ja Kein
PROCESSORS (Level2) Ja Kein
PANELS (Level1) Ja (mit Einschränkungen) Empfang von Bulk-Daten
OPT Levels der Client-Anwendung
Betrieb des File Utility
Funktionsunterstützung Funktionsgrenzen
VIEWS (Level3) Ja Kein
PROCESSORS (Level2) Ja Kein
PANELS (Level1) Nein
Deutsch
4
Minimale Systemanforderungen
Die folgenden Systemanforderungen können sich je nach Betriebsystem
geringfügig voneinander unterscheiden.
Voice Editor für MOTIF6/MOTIF7/MOTIF8
Betriebssystem:
Windows 95/98/Me/NT4.0/2000
XP Home Edition/XP Professional
Computer:
166 MHz oder höher;
Intel Pentium/Celeron processor
Verfügbarer Arbeitsspeicher:
32 MB oder mehr
Festplatte:
12 MB oder mehr
Bildschirmauflösung:
640 x 480, High Color (16 Bit)
File Utility
Betriebssystem:
Windows 98/Me/2000/XP Home Edition/
XP Professional
Computer:
166 MHz oder höher;
Intel Pentium/Celeron processor
Verfügbarer Arbeitsspeicher:
32 MB oder mehr
Festplatte:
6 MB oder mehr
Bildschirmauflösung:
640 x 480, High Color (16 Bit)
TWE V. 2.3
Betriebssystem:
Windows 95/98/Me
Computer:
166 MHz oder höher;
Intel Pentium/Celeron processor
Verfügbarer Arbeitsspeicher:
24 MB oder mehr
Festplatte:
Durchschnittliche Zugriffszeit 30 ms oder
weniger
Bildschirmauflösung:
800 x 600, 256 Farben oder mehr
USB-MIDI-Treiber
Betriebssystem:
Windows 98/Me/2000/XP Home Edition/
XP Professional
Computer:
166 MHz oder höher;
Intel Pentium/Celeron processor
Verfügbarer Arbeitsspeicher:
32 MB oder mehr
(empfohlen: 64 MB oder mehr)
Festplatte:
2 MB oder mehr
Informationen über die Anwendungen im Verzeichnis „Seq_Demo“ finden Sie
in der Bedienungsanleitung der jeweiligen Software.
Software-Installation
Deinstallieren (installierte Anwendung entfernen)
Sie können installierte Programme wieder deinstallieren.
Wählen Sie [Start]
[Einstellungen]
[Systemsteuerung]
[Software]
[Installieren/Deinstallieren], wählen Sie das zu
entfernende Programm und klicken Sie auf [Hinzufügen/Entfernen…].
Befolgen Sie die Anweisungen auf dem Bildschirm zur Deinstallation
der Software.
Die Namen der Schaltflächen und Menüeinträge können sich je nach
Betriebssystem des Computers voneinander unterscheiden.
Acrobat Reader
Um die elektronischen Handbücher (im PDF-Format) der einzelnen
Anwendungen anzeigen zu können, müssen Sie Acrobat Reader installieren.
Wenn bereits eine ältere Version von Acrobat Reader auf Ihrem Computer installiert ist,
müssen Sie diese deinstallieren, bevor Sie mit der Installation fortfahren.
1
Doppelklicken Sie auf den Ordner „Acroread_“.
Es werden Ordner für vier verschiedene Sprachen angezeigt.
2
Wählen Sie die Sprache aus, die Sie nutzen möchten, indem Sie auf das
entsprechende Verzeichnis doppelklicken. Die Datei „ar***.exe“ wird
angezeigt. („***“ steht für die ausgewählte Sprache.)
3
Doppelklicken Sie auf „ar***.exe“.
Das Dialogfeld „Acrobat Reader Setup“ wird angezeigt.
4
Führen Sie die Installation aus, indem Sie den Anweisungen auf dem
Bildschirm folgen.
Nach der Installation erscheint der Acrobat-Ordner auf Ihrem Computer
(standardmäßig im Ordner „Programme“).
Informationen zur Verwendung von Acrobat Reader erhalten Sie, indem Sie im
Menü [Hilfe] auf [Reader Guide] klicken.
USB-MIDI-Treiber
Um den MOTIF über USB mit Ihrem Computer steuern zu können, müssen Sie
zunächst die geeignete Treiber-Software (englisch: Driver) installieren.
Der USB-MIDI-Treiber ist eine Software, die MIDI-Daten zwischen einem
Sequenzerprogramm und dem MOTIF über ein USB-Kabel überträgt.
Windows 98/Me-Anwender Siehe unten.
Windows-2000-Anwender Siehe Seite 5.
Windows-XP-Anwender Siehe Seite 6.
Installation des Treibers unter Windows 98 /
Windows Me
1 Starten Sie den Computer.
2 Legen Sie die mitgelieferte CD-ROM in das CD-ROM-Laufwerk ein.
3 Vergewissern Sie sich, daß der Netzschalter (POWER) des MOTIF auf
„OFF“ (Aus) gestellt ist, und verwenden Sie das USB-Kabel, um die USB-
Buchse des Computers (oder des USB Hub) mit der USB-Buchse des MOTIF
zu verbinden. Sobald der MOTIF eingeschaltet wird, startet auf dem
Computer automatisch der Hardware-Assistent. Falls der Hardware-
Assistent nicht automatisch erscheint, klicken Sie in der Systemsteuerung
auf „Hardware“.
Für Anwender von Windows Me: Wählen Sie die Option „Automatisch nach dem
besten Treiber suchen (empfohlen)“ aus, und klicken Sie auf [Weiter]. Das System
beginnt automatisch, den Treiber zu suchen und zu installieren. Fahren Sie mit
Schritt Nr. 8 fort. Falls das System den Treiber nicht findet, wählen Sie „Position des
Treibers angeben (Erweitert)“ aus, und geben Sie zur Installation des Treibers den
Ordner „USBdrv_“ auf der CD-ROM an.
1
2
Computer
MOTIF
USB-Kabel
Treiber
Sequencer-
Software
Windows 98
Windows Me
Deutsch
5
4 Klicken Sie auf [Weiter].
Das folgende Fenster ermöglicht Ihnen die Auswahl der Suchmethode.
5 Aktivieren Sie bitte die Option „Nach einem besseren als dem derzeit
verwendeten Treiber suchen (Empfohlen)“. Klicken Sie auf [Weiter]. Im
folgenden Fenster geben Sie das Verzeichnis an, in dem der Treiber
installiert werden soll.
6 Aktivieren Sie das Kästchen neben „CD-ROM-Laufwerk“, und deaktivieren
Sie alle anderen Kästchen. Klicken Sie auf [Weiter].
Während der Suche nach dem Treiber fordert das System Sie u.U. auf, die Windows-
CD-ROM einzulegen. Geben Sie das Verzeichnis „USBdrv_“ auf dem CD-ROM-
Laufwerk an (also beispielsweise D:\USBdrv_\), und führen Sie die Installation fort.
Geben Sie bei Verwendung von Windows 98 das Verzeichnis „USBdrv_“ des CD-
ROM-Laufwerks an (also beispielsweise D:\USBdrv_\), und setzen Sie die
Installation fort.
7 Sobald das System den Treiber auf der CD-ROM entdeckt hat und zur
Installation bereit ist, wird das folgende Fenster angezeigt.
Vergewissern Sie sich, daß der „YAMAHA USB MIDI Driver“ aufgeführt
ist, und klicken Sie auf [Weiter]. Die Installation wird gestartet.
8 Wenn die Installation erfolgreich beendet wurde, wird das folgende Fenster
angezeigt. Klicken Sie auf [Fertig stellen].
n
Bei einigen Computern kann es etwa zehn Sekunden dauern, bis dieses Fenster nach
Beendigung der Installation angezeigt wird.
Der Treiber wurde installiert.
Installation des Treibers unter Windows 2000
1 Starten Sie den Computer, und melden Sie sich in Windows 2000 als
„Administrator“ an.
2 Wählen Sie [Mein Computer | Systemsteuerung | System | Hardware |
Treibersignaturoptionen | Dateisignaturverifizierung], aktivieren Sie die
Option „Ignorieren - Alle Dateien installieren, unabhängig von der
Dateisignatur“, und klicken Sie auf [OK].
3 Legen Sie die mitgelieferte CD-ROM in das CD-ROM-Laufwerk ein.
4 Vergewissern Sie sich, daß der Netzschalter (POWER) des MOTIF auf
„OFF“ (Aus) gestellt ist, und verwenden Sie das USB-Kabel, um die USB-
Buchse des Computers (oder des USB Hub) mit der USB-Buchse des MOTIF
zu verbinden. Sobald der MOTIF eingeschaltet wird, erscheint auf dem
Computer der Hardware-Assistent. Klicken Sie auf [Weiter].
5 Aktivieren Sie bitte die Option „Nach einem passenden Treiber für das
Gerät suchen (empfohlen)“. Klicken Sie auf [Weiter].
Im daraufhin angezeigten Fenster können Sie einen Speicherort angeben,
an dem nach dem Treiber gesucht werden soll.
6 Aktivieren Sie das Kästchen neben „CD-ROM-Laufwerk“ (und
deaktivieren Sie alle anderen Kästchen). Klicken Sie auf [Weiter].
Während der Suche nach dem Treiber fordert das System Sie u.U. auf, die Windows-
CD-ROM einzulegen. Geben Sie das Verzeichnis “USBdrv2k_” auf dem CD-ROM-
Laufwerk an (also beispielsweise D:\USBdrv2k_\), und führen Sie die Installation fort.
7 Sobald die Installation erfolgreich beendet wurde, erscheint das Fenster
„Fertig stellen des Assistenten für das Suchen neuer Hardware“. Klicken Sie
auf [Fertig stellen].
Bei einigen Computern kann es etwa zehn Sekunden dauern, bis dieses Fenster nach
Beendigung der Installation angezeigt wird.
8 Starten Sie den Computer neu.
Der Treiber wurde installiert.
Windows 98
Windows Me
Deutsch
6
Installieren des Treibers unter Windows XP
1 Starten Sie den Computer.
2 Wählen Sie [Start] [Systemsteuerung] aus.
Falls die Systemsteuerung wie in der folgenden Abbildung dargestellt wird,
klicken Sie oben links im Fenster auf „Zur klassischen Ansicht wechseln“.
Alle Symbole der Systemsteuerung werden angezeigt.
3 Klicken Sie auf [System] [Hardware] [Treibersignierung]
[Dateisignaturverifizierung], wählen Sie die Option „Ignorieren - Alle
Dateien installieren, unabhängig von der Dateisignatur“ aus, und klicken
Sie auf [OK].
4 Klicken Sie auf [OK], um das Fenster „Eigenschaften von System“ zu
schließen, und klicken Sie dann oben rechts im Fenster auf die Schaltfläche
„X“, um die Systemsteuerung zu schließen.
5 Legen Sie die mitgelieferte CD-ROM in das CD-ROM-Laufwerk ein.
6 Vergewissern Sie sich, daß der Netzschalter (POWER) des MOTIF auf
„OFF“ (Aus) gestellt ist, und verwenden Sie das USB-Kabel, um die USB-
Buchse des Computers (oder des USB Hub) mit der USB-Buchse des MOTIF
zu verbinden. Sobald der MOTIF eingeschaltet wird, erscheint auf dem
Computer der Assistent für das Suchen neuer Hardware.
7 Aktivieren Sie bitte die Option „Nach dem passenden Treiber für das Gerät
suchen (empfohlen)“. Klicken Sie auf [Weiter].
Die Installation wird gestartet.
8 Sobald die Installation erfolgreich beendet wurde, erscheint das Fenster
„Fertig stellen des Assistenten für das Suchen neuer Hardware“. Klicken Sie
auf [Fertig stellen].
Bei einigen Computern kann es etwa zehn Sekunden dauern, bis dieses Fenster nach
Beendigung der Installation angezeigt wird.
9 Starten Sie den Computer neu.
Der Treiber wurde installiert.
Voice Editor, File Utility
Nachdem Sie diese Anwendungen installiert haben, können Sie Ihren
Computer verwenden, um die Voices des MOTIF zu bearbeiten sowie die Daten
zu verwalten, die sich auf an den MOTIF angeschlossenen Medien
(Speicherkarte und SCSI-Geräte) befinden.
1
Doppelklicken Sie auf das Verzeichnis „Tools“ der CD-ROM.
Die Ordner „VEMOT_“, „FU_“ und „TWE“ werden angezeigt.
2
Doppelklicken Sie auf einen der Ordner „VEMOT_“ oder „FU_“.
Die Datei „setup.exe“ wird aufgeführt.
3
Doppelklicken Sie auf die Datei „setup.exe“.
Es erscheint der Tools-Setup-Dialog des Voice Editor oder des File Utility.
4
Führen Sie die Installation aus, indem Sie den Anweisungen auf dem
Bildschirm folgen.
Installieren Sie von den oben genannten Anwendungen zuerst das Programm MIDI
Setup.
Weitere Informationen finden Sie in den Online-Hilfen oder den PDF-
Bedienungsanleitungen des jeweiligen Programms.
TWE
Mit der TWE-Audiobearbeitungs-Software können Sie Wave-Daten direkt auf
Ihrem Computer bearbeiten.
1 Doppelklicken Sie auf das Verzeichnis „TWE“.
Es werden Ordner für vier verschiedene Sprachen angezeigt.
2 Wählen Sie die Sprache aus, die Sie nutzen möchten, indem Sie auf das
entsprechende Verzeichnis doppelklicken.
Das Verzeichnis „YAMAHA TWE“ wird angezeigt.
3 Kopieren Sie das Verzeichnis „YAMAHA TWE“ auf den Schreibtisch Ihres
Computers.
Näheres zur Bedienung finden Sie in der PDF-Bedienungsanleitung im
gleichen Ordner.
Setup-Dateien für die Fernbedienung von
Sequenzerprogrammen.
Um diese Dateien verwenden zu können, muß das entsprechende
Sequenzerprogramm auf Ihrem Computer installiert sein.
Setup-Dateien für Cubase
1 Starten Sie Cubase.
2 Wählen Sie im [Option]-Menü den Eintrag [Remote Setup] und dann
[Setup].
3 Stellen Sie die Parameter im VST-Remote-Fenster, das Sie in Schritt 2
aufgerufen haben, wie unten dargestellt ein, und klicken Sie auf [OK].
Wenn der MOTIF über MIDI mit dem Computer verbunden ist, stellen Sie den Port
auf 1 ein.
4 Klicken Sie auf den [EDIT]-Schalter im Generic-Remote-Fenster, das Sie in
Schritt 3 aufgerufen haben.
5 Klicken Sie auf den [Import]-Schalter im Generic-Remote-Setup-Fenster, das
Sie in Schritt Nr. 4 aufgerufen haben.
6 Wählen Sie im in Schritt 5 aufgerufenen Dialog die Setup-Datei für die
Fernsteuerung von Cubase („Yamaha MOTIF Remote.xml“) aus, und
klicken Sie auf [Open].
7 Schließen Sie das Generic-Remote-Setup-Fenster.
Remote: Generic Remote
Input: YAMAHA USB IN 0-3
Output: YAMAHA USB OUT 0-3
Deutsch
7
Preference-Datei für Logic
1 Starten Sie Logic.
2 Wählen Sie Key Commands... (Tastaturkommandos...) unter Settings
(Einstellungen) aus dem Option (Optionen)-Menü.
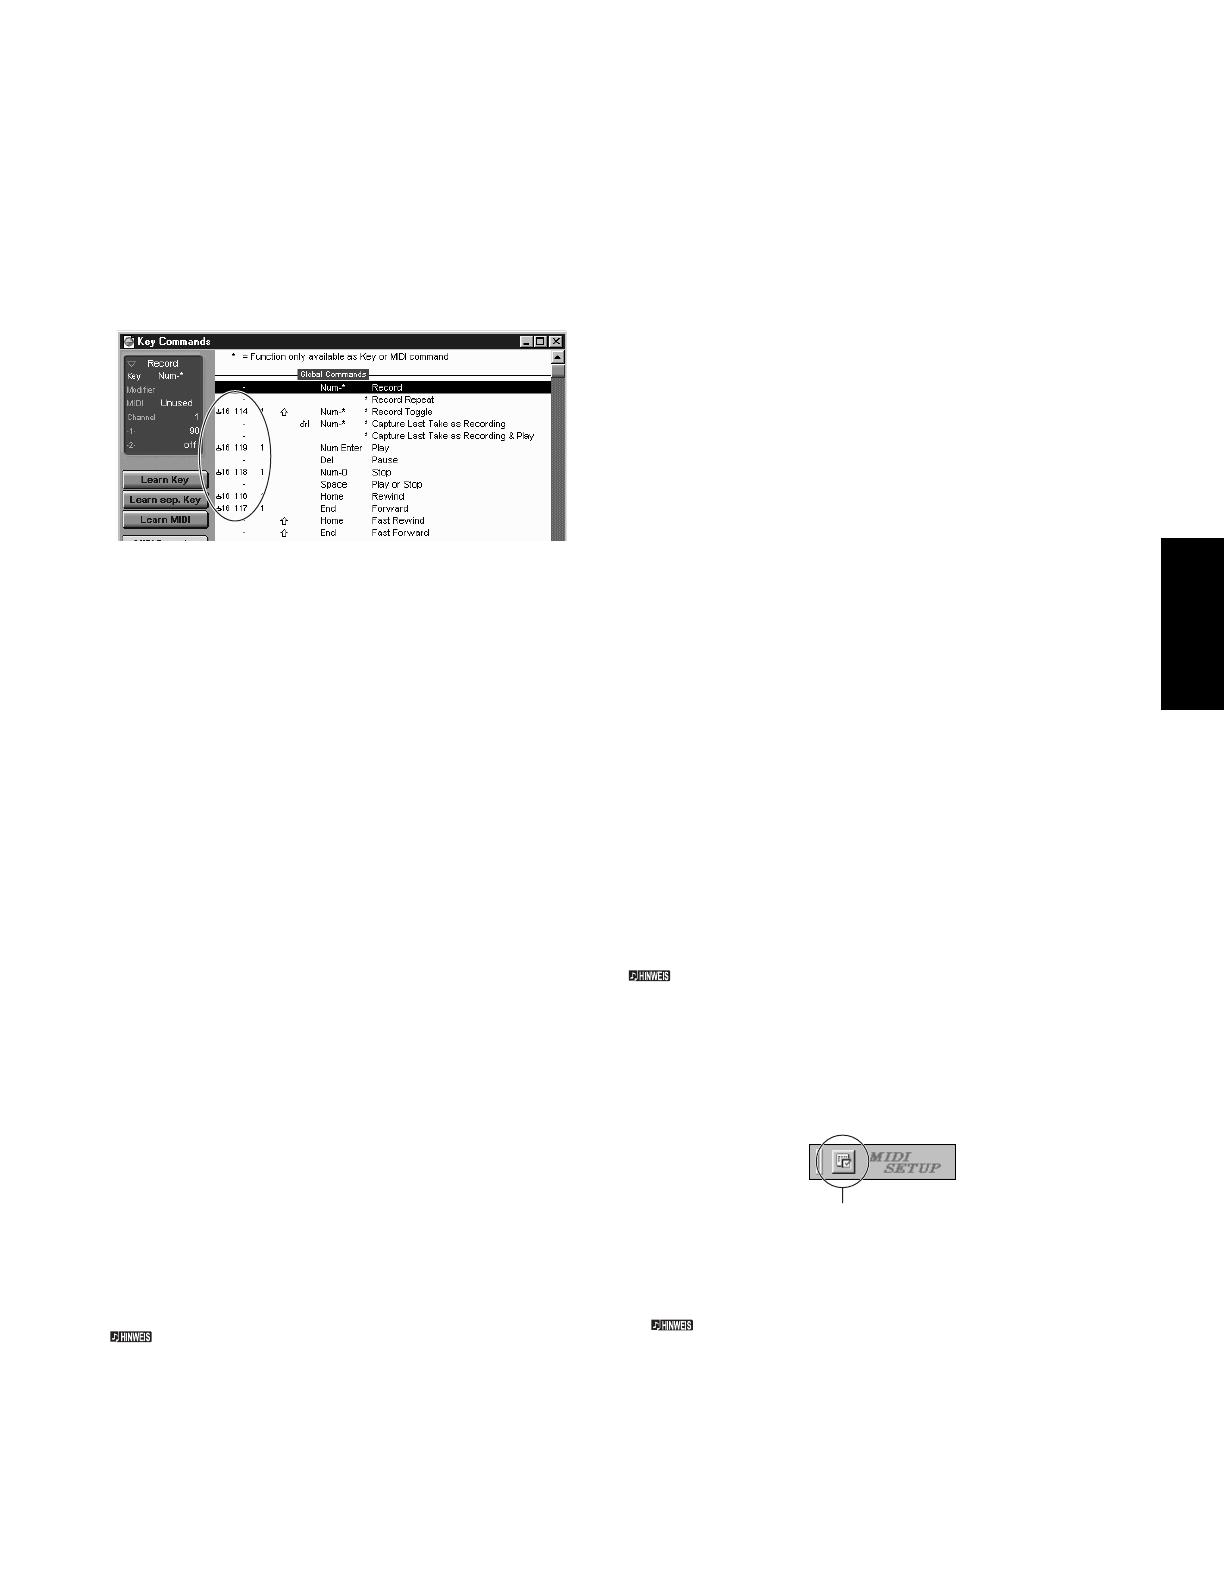
3 Wählen Sie Import Key Commands (Tastaturkommandos importieren) aus
dem Option (Optionen)-Menü im Tastaturbefehle-Fenster, das Sie in Schritt
2 aufgerufen haben.
4 Wählen Sie in dem in Schritt 3 aufgerufen Dialog die Preference-Datei für
Logic namens „Logic32.prf“ von der mitgelieferten CD-ROM aus, und
klicken Sie auf [Öffnen].
Nachdem die Datei importiert wurde, erscheint das folgende Setup.
Beachten Sie, daß die Tastaturkommando-Einstellungen durch die
ausgewählte Preference-Datei ersetzt werden.
Vorlage für SONAR/SONAR2/Cakewalk Pro
Audio (Installation)
1 Kopieren Sie die Vorlagendatei von der CD-ROM in das Verzeichnis, in dem
SONAR/SONAR2/Cakewalk ProAudio installiert ist.
2 Starten Sie SONAR/SONAR2/Cakewalk ProAudio.
3 Wählen Sie [Optionen] aus der Menüleiste und dort [Audio-Optionen]. Das
Dialogfeld „Direct Show Audio (Cakewalk Direct Show Audio)“ wird
angezeigt.
4 Stellen Sie „Anzahl der Aux-Busse“ auf „3“ ein (Standardwert ist „2“) und
klicken Sie auf [OK].
Das Setup zum Laden der Vorlage-Datei ist dadurch abgeschlossen.
Vorlage für SONAR/SONAR2/Cakewalk
ProAudio (Import)
1 Starten Sie SONAR/SONAR2/Cakewalk ProAudio.
2 Wählen Sie im Menü [File] (Datei) den Befehl „Open (SONAR) /New
(Cakewalk)“ („Öffnen (SONAR) /Neu (Cakewalk)“) aus.
Das Dialogfeld „Open/New Project File“ (Projektdatei öffnen/Neue
Projektdatei) wird angezeigt.
3 Wählen Sie im Menü „Files of type“ (Dateien vom Typ) die Option
„Cakewalk Template“ (Cakewalk-Vorlage) aus (wenn Sie SONAR
verwenden), und wählen Sie anschließend in der Liste des Dialogfelds
„Yamaha MOTIF Synthesizer“ aus, und klicken Sie auf [OK].
Die Vorlage wird importiert, und die drei Fenster „Track“, „Control“ und
„Panel“ („Spur“, „Steuerung“ und „Bedienfeld“) werden angezeigt.
Die Einstellungen sind jetzt abgeschlossen, und Sie können SONAR/
SONAR2/Cakewalk ProAudio nun mit dem MOTIF steuern.
Wählen Sie [MIDI Geräte...] aus dem [Optionen]-Menü, um das MIDI-Port-Fenster zu
öffnen. Legen Sie in diesem Fenster für [Input Ports] (Eingangs-Ports) „YAMAHA
USB IN 0-3“ fest. Wenn der MOTIF mit dem Computer über MIDI verbunden ist,
setzen Sie „Input Ports“ auf 1 (beispielsweise „IN 0-1“).
Wenn Sie die Spurenstruktur von dieser Vorlage-Datei aus
ändern...
1 Klicken Sie im Panel-Fenster auf den [CONFIG]-Schalter (Konfiguration).
2 Bestimmen Sie mit dem Schalter [SET MIDI First Track] (Erste MIDI-Spur
bestimmen) die erste Spurnummer der MIDI-Spuren.
Die MIDI-Spuren sollten bei Verwendung dieser Vorlage-Datei in
numerischer Reihenfolge angeordnet werden. Anderenfalls können Sie
Cakewalk ProAudio nicht mit dem MOTIF steuern.
Wenn Sie die erste Spurnummer auf eine nicht verwendete Spur stellen,
kann es sein, daß die Regler, Schalter und Fader im Fenster abgeblendet
werden. Stellen Sie in diesem Fall die erste Spurnummer auf die erste Spur,
die Daten enthält.
Pro Tools
Zur Verwendung von Pro Tools ist keine spezielle Setup-Datei erforderlich. Sie
können Pro Tools vom MOTIF aus bedienen, sobald Sie die Einstellungen
innerhalb Pro Tools ändern. Die Einstellmethode ist die gleiche wie für den
Macintosh. Siehe Seite 11.
Cubase VST/32 Demo-Version
1 Doppelklicken Sie auf das Verzeichnis „Seq_Demo“.
Das Verzeichnis „Cubase“ wird angezeigt.
2 Doppelklicken Sie auf den Ordner „Cubase“.
Die Datei „Cubase_VST/32_Demo_50.exe“ wird angezeigt.
3 Doppelklicken Sie auf die Datei „Cubase_VST/32_Demo_50.exe“.
4 Führen Sie die Installation aus, indem Sie den Anweisungen auf dem
Bildschirm folgen.
MIDI-Port-Einstellungen
(Beim Starten der Software als
eigenständiges Programm)
Bevor Sie den MIDI-Port im Voice Editor oder File Utility einstellen, sollten Sie
den MIDI-Port in der MIDI-SETUP-Werkzeugleiste auswählen.
Wenn Sie File Utility oder Voice Editor innerhalb eines zur Open-Plug-in-Technologie
kompatiblen Programms als Plug-in starten, lesen Sie die PDF-Anleitung des
entsprechenden Programms.
1 Starten Sie den Voice Editor oder das File Utility.
2
Klicken Sie auf den [MIDI Setup]-Schalter in der MIDI SETUP-
Werkzeugleiste.
3 Klicken Sie im MIDI Setup-Fenster, das Sie in Schritt 2 aufgerufen haben,
auf die []-Schalter rechts an jedem Textfeld, und nehmen Sie die
folgenden Port-Einstellungen vor.
Damit hier MIDI-Ports zur Verfügung stehen, müssen Sie den entsprechenden MIDI-
Port innerhalb der einzelnen Anwendungen auswählen (Voice Editor oder File
Utility). Dies ist der Port, den Sie in den verschiedenen Programmen benutzen
werden. Weitere Informationen über die Einstellung des MIDI-Ports finden Sie in der
Online-Bedienungsanleitung der jeweiligen Software.
[MIDI Setup]-Schalter
Deutsch
8
Für Mac-Anwender
Inhalt der CD-ROM
Die CD-ROM enthält zwei Ordner: „International“ und „Japanese“. Doppelklicken Sie auf den Ordner „International“, um ihn zu öffnen. In den folgenden
Verzeichnissen befinden sich mehrere Programme (mit Installationsprogrammen) und Daten.
* Yamaha gibt keine Garantie für die Stabilität dieser Programme (markiert mit einem Stern) und kann den Anwendern auch keine technische
Unterstützung anbieten.
Alle oben aufgeführte Anwendungen sind mit Online-Bedienungsanleitungen oder Bedienungsanleitungen im PDF-Format ausgestattet.
OMS® und sind eingetragene Warenzeichen von Opcode Systems, Inc.
Verwenden eines Audio-CD-Players
Track 1: Enthält die Daten der oben erwähnten Anwendungen; Spielen Sie diesen Track NIEMALS auf Ihrem Audio-CD-Player ab!
Spielen Sie NIEMALS Track 1 (enthält die Softwaredaten) auf einem Audio-CD-Player ab. Sie können dadurch sowohl Ihrem Gehör als auch Ihrem
CD-Player und Ihren Lautsprechern schwere Schäden zufügen.
Track 2 - 40: Digitalisierte Audiodaten (Samples), die optimal für die Aufnahme mit dem MOTIF 6 / MOTIF 7 / MOTIF 8 vorbereitet sind.
Ordnername Programm Inhalt
ACROBAT Acrobat Reader* Anzeigeprogramm für PDF-Dateien (Portable Document Format). Hiermit können Sie
die im PDF-Format vorliegenden Bedienungsanleitungen für die Anwendungen lesen.
OMS Open Music System (OMS)* Ermöglicht die Verwendung mehrerer MIDI-Anwendungen auf dem Mac.
OMS Setup for YAMAHA Enthält die OMS-Setup-Dateien für den Yamaha MOTIF.
USBdrv_ YAMAHA USB-MIDI-Treiber Ermöglicht die Kommunikation zwischen Ihrem Computer und dem MOTIF, wenn
diese über ein USB-Kabel miteinander verbunden sind.
Tools Voice Editor for MOTIF6/MOTIF7/MOTIF8 Ermöglicht Ihnen die Bearbeitung der MOTIF-Voices auf Ihrem Computer.
File Utility (Dateidienstprogramm) Ermöglicht die Verwaltung von Dateien auf der in den MOTIF
eingesteckten Speicherkarte oder auf dem SCSI-Gerät, das an den MOTIF
angeschlossen ist.
YAMAHA Wave Editor TWE V2.3 Ermöglicht Ihnen die Bearbeitung von Audio-(Wave-)daten auf Ihrem Computer und
die Übertragung der Daten zwischen Ihrem Computer und dem MOTIF.
Seq_Demo Cubase VST/5.0 Demo-Version*
Logic Audio Platinum 4.6 Demo*
Demo-Version des Sequenzerprogramms Cubase VST/5.0.
Demo-Version des Sequenzerprogramms Logic Audio Platinum 4.6.
Ordnername Dateiname Inhalt
Remote Setup-Datei für Cubase Enthält die Einstellungen zur Steuerung von Cubase durch den MOTIF.
Setup-Datei für Logic Enthält die Einstellungen zur Steuerung von Logic durch den MOTIF.
Liste der Voices Liste der Normal Voices Eine Liste der Normal Voices (tonal spielbaren Voices) des MOTIF
Liste der Drum Voices Eine Liste der Drum Voices (Schlaginstrument-Voices) des MOTIF
Liste der Performances Eine Liste der „Performances“ des MOTIF
Deutsch
1 / 1

Yamaha MOTIF 6 Omistajan opas

Tyyppi
Omistajan opas