Table of contents
Specifications on page 3 System startup on page 25
General information on page 4 Maintenance on page 26
Installation on page 7 Troubleshooting on page 26
User interface and navigation on page 22
Additional information
Additional information is available on the manufacturer's website.
Specifications
Specifications are subject to change without notice.
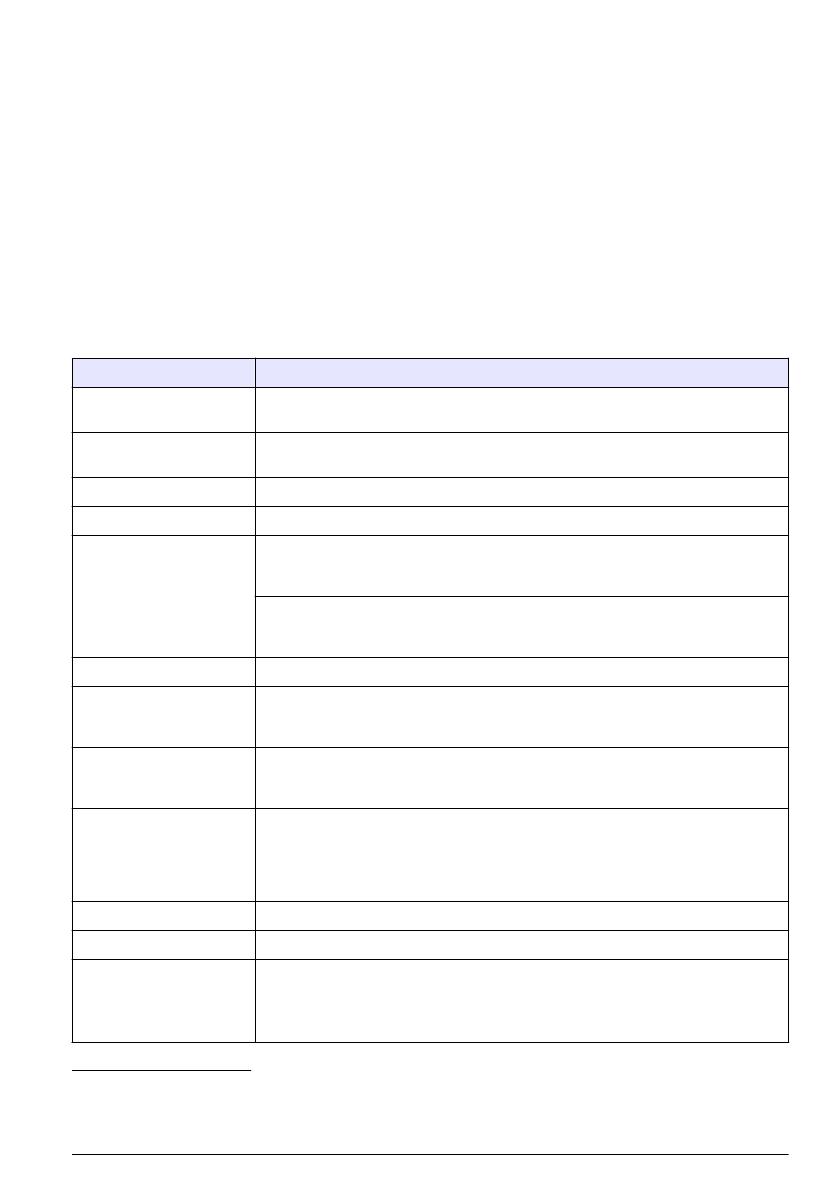
Specification Details
Component description Microprocessor-controlled and menu-driven controller that operates the sensor and
displays measured values.
Operating temperature -20 to 60 ºC (-4 to 140 ºF); 95% relative humidity, non-condensing with sensor load
<7 W; -20 to 50 ºC (-4 to 104 ºF) with sensor load <28 W
Storage temperature -20 to 70 ºC (-4 to 158 ºF); 95% relative humidity, non-condensing
Enclosure
1
NEMA 4X/IP66 metal enclosure with a corrosion-resistant finish
Power requirements AC powered controller: 100-240 VAC ±10%, 50/60 Hz; Power 50 VA with 7 W
sensor/network module load, 100 VA with 28 W sensor/network module load
(optional Modbus, RS232/RS485, Profibus DPV1 or HART network connection).
24 VDC powered controller: 24 VDC—15%, + 20%; Power 15 W with 7 W
sensor/network module load, 40 W with 28 W sensor/network module load (optional
Modbus, RS232/RS485, Profibus DPV1 or HART network connection).
Altitude requirements Standard 2000 m (6562 ft) ASL (Above Sea Level)
Pollution
degree/Installation
category
Polution Degree 2; Installation Category II
Outputs Two analog (0-20 mA or 4-20 mA) outputs. Each analog output can be assigned to
represent a measured parameter such as pH, temperature, flow or calculated
values. Optional module supplies three additional analog outputs (5 total).
Relays Four SPDT, user-configured contacts, rated 250 VAC, 5 Amp resistive maximum for
the AC powered controller and 24 VDC, 5A resistive maximum for the DC powered
controller. Relays are designed for connection to AC Mains circuits (i.e., whenever
the controller is operated with 115 - 240 VAC power) or DC circuits (i.e., whenever
the controller is operated with 24 VDC power).
Dimensions ½ DIN—144 x 144 x 180.9 mm (5.7 x 5.7 x 7.12 in.)
Weight 1.7 kg (3.75 lb)
Compliance information
2
CE approved (with all sensor types). Listed for use in general locations to UL and
CSA safety standards by ETL (with all sensor types).
Certain AC mains powered models are listed for use in general safety locations to
UL and CSA safety standards by Underwriters Laboratories (with all sensor types).
1
Units that have the Underwriters Laboratories (UL) certification are intended for indoor use only
and do not have a NEMA 4X/IP66 rating.
2
DC powered units are not listed by UL.
English 3


