Bernina MEGA Ohjekirja

Tyyppi
Ohjekirja
1
de
Language
8
Mega Hoop 40.0 x 15.0 cm
Stickrahmen Mega | Cadre de broderie Mega
2
You can find further information at:
www.bernina.com
3
Language
Mega Hoop en | 4
Stickrahmen Mega de | 8
Cadre de broderie Mega fr | 12
Borduurraam Mega Hoop nl | 16
Telaio Mega Hoop it | 20
Bastidor Mega Hoop es | 24
Mega Hoop broderiram sv | 28
Mega Hoop broderiramme da | 32
Mega Hoop rammen no | 36
Kirjontakehys Mega fi | 40
Вышивальные пяльцы Mega Hoop ru | 44
ゅう jp | 48
Language
4
a b
c d
ee
f
g
h
Supplies
en
1 Embroidery hoop Mega
1 Embroidery template orange
1 Embroidery template purple
2 Embroidery template holders
4 Clamps for fabric
1 Instruction manual
Additionally required
fabric
stabilizer
spray starch
(for light and loosely woven materials)
a Outer Hoop
b Inner Hoop
c Attaching Mechanism
d Ends of the Attaching Mechanism
e Setscrews
f Embroidery Template Holders
g Embroidery Template
h Fabric Clamps
5
VAR 01
artista 640
artista 630
B 580
B 560
aurora 450
aurora 440 QE
aurora 435
aurora 430
VAR 00
B 880
B 830
B 780
B 750 QE
artista 730
artista 200
Application
Preparation
en
The BERNINA embroidery hoop Mega in the size of 40.0 cm x 15.0 cm allows comfortable
embroidering of very large embroidery motifs and prevents the material from being re-hooped.
Depending on your embroidery machine, the motifs need to be embroidered in three areas. The
hoop will be moved to the respective embroidery area. As the embroidery machine is able to
join the embroidery section exactly together, neither misalignements nor gaps in the embroidery
motif will occur.
The embroidery hoop is accompanied with embroidery templates where the embroidery area is
marked in 1cm squares. Various punch wholes are helpful to transfer markings or corner points
onto the material.
For your safety
Make sure that you read the instruction manuals of the embroidery machine as well as of this
accessory carefully before use!
Calibrating the embroidery hoop
The embroidery hoop calibration involves the coordination of the needle and the center of the
hoop. The calibration can only be carried out when the embroidery module is connected.
According to the machine type, following steps need to be performed.
B 880, B 830, B 780 und B 750 QE
attach the desired embroidery hoop
insert the appropriate embroidery template
select «Calibrating the hoop» in the Setup program
select the attached hoop
follow the instructions shown on the Display
Any other BERNINA embroidery machines
attach the embroidery hoop Oval
insert the embroidery template
select «Calibrating the hoop» in the Setup program
follow the instructions shown on the Display
The calibrations for the embroidery hoop Oval correspond with all hoop sizes.
Selecting embroidery template
Select the embroidery template in accordance with your embroidery machine.
6
1
2
3
4
5
6
en
Selecting embroidery motif
Choose your embroidery motif, a border or a combination of patterns.
Fixing the stabilzer on the fabric
Select the stabilizer suitable for fabric and embroidery motif.
Stabilize light, soft and loosely woven fabrics additionally with spray starch (1).
To achieve an optimal stability, spray soluble adhesive on the stabilizer.
Place the fabric on the stabilizer.
Marking the position of the embroidery motif
Mark the center of the embroidery motif with chalk or a marking pencil on the fabric (2).
While positioning, be aware that the fabric needs to overlap the embroidery hoop at 5 cm
on every side.
Preparing the embroidery hoop
Loosen the setscrews on both hoop sides so that the inner hoop can be removed without
using force (3).
Attach the embroidery template holders to the embroidery template.
Place the embroidery template into the inner hoop (4).
Hooping the fabric
Place the inner hoop with the embroidery template onto the fabric (5).
Make sure that the center of the motif and the center of the template lie exactly on top of
each other.
Put the fabric and the inner hoop into the outer hoop.
Please be careful that the fabric does not get deformed.
Make sure that the arrow markings match exactly at the lower end and in the middle of the
hoop.
Tighten both setscrews evenly without using any tools.
Remove the embroidery template.
Stretch the fabric and the stabilizer evenly in the hoop.
Push the fabric clamps into the provided notches (6).
7
7
8
Mode of operation
en
Attach the embroidery hoop to the embroidery machine
Before attaching the embroidery hoop:
Squeeze the both ends of the attaching mechanism.
Move the the attaching mechanism to middle position 2.
Raise the needle and the presser foot.
Hold the embroidery hoop at the attaching mechanism and pass under the presser foot. (7).
Squeeze both ends of the attachning mechanism against each other.
Position the hoop over the brackets on the embroidery arm and push down until the atta-
ching mechanism engages.
Release the ends of the attaching mechanism.
Embroidering
Choose the embroidery motif and make the necessary adjustments.
Start the embroidery machine.
If the position of the embroidery hoop needs to be changed, a message appears on Display
(8).
Position change of the embroidery hoop
Raise the needle and the presser foot.
Press only the front end of the attaching mechanism.
Move the hoop to the required position or pull the hoop carefully towards you until the
attaching mechanism engages.
Following positions are possible:
Position 1: upper embroidery area
hoop is close to the user
Position 2: middle embroidery area
the hoop is in the middle
Position 3: lower embroidery area
the hoop is furthest from the user
After a position change, pull the upper thread back manually, holding the upper thread spool.
Removing the embroidery hoop from the embroidery machine
Raise the needle and the presser foot.
Squeeze both ends of the attaching mechanism against each other.
Position the attaching mechanism after finishing the motif to position 2.
Remove the embroidery hoop.
Finishing and cleaning
Loosen the setscrews and remove the fabric.
Remove adhesive residues on the hoop using cleaning spray if necessary.
Tipp
With the embroidery machines B 880, B
830 B
780 und
B
750
QE
, a position change while embroidering is not requi-
red.
8
a b
c d
ee
f
g
h
de
Lieferumfang
1 Stickrahmen Mega
1 Stickschablone orange
1 Stickschablone violett
2 Stickschablonen-Halterungen
4 Stoffklammern
1 Bedienungsanleitung
Zusatzmaterial
Stoff
Stickvlies
Stärkespray
für leichte und locker gewobene Stoffe
a Aussenrahmen
b Innenrahmen
c Stickrahmen-Kupplung
d Drucktaste
e Feststellschrauben
f Stickschablonen-Halterung
g Stickschablone
h Stoffklammer
9
de
VAR 01
artista 640
artista 630
B 580
B 560
aurora 450
aurora 440 QE
aurora 435
aurora 430
VAR 00
B 880
B 830
B 780
B 750 QE
artista 730
artista 200
Anwendung
Der 40.0 cm x 15.0 cm grosse BERNINA Stickrahmen Mega ermöglicht das bequeme Sticken
von sehr grossen Stickmustern, ohne das dabei der Stoff im Stickrahmen umgespannt werden
muss.
Je nach Stickmaschine, müssen die Muster über 3 Stickbereiche gestickt werden. Der Stickrah-
men wird dazu in den jeweiligen Stickbereich geschoben. Da die Stickmaschine die Stickberei-
che exakt aneinanderfügt, entstehen weder Versatz noch Lücken im Stickmuster.
Dem Stickrahmen liegen Stickschablonen bei, auf denen der Stickbereich in Quadratzentime-
tern markiert ist. Diverse Stanzlöcher sind hilfreich, um Markierungen oder Eckpunkte auf den
Stoff zu übertragen.
Zu Ihrer Sicherheit
Vor Gebrauch des Zubehörs die Bedienungsanleitung der Stickmaschine und dieses Zubehörs
sorgfältig lesen!
Stickrahmen justieren
Die Stickrahmenjustierung ist die Abstimmung der Nadel zur Mitte des Stickrahmens. Die Jus-
tierung kann nur bei angeschlossenem Stickmodul ausgeführt werden.
Je nach Maschinentyp müssen folgende Schritte ausgeführt werden.
B 880, B 830, B 780 und B 750 QE
gewünschten Stickrahmen montieren
zum Stickrahmen passende Stickschablone einlegen
im Stetup-Programm Stickrahmen justieren anwählen
montierten Stickrahmen anwählen
den Anweisungen auf dem Display folgen
Alle weiteren BERNINA Stickmaschinen
Stickrahmen Oval montieren
Stickschablone einlegen
im Setup-Programm Stickrahmen justieren anwählen
den Anweisungen auf dem Display folgen
Die Justierungen mit dem Stickrahmen Oval gelten für alle Stickrahmengrössen.
Stickschablone wählen
Stickschablone passend zur Stickmaschine wählen.
Vorbereitung
10
de
1
2
3
4
5
6
Stickdesign wählen
Stickmuster, Bordüre oder Musterkombination wählen.
Stoff und Stickvlies fixieren
Stickvlies passend zum Stoff und Stickmuster verwenden.
Leichte, weiche und locker gewobene Stoffe zusätzlich mit Stärkespray behandeln/einsprü-
hen (1).
Um eine optimale Stabilität zu erreichen, Stickvlies mit einem löslichen Klebespray besprü-
hen.
Stoff auf Stickvlies legen.
Stickmusterposition markieren
Stickmustermitte mit Kreide oder Markierstift auf dem Stoff bezeichnen (2).
Bei der Positionierung beachten, dass der Stoff den Stickrahmen auf allen Seiten min. 5 cm
überlappen muss.
Stickrahmen vorbereiten
Beide Feststellschrauben lösen, bis sich der Innenrahmen leicht herausnehmen lässt (3).
Stickschablonen-Halterungen an der Stickschablone anbringen.
Stickschablone auf den Innenrahmen setzen (4).
Stoff einspannen
Innenrahmen mit Stickschablone auf den Stoff legen (5). Dabei müssen Stickmustermitte und
Schablonenmitte direkt übereinander liegen.
Stoff und Innenrahmen in den Aussenrahmen legen. Darauf achten, dass sich der Stoff nicht
verzieht.
Sicherstellen, dass die Pfeilmarkierungen am unteren, mittleren Stickrahmen-Bereich aufeinan-
der treffen.
Beide Feststellschrauben gleichmässig, ohne Werkzeug anziehen.
Stickschablone entfernen.
Stoff und Stickvlies gleichmässig im Stickrahmen straff ziehen.
Stoffklammern in die dafür vorgesehenen Kerben schieben (6).
11
de
7
8
Arbeitsweise
Stickrahmen am Stickcomputer befestigen
Vor dem Befestigen des Stickrahmens:
Drucktasten der Stickrahmen-Kupplung zusammendrücken.
Stickrahmen-Kupplung auf mittlere Position 2 schieben.
Nadel- und Nähfussposition nach oben stellen.
Stickrahmen an der Stickrahmen-Kupplung halten und unter dem Nähfuss einfahren (7).
Drucktasten der Stickrahmen-Kupplung zusammendrücken.
Stickrahmen auf die Stickarm-Halterung setzen und nach unten drücken, bis die Stickrahmen-
Kupplung einrastet.
Drucktasten lösen.
Sticken
Stickmuster wählen und gewünschte Anpassungen vornehmen.
Stickmaschine starten.
Muss die Position des Stickrahmens gewechselt werden, erscheint eine Meldung am Bild-
schirm (8).
Positionswechsel des Stickrahmens
Nadel- und Nähfussposition nach oben stellen.
Die vordere Drucktaste der Stickrahmen-Kupplung zusammendrücken.
Stickrahmen in den erforderlichen Stickbereich schieben oder ziehen, bis die Stickrahmen-
Kupplung einrastet.
Folgende Stickrahmen-Positionen sind möglich:
Position 1: oberer Stickbereich
Stickrahmen ist nahe am Anwender
Position 2: mittlerer Stickbereich
Stickrahmen ist in der Mitte
Position 3: unterer Stickbereich
Stickrahmen ist vom Anwender entfernt
Nach einem Positionswechsel: den Oberfaden manuell an der Oberfadenspule zurückziehen.
Stickrahmen vom Stickcomputer entfernen
Nadel- und Nähfussposition nach oben stellen.
Drucktasten der Stickrahmen-Kupplung zusammendrücken.
Stickrahmen-Kupplung nach Fertigstellung des Musters auf mittlere Position 2 schieben.
Stickrahmen herausheben.
Fertigstellung und Reinigung
Feststellschrauben lösen und Stoff entnehmen.
Stärkespray-Rückstände auf dem Stickrahmen mit Reinigungsspray entfernen.
Tipp
Bei den Stickmaschinen B 880, B 830 B 780 und B 750 QE,
ist ein Positionswechsel während des Stickens nicht erforder-
lich.
12
a b
c d
ee
f
g
h
Livraison
fr
1 cadre de broderie Mega
1 gabarit de broderie orange
1 gabarit de broderie violet
2 supports de gabarit de broderie
4 pinces de tissu
1 directive d‘emploi
Accessoires nécessaires
Tissu
Non tissé de broderie
Amidon en vaporisateur
(pour les tissus fins et tiss
lâches)
a cadre extérieur
b cadre intérieur
c embrayage du cadre de broderie
d bouton poussoir
e vis de serrage
f support de gabarit
g gabarit de broderie
h pince pour le tissu
13
VAR 01
artista 640
artista 630
B 580
B 560
aurora 450
aurora 440 QE
aurora 435
aurora 430
VAR 00
B 880
B 830
B 780
B 750 QE
artista 730
artista 200
Application
Préparation
fr
Le «cadre de broderie Mega» de 40.0 x 15.0 cm de BERNINA permet de broder confortable-
ment de très grands motifs de broderie sans devoir retendre le tissu dans le cadre.
Selon la machine à broder, le motif doit être brodé divisé en 3 secteurs de broderie et le cadre
de broderie repoussé chaque fois dans le secteur correspondant. Puisque la machine à broder
juxtapose parfaitement les secteurs de broderie, le motif de broderie est parfaitement brodé
sans être déplacé et sans points manquants.
Des gabarits dont le secteur de broderie est grillagé en centimères carrés accompagnent
chaque cadre de broderie. Les divers trous offrent une précieuse aide pour le marquage ou
pour reporter les points de délimitation sur le tissu.
Pour votre sécurité
Avant d‘utiliser cet accessoire veuillez lire attentivement les directives d‘emploi de la machine
à coudre et de cet accessoire.
Calibrer le cadre de broderie
Pour calibrer le cadre de broderie, l’aiguille doit parfaitement piquer au centre du cadre de
broderie. Le calibrage ne peut que s’effectuer avec le module de broderie fixé.
Selon le type de machine, les étapes suivantes doivent être entreprises.
B 880, B 830, B 780 et B 750QE
fixer le cadre de broderie souhaité
ajouter le gabarit correspondant au cadre de broderie
sélectionner dans le programme Setup le calibrage du cadre de broderie
sélectionner le cadre de broderie fixé
suivre les directives sur l’écran
Toutes les autres machines à broder BERNINA
fixer le cadre de broderie ovale
ajouter le gabarit
sélectionner dans le programme Setup le calibrage du cadre de broderie
suivre les directives sur l’écran
Le calibrage avec le cadre de broderie ovale vaut ensuite pour toutes les dimensions de cadres
de broderie.
Choisir le gabarit de broderie
Choisir le gabarit de broderie adapté à la machine à broder.
14
1
2
3
4
5
6
fr
Choisir le motif de broderie
Choisir le motif de broderie, la bordure ou la combinaison de motifs.
Fixer le tissu et le non tissé de broderie
Choisir le non tissé de broderie adapté au tissu et au motif de broderie sélectionnés.
Renforcer les tissus fins et fluides avec de l‘amidon en vaporisateur (1).
Vaporiser le non tissé de broderie de colle en vaporisateur pour renforcer la stabilité de
l‘ouvrage.
Poser le tissu sur le non tissé de broderie.
Marquer la position du motif de broderie
Dessiner le centre du motif de broderie sur le tissu à la craie ou avec un stylo pour textile (2).
Positionner le tissu et veiller à ce qu‘il dépasse d’au moins 5 cm tout autour du cadre de
broderie.
Préparer le cadre de broderie
Desserrer les deux vis de fixation sur les deux côtés du cadre de broderie jusqu‘à pouvoir
retirer facilement le cadre intérieur (3).
Fixer le support du gabarit de broderie sur le gabarit.
Poser le gabarit de broderie sur le cadre intérieur (4).
Tendre le tissu
Poser le cadre intérieur avec le gabarit de broderie (5) sur le tissu.
Le centre du motif de broderie et le centre du gabarit de broderie doivent être parfaitement
superposés.
Poser le cadre intérieur et le tissu dans le cadre extérieur.
Veiller à ne pas déplacer le tissu.
S’assurer que les flèches de marquage dans le secteur inférieur et du centre du cadre de
broderie soient parfaitement superposées.
Revisser régulièrement les deux vis de fixation sans outil.
Retirer le gabarit de broderie.
Tendre parfaitement le tissu et le non tissé de broderie dans le cadre.
15
7
8
fr
Directives
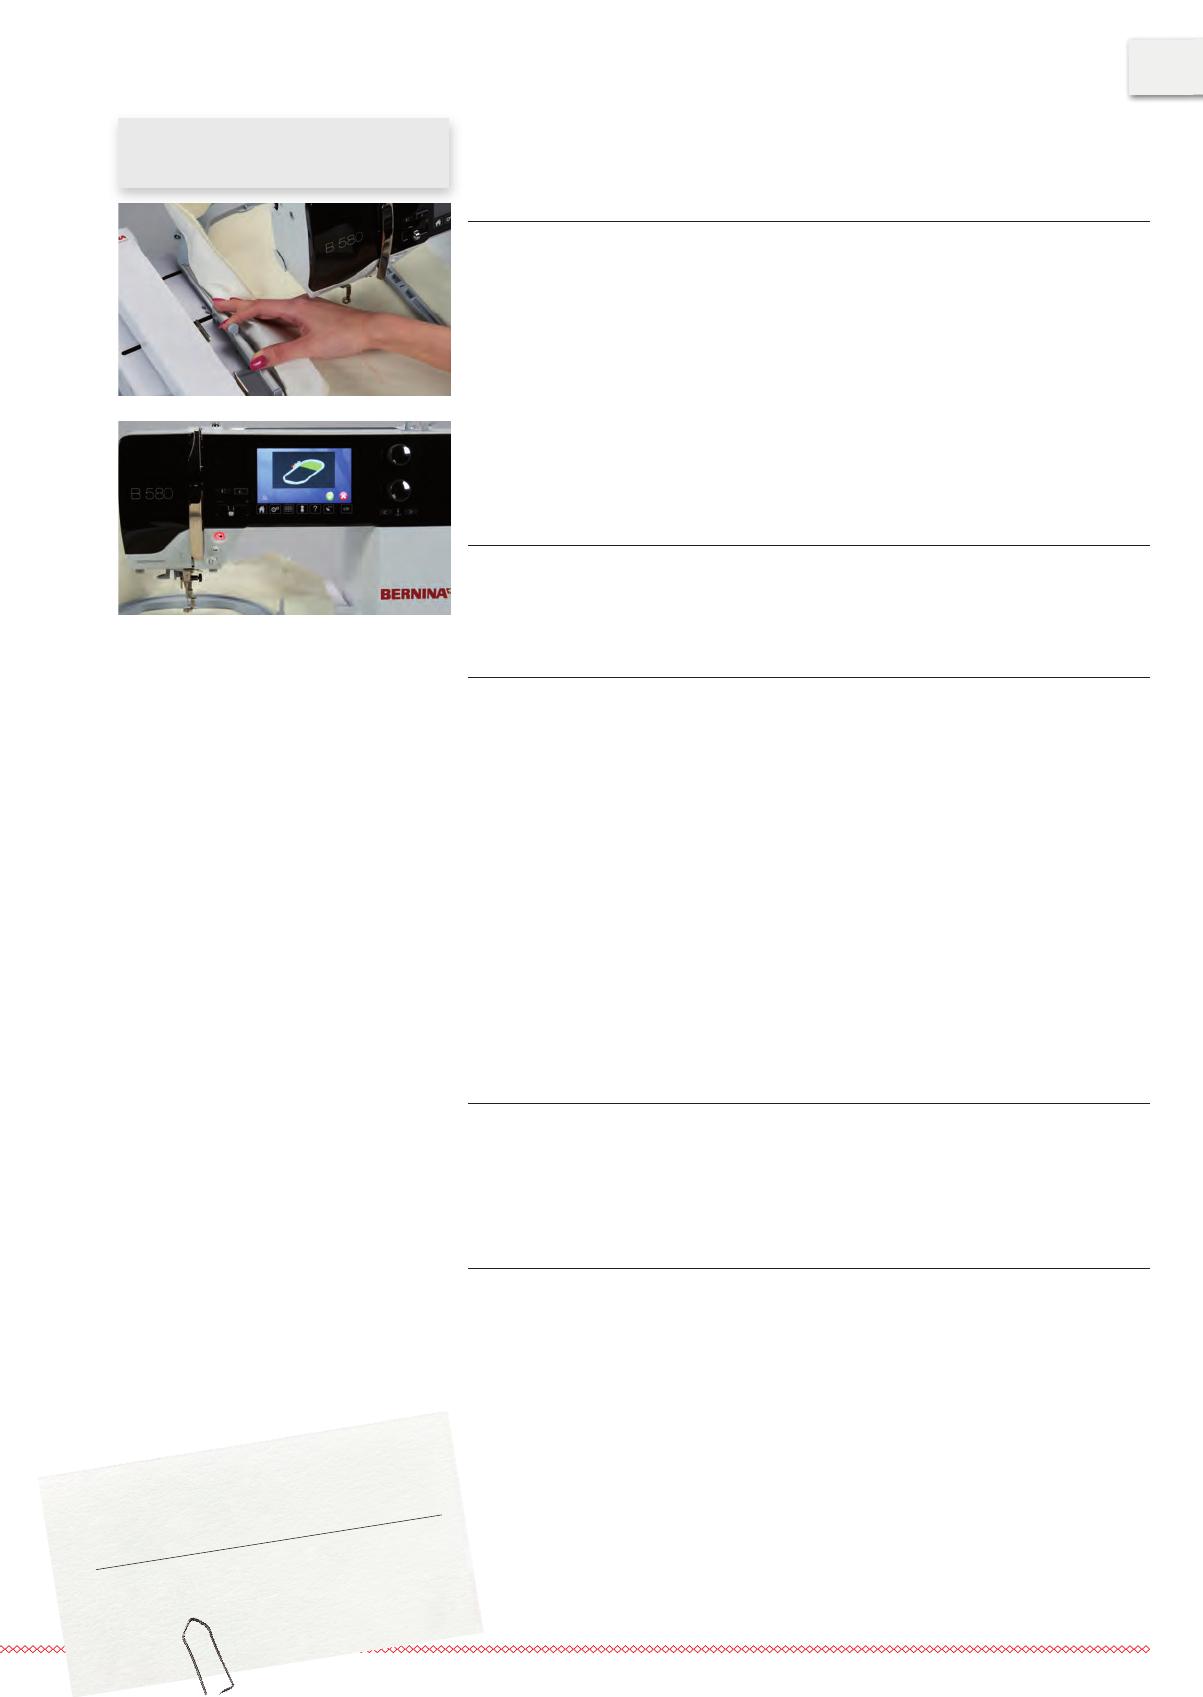
Fixer le cadre de broderie à la machine à broder
Avant de fixer le cadre de broderie,
Saisir et resserrer les deux touches du dispositif de fixation.
Repousser le dispositif de fixation en position 2.
Relever l’aiguille et le pied-de-biche.
Tenir le dispositif de fixation du cadre de broderie et le glisser sous le pied-de-biche (7).
Saisir et resserrer les touches du dispositif de fixation.
Positionner le cadre de broderie sur support du bras de broderie, puis appuyer vers le bas
jusqu‘à ce que le dispositif de fixation s‘encliquette.
Relâcher les touches.
Broder
Choisir le motif de broderie et effectuer les modifications souhaitées.
Démarrer la machine à broder.
Si la position du cadre de broderie doit être modifiée, un message s’affiche sur l’écran (8).
Changement de position du cadre de broderie
Relever l’aiguille et le pied-de-biche.
Appuyer sur le bouton du dispositif de fixation.
Déplacer le cadre de broderie dans la position recommandée ou tirer jusqu‘à ce que le dis-
positif de fixation s‘encliquette.
Les positions suivantes sont possibles:
Position 1: secteur supérieur de broderie
le cadre de broderie est proche de l‘utilisateur
Position 2: secteur central de broderie
le cadre de broderie est au centre
Position 3: secteur inférieur de broderie
le cadre de broderie est éloigné de l‘utilisateur
Après un changement de position, réenrouler le fil supérieur à la main sur la bobine du fil
supérieur.
Retirer le cadre de broderie de la machine à broder
Relever l’aiguille et le pied-de-biche.
Saisir et resserrer les touches du dispositif de fixation.
Après la broderie du motif, placer le dispositif de fixation sur la position 2.
Dégager le cadre de broderie.
Terminer et nettoyer
Desserrer les vis de fixation et retirer le tissu.
Retirer les éventuels résidus de colle sur le cadre avec un spray de nettoyage.
Remarque
Avec les machine à broder B 880, B
830, B
780 et B
750
QE,
aucun
changement de position du cadre de broderie n‘est
nécessaire.
16
a b
c d
ee
f
g
h
nl
Leveringspakket
1 borduurraam Mega Hoop
1 borduursjabloon oranje
1 borduursjabloon paars
2 borduursjabloonhouders
4 stofklemmen
1 handleiding
Extra benodigdheden
stof
borduurvlies
verstevigingsspray
(voor lichte en los geweven stoffen)
a Buitenraam
b Binnenraam
c Borduurraamkoppeling
d Drukknop
e Stelschroef
f Sjabloonhouder
g Borduursjabloon
h Stofklem
17
VAR 01
artista 640
artista 630
B 580
B 560
aurora 450
aurora 440 QE
aurora 435
aurora 430
VAR 00
B 880
B 830
B 780
B 750 QE
artista 730
artista 200
nl
Toepassing
Voorbereiding
Met het 40.0 x 15.0 cm grote BERNINA borduurraam Mega kunnen zeer grote borduurmotie-
ven gemakkelijk worden geborduurd, zonder dat hierbij de stof opnieuw in het borduurraam
moet worden gespannen.
Afhankelijk van de borduurmachine dient het borduurraam voor het borduren van een groot
motief in een drietal posities verschoven te worden. Daar de borduurmachine de borduursecties
exact samenvoegt, ontstaan geen onregelmatigheden of gaten in het borduurpatroon.
Bij het borduurraam worden borduursjablonen geleverd waarop het borduurgedeelte in vier-
kante centimeters is aangegeven. De diverse gaatjes in de sjabloon zijn handig om markeringen
of hoekpunten op de stof over te brengen.
Voor uw veiligheid
Lees voor het gebruik van accessoires de handleiding van de borduurmachine en de handlei-
ding van het accessoire zorgvuldig door!
Borduurraam afstellen
De borduurraamafstelling is het afstellen van de naald op het midden van het borduurraam. De
afstelling kan alleen worden uitgevoerd als de borduurmodule is aangesloten.
Afhankelijk van het machinemodel moeten de volgende stappen worden uitge-
voerd.
B 880, B 830, B 780 en B 750QE
Gewenst borduurraam bevestigen
Passende borduursjabloon in het borduurraam leggen
In het setup-programma «Borduurraam afstellen» kiezen
Bevestigd borduurraam kiezen
De aanwijzingen op het beeldscherm volgen
Alle andere BERNINA borduurmachines
«borduurraam ovaal» bevestigen
Borduursjabloon in het borduurraam leggen
In het setup-programma «Borduurraam afstellen» kiezen
De aanwijzingen op het beeldscherm volgen
De afstellingen met het «borduurraam ovaal» gelden voor alle borduurraamgroottes.
Borduursjabloon kiezen
Borduursjabloon passend bij de borduurmachine kiezen.
18
1
2
3
4
5
6
nl
Borduurpatroon kiezen
Borduurmotief, decoratieve sierrand of motiefcombinatie kiezen.
Stof en borduurvlies fixeren
Borduurvlies passend bij de stof en het borduurpatroon kiezen.
Lichte, zachte en los geweven stoffen bovendien met verstevigingsspray behandelen (1).
Voor een optimale stabiliteit tijdelijke plakspray op het borduurvlies spuiten.
Stof op het borduurvlies leggen.
Plaats van het borduurpatroon markeren
Het midden van het borduurpatroon met kleermakerskrijt of een stofmarkeerstift op de stof
overbrengen (2).
Bij het plaatsen opletten, dat de stof aan alle kanten minstens 5 cm over het borduurraam
ligt.
Borduurraam voorbereiden
Beide stelschroeven losdraaien tot het binnenraam gemakkelijk kan worden weggenomen
(3).
Borduursjabloonhouders aan de borduursjabloon bevestigen.
Borduursjabloon op het binnenraam leggen (4).
Stof inspannen
Binnenraam met de borduursjabloon op de stof leggen (5).
Hierbij moeten het midden van het borduurpatroon en het midden van de sjabloon precies
op elkaar liggen.
Stof en binnenraam in het buitenraam leggen.
Let erop, dat de stof niet verschuift.
Controleer, dat de pijlmarkeringen onderaan in het midden van het borduurraam op elkaar
vallen.
Beide schroeven gelijkmatig, zonder gereedschap aandraaien.
Borduursjabloon verwijderen.
Stof en borduurvlies gelijkmatig in het borduurraam strak trekken.
Stofklemmen in de hiervoor bestemde openingen schuiven (6).
19
7
8
Werkwijze
nl
Borduurraam bevestigen
De knoppen van de borduurraamkoppeling naar elkaar toe duwen.
Borduurraamkoppeling naar de middelste stand 2 schuiven.
Naald en naaivoet omhoogzetten.
Borduurraam bij de borduurraamkoppeling vasthouden en onder de naaivoet schuiven (7).
Knoppen van de borduurraamkoppeling naar elkaar toe duwen.
Borduurraam boven = op de houder van de borduurarm plaatsen en naar beneden drukken
tot de borduurraamkoppeling vastzit.
Knoppen loslaten.
Borduren
Borduurpatroon kiezen en de gewenste aanpassingen maken.
Borduurmachine starten.
Als de positie van het borduurraam veranderd moet worden, verschijnt een melding op het
beeldscherm.
Positieverandering van het borduurraam
Naald en naaivoet omhoogzetten.
Op de voorste knop van de borduurraamkoppeling drukken.
Borduurraam in de juiste positie schuiven tot de borduurraamkoppeling vastzit (8).
De volgende posities zijn mogelijk:
Positie 1: eerste borduursectie
het borduurpatroon begint in het onderste deel van het borduurraam
Positie 2: middelste borduursectie
borduurraam staat in het midden, het borduurpatroon wordt in het middelste gedeelte
verder geborduurd
Positie 3: derde borduursectie
het derde deel van het borduurpatroon wordt verder in het borduurraam geborduurd
Na elke positieverandering van het borduurraam moet even handmatig aan de bovendraad
worden getrokken, zodat er weer spanning op de draad staat.
Borduurraam verwijderen
Naald en naaivoet omhoogzetten.
Knoppen van de borduurraamkoppeling naar elkaar toe drukken.
Borduurraamkoppeling na het borduren van het patroon op positie 2 zetten.
Borduurraam wegnemen.
Afmaken en reinigen
Schroeven losdraaien en stof wegnemen.
Eventueel lijmrestjes van de verstevigings en/of plakspray op het borduurraam met reini-
gingsspray verwijderen.
Aanwijzing
Bij de borduurmachines B 880, B
830, B
780 en B
750
QE,
is een positiever
andering tijdens het borduren niet noodz-
akelijk.
20
a b
c d
ee
f
g
h
Contenuto
it
1 Telaio Mega
1 Mascherina di plastica arancione
1 Mascherina di plastica viola
2 Supporti per fissare la mascherina
4 Mollette per fissare la stoffa
1 Istruzioni d’uso
Materiale occorrente
Stoffa
Stabilizzatore per ricamo
Spray inamidante
(per stoffe leggere o stoffe con trama rada)
a Telaio esterno
b Telaio interno
c Meccanismo di scorrimento
d Tasti a pressione
e Viti di fissaggio
f Supporti della mascherina
g Mascherina
h Mollette per fissare la stoffa
  • Page 1 1
  • Page 2 2
  • Page 3 3
  • Page 4 4
  • Page 5 5
  • Page 6 6
  • Page 7 7
  • Page 8 8
  • Page 9 9
  • Page 10 10
  • Page 11 11
  • Page 12 12
  • Page 13 13
  • Page 14 14
  • Page 15 15
  • Page 16 16
  • Page 17 17
  • Page 18 18
  • Page 19 19
  • Page 20 20
  • Page 21 21
  • Page 22 22
  • Page 23 23
  • Page 24 24
  • Page 25 25
  • Page 26 26
  • Page 27 27
  • Page 28 28
  • Page 29 29
  • Page 30 30
  • Page 31 31
  • Page 32 32
  • Page 33 33
  • Page 34 34
  • Page 35 35
  • Page 36 36
  • Page 37 37
  • Page 38 38
  • Page 39 39
  • Page 40 40
  • Page 41 41
  • Page 42 42
  • Page 43 43
  • Page 44 44
  • Page 45 45
  • Page 46 46
  • Page 47 47
  • Page 48 48
  • Page 49 49
  • Page 50 50
  • Page 51 51
  • Page 52 52

Bernina MEGA Ohjekirja

Tyyppi
Ohjekirja