Silvercrest HG00409C Omistajan opas
- Kategoria
- Personal scales
- Tyyppi
- Omistajan opas
Tämä käsikirja sopii myös

KITCHEN SCALE
KÜCHENWAAGE
Bedienungs- und Sicherheitshinweise
KØKKENVÆGT
Brugs- og sikkerhedsanvisninger
KÖKSVÅG
Bruksanvisning och säkerhetsanvisningar
KITCHEN SCALE
Operation and Safety Notes
KEITTIÖVAAKA
Käyttö- ja turvallisuusohjeet
BALANCE DE CUISINE
Instructions d‘utilisation et consignes de sécurité
KEUKENWEEGSCHAAL
Bedienings- en veiligheidsinstructies
IAN 271098

GB / IE Operation and Safety Notes Page 5
FI Käyttö- ja turvallisuusohjeet Sivu 12
SE Bruksanvisning och säkerhetsanvisningar Sidan 19
DK Brugs- og sikkerhedsanvisninger Side 26
FR / BE Instructions d‘utilisation et consignes de sécurité Page 33
NL / BE Bedienings- en veiligheidsinstructies Pagina 41
DE / AT / CH Bedienungs- und Sicherheitshinweise Seite 48

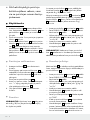
1
2
3
456
7
c
TARE
ZERO
kg lb oz g
B
11 12
131415
A
9
8
10


5 GB/IE
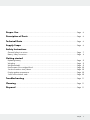
Proper Use .....................................................................................................................................Page 6
Description of Parts ................................................................................................................Page 6
Technical Data .............................................................................................................................Page 6
Supply Scope ...............................................................................................................................Page 6
Safety Instructions
General Safety Instructions ................................................................................................................Page 7
Battery Safety Instructions ...................................................................................................................Page 8
Getting started
Replacing battery ................................................................................................................................ Page 9
Weighing ............................................................................................................................................. Page 9
Weigh and add ..................................................................................................................................Page 9
Remove part of the weighed food .....................................................................................................Page 10
Set the countdown timer / alarm ........................................................................................................Page 10
Display ambient temperature .............................................................................................................Page 10
Switch off the kitchen scale ................................................................................................................Page 10
Troubleshooting ........................................................................................................................Page 11
Cleaning ...........................................................................................................................................Page 11
Disposal ............................................................................................................................................Page 11

6 GB/IE
Kitchen Scale
Q
Proper Use
This appliance is designed to weigh household
quantities of foods, indicate temperatures and for
timing. The digital kitchen
scale measures the weight
of non-aggressive, non-corrosive and non-abrasive
liquids or solids. It is not intended for weighing medi
-
cation or prohibited materials.
The product is for
private use only and is not intended for medical or
commercial use.
Q
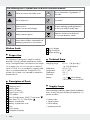
Description of Parts
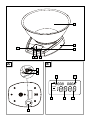
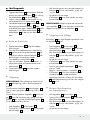
1
Weighing bowl
2
Kitchen scale
3
ON / OFF button
4
Timer button (T-SET)
5
LCD readout
6
Unit of weight button (UNIT) / Timer button
7
Zero button (Z / T) / Timer button
8
Battery compartment
9
Battery compartment cover
10
Grip
11
Timer display
12
Temperature display
13
g / oz display
14
kg / lb display
15
Alarm display
Q
Technical Data
Weighing range: 0.1 oz - 11 lb (pounds) /
1 g - 5 kg (kilograms)
Graduation: 0.1 oz / 1g
Temperature: 0 °C - 40 °C
Graduation: 0.5 °C
Tolerance: ± 2 °C
Battery:
1 x 3 V Lithium battery
(CR2032 Lithium round cell)
Q
Supply Scope
After unpacking the delivery, please check immediately
that it contains all parts and that the appliance is in
perfect condition.
1 kitchen scale
1 weighing bowl
1 lithium battery
1 operating manual
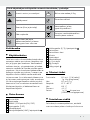
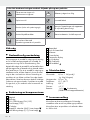
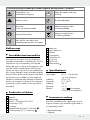
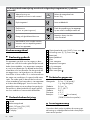
The following icons / symbols are used in this instruction manual:
Observe caution and safety notes!
5 kg
Do not exceed the 5 kg capacity of
the scale.
Risk of explosion! Food-safe!
Direct current
(Type of current and voltage)
Dispose packaging and appliance in
an environmentally-friendly way!
Wear protective gloves.
Batteries should not be disposed
of in normal domestic waste!
Never leave children unattended with
packaging materials or the product.

7 GB/IE
Q
Safety Instructions
General Safety
Instructions
DAN-
GER TO LIFE AND
RISK OF ACCIDENTS FOR
INFANTS AND CHILDREN!
Never leave children unattended
with packaging materials or the
product. There is otherwise a
risk of fatal injury by suffocation.
Always keep children away from
the product.
This appliance can be used by
children aged from 8 years and
above and persons with reduced
physical, sensory or mental ca-
pabilities or lack of experience
and knowledge if they have been
given supervision or instruction
concerning use of the appliance
in a safe way and understand
the hazards involved. Children
shall not play with the appliance.
Cleaning and user maintenance
shall not be made by children
without supervision.
5 kg
CAUTION! RISK OF
INJURY! Do not exceed
the 5 kg capacity of the scale.
This could damage the product.
Do not expose the product to
- extreme temperatures,
- strong vibrations,
- heavy mechanical loads,
- direct sunlight
- magnetic fields,
- moisture.
These can damage the product.
Protect the product from electro-
static charge / discharge. This
could hinder the internal data
exchange, which causes errors
in the LCD readout.
Check the product for damage
before use. Never use a dam-
aged product.
Never open the
housing of the product. This can
result in injury and damage to
the product. Repairs must be car-
ried out by an electrician only.
Do not allow anyone inexperi-
enced to use the product. Make
sure that anyone intending to use
the product has read the operat-
ing manual and is capable of
operating the product safely.
Place the product on a solid,
horizontal and flat surface.
Normal functioning of the product
may be disturbed by electromag-
netic interference. In this case,
briefly remove the battery from
the product and insert it again.
Do this as described in the
“Replacing battery“ chapter.

8 GB/IE
FOOD-SAFE! This
product has no adverse
effect on taste or smell.
Battery Safety
Instructions
DANGER TO
LIFE! Keep batteries out of the
reach of children. Do not leave
batteries lying around. There is a
risk of children or animals swal-
lowing them. Consult a doctor
immediately if a battery is swal-
lowed.
EXPLOSION HAZ-
ARD! Never recharge,
short-circuit and / or open batteries.
This can cause them to overheat,
burn or burst. Never throw batter-
ies into fire or water. The batter-
ies may explode.
Avoid extreme conditions and
temperatures which can affect
batteries, e. g. heaters. Otherwise
there is an increased risk of
leakage.
Remove a spent battery from the
product immediately. Otherwise
there is an increased risk of
leakage.
Check regularly that the battery
is not leaking.
Leaked or damaged bat-
teries can cause chemical
burns if they come into contact
with the skin; in such cases you
must wear suitable protective
gloves.
Avoid contact with the skin, eyes
and mucous membranes if fluid
has leaked from the battery. In
the event of contact with battery
acid, rinse the affected area with
plenty of clean water and consult
a doctor immediately.
Remove light dirt from the battery
and product contacts with a dry,
non-fluffing cloth before inserting
the battery.
Remove the battery from the
product if it is not in use for any
length of time.
Make sure that the polarity is cor-
rect when you insert the
battery
.
This is indicated in the battery
compartment. The battery can
otherwise explode.
Insert the battery with care.
The product can otherwise be
damaged.
Please do not dispose of used
batteries in your household waste
but take them to a designated
collection depot for special waste.

9 GB/IE
Q
Getting started
1. Open the battery compartment
8
on the back
of the product by pushing the clip of the battery
compartment cover
9
towards the battery
compartment
8
and lift the cover off.
2. Remove the isolating strip. This is located
between the battery and the battery compart-
ment
8
.
3. Replace the battery compartment cover
9
on
the battery compartment
8
. Make sure that
the two extensions on the battery compartment
cover
9
engage in the two openings in the
battery compartment
8
. Press the battery
compartment cover
9
onto the battery com-
partment
8
until it noticeably and audibly
clicks into place.
Q
Replacing battery
1. Open the battery compartment
8
as described
above.
2. Remove the used battery from the battery com-
partment
8
by gently pulling the grip
10
out-
wards. Make sure that you do not exert too
much pressure on the grip
10
or it may other-
wise be damaged.
Remove the battery from the battery compart-
ment
8
.
3. Insert the new battery. Make sure that the polarity
is correct. The “+“ must be pointing upwards and
the battery is held in the battery compartment
8
.
4. Close the battery compartment
8
as described
above.
Q
Weighing
NOTE: The kitchen scale
2
always starts at
0g / 0.0 oz (the temperature will also be shown)
when you switch it on. If you place the weighing
bowl
1
on the kitchen scale
2
before switching
it on, 0g / 0.0 oz “Zero“ is displayed.
However, if you place the weighing bowl
1
on
the kitchen scale
2
after you have switched it on,
the scale will indicate the weight of the weighing
bowl
1
. Press the zero button
7
to reset the dis-
play to 0g / 0.0 oz.
j Place the weighing bowl
1
on the kitchen
scale
2
.
j Press the ON / OFF button
3
to switch the
kitchen scale
2
on.
j Select the unit of weight by pressing the Unit
button
6
. You can choose between “g / kg“
and “oz / lb“.
j Place the food you wish to weigh in the bowl.
j The LCD readout
5
indicates the weight of the
food in the selected unit of weight.
NOTE: The scale operates almost exactly the
same way without the bowl
1
. To operate without
bowl, simply follow & repeat the same steps as
above except starting without the bowl
1
.
Q
Weigh and add
The kitchen scale
2
allows you to weigh foods
consecutively without removing food already in the
weighing bowl
1
.
j Place the weighing bowl
1
on the kitchen
scale
2
.
j Press the ON / OFF button
3
to switch the
kitchen scale
2
on.
j Select the unit of weight by pressing the Unit
button
6
. You can choose between “g / kg“
and “oz / lb“.
j Place the food you wish to weigh in the bowl.
j The LCD readout
5
indicates the weight of the
food in the selected unit of weight.
j Now press the zero button
7
. The scale now
reads “TARE“.
j Now place more food in the weighing bowl
1
.
j The LCD readout
5
indicates the weight of the
food you have added in the selected unit of weight.
j Continue in this way only until the maximum
capacity of the kitchen scale
2
is reached or
the weighing bowl
1
is full.

10 GB/IE
Q
Remove part of the weighed
food
j Place the weighing bowl
1
on the kitchen
scale
2
.
j Press the ON / OFF button
3
to switch the
kitchen scale
2
on.
j
Select the unit of weight by pressing the Unit
button
6
. You can choose between
“
g / kg“
and
“
oz / lb“.
j Place the food you wish to weigh in the bowl.
j The LCD readout
5
indicates the weight of the
food in the selected unit of weight.
j Now press the Zero button
7
.
j Now remove the required amount of food from
the weighing bowl
1
.
j The LCD readout
5
indicates the weight of the
food you have removed as a negative number.
Q
Set the countdown timer / alarm
The timer on the kitchen scale has a time span of 0
to 99.50 minutes. The set time is counted down in
reverse to “0“. An alarm signal then sounds and
the alarm display “
“
15
flashes.
j Press the ON / OFF button
3
to switch the
kitchen scale
2
on.
j Press the Timer button
4
.
j Set the required time by pressing the Timer button
“
“
6
, or the Timer button “ “
7
.
j Press the Timer button
4
again to confirm the
set time and to start the countdown timer.
j Press the Timer button
4
again to stop the
countdown timer.
j Press the Timer button
4
again to reset the set
time to “0“.
NOTE: When the set time has elapsed, an
alarm signal sounds.
j
Press the ON / OFF button
3
to stop the alarm
and
at the same time switch off the kitchen scale
2
.
Q
Display ambient temperature
When the kitchen scale
2
is switched on, the LCD
readout
5
shows the current ambient temperature.
This is indicated by the temperature display
12
in °C.
Q
Switch off the kitchen scale
The kitchen scale
2
switches itself off automatically
after 90 seconds of inactivity to save energy.
j Press the ON / OFF button
3
to switch the
kitchen scale
2
off manually.

11 GB/IE
Q
Cleaning
j Clean the product with a slightly dampened,
non-fluffing cloth. To remove more stubborn
dirt, you can also dampen the cloth with a
weak soap solution.
j Do not use chemical cleaners, scouring agents
or sharp objects for cleaning. These can dam-
age the product.
j Never immerse the product in water or other
liquids. This can damage the product.
j The weighing bowl
1
is dishwasher safe.
Q
Disposal
The packaging is made entirely of recy-
clable materials, which you may dispose
of at local recycling facilities.
Contact your local refuse disposal authority for more
details of how to dispose of your worn-out product.
To help protect the environment, please
dispose of the product properly when it
has reached the end of its useful life and
not in the household waste. Information on
collection points and their opening hours
can be obtained from your local authority.
Faulty or used batteries must be recycled in accord-
ance with Directive 2006 / 66 / EC. Please return
the batteries and/or the device to the available
collection points.
Environmental damage
through incorrect disposal
of the batteries!
Batteries may not be disposed of with the usual do-
mestic waste. They may contain toxic heavy metals
and are subject to hazardous waste treatment rules
and regulations. The chemical symbols for heavy
metals are as follows: Cd = cadmium, Hg= mercury,
Pb = lead. That is why you should dispose of used
batteries at a local collection point.
Q
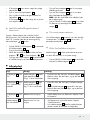
Troubleshooting
Error Cause Solution
The LCD readout
5
indicates “Err“.
The maximum capacity
of the kitchen scale
2
of
5 kg / 11 lb has been
exceeded.
j Remove the food from the kitchen scale
2
.
j Reduce the amount of food and weigh it in
several steps.
The LCD readout
5
indicates “Err“ and
does not change.
The maximum capacity of
the kitchen scale
2
of 5
kg / 11 lb has been
exceeded.
j Remove the food from the kitchen scale
2
.
j Switch the kitchen scale
2
off and then back
on again.
j Reduce the amount of food and weigh it in
several steps.
The LCD readout
5
indicates “Lo“.
The battery is empty.
j Replace the battery as described in the
“Replacing battery“ chapter.
It is not possible to
switch the kitchen
scale
2
on.
The battery may be
empty.
j Replace the battery as described in the
“Replacing battery“ chapter.
j If it is still not possible to switch the kitchen scale
2
on, please contact a specialist.

12 FI
Käyttötarkoitus .......................................................................................................................... Sivu 13
Osien kuvaus ................................................................................................................................ Sivu 13
Tekniset tiedot .............................................................................................................................. Sivu 13
Toimituksen sisältö ................................................................................................................... Sivu 13
Turvaohjeet
Yleiset turvallisuus ohjeet ...................................................................................................................... Sivu 14
Paristojen turvaohjeet ........................................................................................................................... Sivu 15
Käyttöönotto
Paristojen vaihtaminen ......................................................................................................................... Sivu 16
Punnitus ................................................................................................................................................. Sivu 16
Punnitus ja lisäys................................................................................................................................... Sivu 16
Punnittavan tuotteen / aineen osittainen poisto .................................................................................. Sivu 17
Count-Down-ajastimen / hälytyksen säätö .......................................................................................... Sivu 17
Ympäristön lämpötilan näyttö ............................................................................................................. Sivu 17
Keittiövaa‘an kytkeminen pois päältä................................................................................................. Sivu 17
Vian määritys ............................................................................................................................... Sivu 18
Puhdistus .......................................................................................................................................... Sivu 18
Jätehuolto ........................................................................................................................................ Sivu 18

13 FI
Keittiövaaka
Q
Käyttötarkoitus
Tämä laite soveltuu elintarvikkeiden kotitaloudessa
tarvittavien määrien punnitukseen, lämpötilan näyt-
töön ja lyhyeen ajan mittaukseen. Keittiövaaka on
tarkoitettu mietojen, syövyttämättömien ja hankaa-
mattomien nesteiden tai kiinteiden aineiden painon
mittaukseen. Sitä ei ole tarkoitettu lääkeaineiden tai
kiellettyjen aineiden punnitukseen. Tuotetta ei saa
käyttää muulla kuin edellä kuvatulla tavalla eikä
sitä saa muuttaa. Se voi aiheuttaa loukkaantumisia
ja / tai tuotteen vanhingoittumista. Lisäksi seurauksena
voi olla muita hengenvaarallisia vahinkoja ja louk-
kaantumisia. Tuote on tarkoitettu ainoastaan henki-
lökohtaiseen käyttöön, ei lääketieteelliseen tai
kaupalliseen käyttöön.
Q
Osien kuvaus
1
Punnituskulho
2
Keittiövaaka
3
PÄÄLLE- / POIS-painike (ON / OFF)
4
Ajastinpainike (T-SET)
5
Nestekidenäyttö
6
Painoyksikköpainike (UNIT) / ajastinpainike
7
Nollauspainike (Z / T) / ajastinpainike
8
Paristolokero
9
Paristolokeron kansi
10
Kiinnitin
11
Ajastinnäyttö
12
Lämpötilanäyttö
13
g / unssi-näyttö
14
kg / lb-näyttö
15
Hälytysnäyttö
Q
Tekniset tiedot
Punnitusalue: 0,1 unssi - 11 lb (naula) /
1 g - 5 kg (kilogramma)
Jako: 0,1 unssi / 1g
Lämpötila: 0 °C - 40 °C
Jako: 0,5 °C
Toleranssi: ± 2 °C
Paristot: 1 x 3 V
litiumparistoa
(CR2032 litiumnappiparistoa)
Q
Toimituksen sisältö
Tarkistakaa, kun avaatte pakkauksen, että kaikki
osat ovat mukana ja laite on kaikin puolin kunnossa.
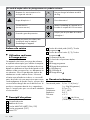
Tässä käyttöohjeessa käytetään seuraavia kuvakkeita / symboleja:
Huomioi varoitus- ja turvaohjeet!
5 kg
Älä kuormita vaakaa yli 5 kg.
Räjähdysvaara!
Elintarviketurvallinen!
Tasavirta (Virta- ja jännitelaji)
Hävitä pakkaus ja laite
ympäristöystävällisesti!
Pidä suojakenkiä.
Paristoja ei saa hävittää tavallisen
kotitalousjätteen mukana!
Älä koskaan jätä lapsia
pakkausmateriaalien ja laitteen
läheisyyteen ilman valvontaa.

14 FI
1 digitaalinen keittiövaaka
1 punnituskulho
1 litiumparistoa
1 käyttöohje
Q
Turvaohjeet
Yleiset turvallisuus-
ohjeet
J
HENGEN- JA LOUK
KAANTU MISVAARA LAP-
SILLE! Älä jätä pakkausmateri-
aalia tai tuotetta valvomatta lasten
ulottuville. Pakkausmateriaali voi
aiheuttaa tukehtumisvaaran. Pidä
tuote aina pois lasten ulottuvilta.
J Laitetta voivat käyttää 8 vuotta
täyttäneet lapset ja henkilöt, jotka
ovat fyysisiltä tai psyykkisiltä
kyvyiltääntai aisteiltaan rajoittu-
neita tai joilla ei ole kokemusta
tai tietoa laitteen käytöstä, jos he
käyttävät laitettavalvonnan alai-
sina tai heitä on opastettu laitteen
turvallisessa käytössä ja he ovat
tietoisia laitteeseen liittyvistä vaa-
roista. Lapset eivät saa leikkiä
laitteella. Lapset eivät saa puh-
distaa tai huoltaa laitetta ilman
valvontaa.
J
5 kg
VAROITUS! LOUK-
KAANTUMISVAARA!
Älä kuormita vaakaa yli 5 kg.
Tuote voi vaurioitua.
J Älä altista laitetta
- äärimmäisille lämpötiloille,
- voimakkaalle tärinälle,
- minkäänlaiselle voimakkaalle
mekaaniselle
rasitukselle,
- suoralle auringonpaisteelle,
- magneettiselle ympäristölle,
- kosteudelle. Muuten tuote voi
vaurioitua.
J Suojaa tuote sähköstaattiselta
varaukselta / purkaukselta. Ne
voivat estää sisäisen tiedonvaih-
don, mikä saa aikaan virheellisen
näytön.
J Tarkista tuote ennen käyttöönottoa
vaurioiden varalta. Älä ota vauri-
oitunutta tuotetta käyttöön.
Älä koskaan avaa
tuotteen koteloa. Seurauksena
saattaa olla loukkaantuminen ja /
tai esinevahinko. Anna ainoastaan
asiantuntijan suorittaa korjaukset.
J Älä anna henkilöiden, jotka eivät
tunne tuotteen käyttöä, käyttää
sitä. Varmista, että jokainen
tuotetta käyttävä on lukenut sen
käyttöohjeen ja pystyy käyttä-
mään tuotetta turvallisesti.
J Sijoita tuote tukevalle, vaakasuo-
ralle ja tasaiselle alustalle.

15 FI
J Magneettiset häiriökentät voivat
estää tuotteen toiminnot. Jos
sellaisia häiriöitä esiintyy, ota
paristot hetkeksi pois ja laita ne
uudelleen paikoilleen. Toimi
siinä luvun “Paristojen vaihtami-
nen“ mukaan.
J ELINTARVIKETUR-
VALLINEN! Tällä tuot
teella ei ole vaikutusta maku- ja
hajuominaisuuksiin.
Paristojen turvaohjeet
HENGEN
VAARA! Paristoja ei saa antaa
lasten käsiin! Älä jätä paristoja
minnekään lojumaan. Vaarana on,
että lapset tai kotieläimet voivat
niellä ne. Jos paristoja on nielty,
ota välittömästi yhteys lääkäriin.
J
RÄJÄHDYSVAARA!
Älä koskaan lataa paris-
toja uudestaan, älä oikosulje niitä
tai avaa avaa niitä. Kuumentumi-
nen, palovaara ja räjähdys saat-
tavat olla seurauksena. Älä
koskaan heitä paristoja tuleen tai
veteen. Paristot voivat räjähtää.
J Vältä äärimmäisiä olosuhteita ja
lämpötiloja, jotka saattaisivat
vaikuttaa paristoihin, esim.
lämpöpattereita. Muutoin paris-
tot saattavat vuotaa.
J Poista käytetty paristo heti tuot-
teesta. Muutoin paristot saattavat
vuotaa.
J Tarkasta paristojen tiiviys sään-
nöllisesti.
J
Vuotaneet tai vaurioituneet
paristot voivat joutuessaan
kosketuksiin ihon kanssa syövyttää
ihoa; käytä siksi tällöin ehdotto-
masti sopivia suojakäsineitä!
J Vältä kosketusta ihon, silmien ja
limakalvojen kanssa, mikäli paris-
tosta on purkautunut nestettä.
Huuhtele paristonesteen kanssa
kosketuksiin joutuneet kohdat
runsaalla vedellä ja ota välittö-
mästi yhteyttä lääkäriin.
J Jos paristoissa on hieman likaa,
puhdista ne ja tuotteen kosketus-
navat kuivalla, nukkaamatto-
malla liinalla, ennen kuin laitat
paristot paikalleen.
J Mikäli laite on pitkään käyttä-
mättömänä, poista paristot
laitteesta.
J Noudata oikeaa napaisuutta
paristojen asennuksessa. Se on
merkitty paristolokeroon. Muu-
toin paristot saattavat räjähtää.
J Aseta paristot huolellisesti sisään.
Muutoin tuote voi vahingoittua.

16 FI
J Älä heitä käytettyjä paristoja
kotitalousjätteen sekaan, vaan
vie ne paristojen omaan keräys-
pisteeseen.
Q
Käyttöönotto
1. Avaa paristolokero
8
tuotteen takapuolelta
siten, että painat paristolokeron kannen
9
uraa
paristolokeron
8
suuntaan ja nostat kantta
ylöspäin.
2. Poista eristysnauha. Se on paristojen ja paristo-
lokeron
8
välissä.
3. Aseta paristolokeron kansi
9
takaisin paristo-
lokeroon
8
. Varmista, että paristolokeron kan-
nen
9
molemmat laajennusosat menevät
paristolokeron
8
molempiin aukkoihin. Paina
paristolokeron kantta
9
paristolokeron
8
päälle, kunnes se tuntuvasti ja kuuluvasti lukittuu
paikoilleen.
Q
Paristojen vaihtaminen
1. Avaa paristolokero
8
kuten aikaisemmin
kuvattiin.
2. Poista käytetty paristo paristolokerosta
8
vetämällä kiinnitintä varovasti
10
ulospäin. Älä
vedä liian lujasti kiinnittimestä
10
, jotta se ei
vahingoitu.
Poista paristo paristolokerosta
8
.
3. Aseta uusi paristo sisään. Tarkista oikeanapai-
suus. ”+” täytyy näyttää ylöspäin ja paristo
tulee pitää paristolokerossa
8
.
4. Sulje paristolokero
8
kuten aikaisemmin
kuvattiin.
Q
Punnitus
HUOMAUTUS: Keittiövaa´assa
2
näkyy aina
alussa 0g / 0,0 oz (lämpötila näytetään myös),
kun kytket sen päälle.
Jos asetat punnituskulhon
1
ennen päällekytke-
mistä keittiövaa‘an
2
päälle, kytkennän jälkeen
näytetään 0g / 0,0 unssia ”zero”.
Mutta jos asetat punnituskulhon
1
keittiövaa‘an
2
päälle vasta päällekytkennän jälkeen, näyttää se
punnituskulhon
1
painon. Paina nollauspainiketta
7
asettaaksesi näytön jälleen asentoon 0g /
0,0 unssia.
j Aseta punnituskulho
1
keittiövaa‘an
2
päälle.
j Paina PÄÄLLE / POIS-painiketta
3
kytkeäksesi
keittiövaa‘an
2
päälle.
j Valitse painoyksikkö siten, että painat painoyk-
sikkö-painiketta
6
. Voit valita joko ”g / kg” tai
”unssia / lb”.
j Aseta punnittava tuote vaa‘an päälle.
j Nestekidenäyttö
5
näyttää sen painon vali-
tussa painoyksikössä.
HUOMAUTUS: Vaaka toimii ilman punnituskul-
hoa
1
samalla tavoin. Noudata yksinkertaisesti
edellä kuvattuja vaiheita ilman punnituskulhoa
1
.
Q
Punnitus ja lisäys
Keittiövaa‘alla
2
voi tehdä punnituksia peräjälkeen
ilman, että punnittava aine täytyisi välillä ottaa pois
punnituskulhosta
1
.
j Aseta punnituskulho
1
keittiövaa‘an
2
päälle.
j Paina PÄÄLLE / POIS-painiketta
3
kytkeäksesi
keittiövaa‘an
2
päälle.
j Valitse painoyksikkö siten, että painat painoyk-
sikkö-painiketta
6
. Voit valita joko ”g / kg” tai
”oz / lb”.
j Aseta punnittava tuote vaa‘an päälle.
j Nestekidenäyttö
5
näyttää sen painon vali-
tussa painoyksikössä.
j Paina nyt nollauspainiketta
7
. Vaaka näyttää
nyt ”TARE”.
j Lisää nyt punnituskulhoon
1
uusi punnittava
tuote tai samaa ainetta.
j Nestekidenäyttö
5
näyttää uudelleen lisätyn
tuotteen / aineen painon valitussa painoyksikössä.
j Toista tätä menetelmää korkeintaan niin kauan,
kunnes keittiövaa‘an
2
maksimikuormitus on

17 FI
saavutettu tai punnituskulho
1
on lastattu
täyteen.
Q
Punnittavan tuotteen /
aineen osittainen poisto
j Aseta punnituskulho
1
keittiövaa‘an
2
päälle.
j Paina PÄÄLLE / POIS-painiketta
3
kytkeäksesi
keittiövaa‘an
2
päälle.
j Valitse painoyksikkö siten, että painat painoyk-
sikkö-painiketta
6
. Voit valita joko ”g / kg” tai
”oz / lb”.
j Aseta punnittava tuote vaa‘an päälle.
j Nestekidenäyttö
5
näyttää sen painon vali-
tussa painoyksikössä.
j Paina nyt nollauspainiketta
7
.
j Poista nyt haluamasi määrä punnittavasta
aineesta punnituskulhosta
1
.
j Nestekidenäyttö
5
näyttää punnittavasta
aineesta poistetun painon negatiivisena arvona.
Q
Count-Down-ajastimen/
hälytyksen säätö
Keittiövaa‘an ajastimessa on 0 - 99,50 minuutin
aikaväli. Säädettyä aikaa lasketaan taaksepäin aina
nollaan ”0” asti. Sen jälkeen kuuluu hälytysääni ja
hälytysnäyttö ”
“
15
vilkkuu.
j Paina PÄÄLLE / POIS-painiketta
3
kytkeäksesi
keittiövaa‘an
2
päälle.
j Paina ajastinpainiketta
4
.
j Säädä haluamasi aika siten, että painat ajastin-
painiketta ”
“
6
, tai ajastinpainiketta ” “
7
.
j Paina ajastinpainiketta
4
uudestaan vahvis-
taaksesi säädetyn ajan ja käynnistääksesi ajan
laskemisen taaksepäin, count-downin.
j Paina ajastinpainiketta
4
uudestaan pysäyt-
tääksesi count-down-ajastimen.
j Paina ajastinpainiketta
4
vielä kerran aset-
taaksesi säädetyn ajan jälleen arvoon ”0”.
OHJE: Kun säädetty aika on kulunut loppuun,
kuuluu hälytysääni.
j Paina PÄÄLLE / POIS-painiketta
3
sammut-
taaksesi hälytyksen ja kytkeäksesi samalla
keittiövaa‘an
2
pois päältä.
Q
Ympäristön lämpötilan näyttö
Kun keittiövaaka
2
on kytketty päälle, nestekide-
näytölle
5
ilmestyy vallitseva ympäristön lämpötila.
Se näytetään lämpötilanäytössä
12
°C-asteina.
Q
Keittiövaa‘an kytkeminen
pois päältä
Keittiövaaka
2
kytkeytyy energian säästämiseksi
itsestään pois päältä, kun sitä ei ole käytetty 90 se-
kuntiin.
j Paina PÄÄLLE/POIS-painiketta
3
kytkeäksesi
keittiövaa‘an
2
manuaalisesti pois päältä.

18 FI
Q
Puhdistus
j Puhdista tuote hieman kostealla, nukkaamatto-
malla liinalla. Jos lika ei lähde näin, voit kostut-
taa liinaa myös miedolla saippuavedellä.
j Älä käytä puhdistukseen kemiallisia puhdistus-
aineita, hankausaineita tai teräviä esineitä.
Muutoin tuote voi vahingoittua.
j Älä upota tuotetta koskaan veteen tai muihin
nesteisiin. Muuten tuote voi vahingoittua.
j Punnituskulhon
1
voi pestä astianpesukoneessa.
Q
Jätehuolto
Pakkaus on ympäristöystävällista materi-
aalia, jonka voit viedä paikalliseen kier-
rätyspisteeseen.
Saat lisätietoa käytettyjen tuotteiden jätehuoltomah-
dollisuuksista kunnan- tai kaupungintoimistosta.
Älä heitä käytettyä tuotetta talousjättei-
siin. Toimi ympäristöystävällisesti toimitta-
malla se asianmukaiseen jätehuoltoon.
Paikallisesta kunnan- tai
kaupungintoimistosta saat lisätietoa kier-
rätyspisteistä ja aukioloajoista.
Vahingoittuneet tai kuluneet paristot on kierrätettävä
direktiivin 2006 / 66 / EC mukaan. Toimita paristo
ja / tai tuote asianmukaiseen keräyspisteeseen.
Paristojen väärä hävittäminen
aiheuttaa ympäristövahinkoja!
Akkuja ei saa hävittää talousjätteenä. Ne voivat
sisältää myrkyllisiä raskasmetalleja ja ne kuuluvat
ongelmajätekäsittelyyn. Raskasmetallien kemialliset
merkit ovat seuraavat: Cd = kadmium, Hg= eloho-
pea, Pb = lyijy. Toimita tästä syystä vanhat käytetyt
akut kunnalliseen keräyspisteeseen.
Q
Vian määritys
Häiriö Syy Ratkaisu
Nestekidenäytöllä
5
näkyy „Err“.
Keittiövaa’an
2
maksimi-
kuormitus 5 kg /
11 lb on ylitetty.
j Poista punnittava tuote keittiövaa'asta
2
.
j Vähennä punnittavaa tuotetta/ainetta ja pun-
nitse se useammassa vaiheessa.
Nestekidenäyttö
5
näyttää „Err“ ja jää
tähän tilaan.
Keittiövaa'an
2
maksimi-
kuormitus 5 kg /
11 lb on ylitetty.
j Poista punnittava tuote keittiövaa'asta
2
.
j Kytke keittiövaaka
2
pois päältä ja jälleen päälle.
j Vähennä punnittavaa tuotetta/ainetta ja pun-
nitse se useammassa vaiheessa.
Nestekidenäytöllä
5
näkyy “Lo“.
Paristot ovat lopussa.
j Vaihda paristot luvun "Paristojen vaihtaminen"
mukaisesti.
Keittiövaaka
2
ei
kytkeydy päälle.
Paristot ovat mahdollisesti
lopussa.
j Vaihda paristot luvun "Paristojen vaihtaminen"
mukaisesti.
j Jos keittiövaakaa
2
ei vieläkään voi kytkeä
päälle, ota yhteyttä huoltoliikkeeseen.

19 SE
Ändamålsenlig användning ...........................................................................................Sidan 20
Beskrivning av komponenterna ................................................................................Sidan 20
Tekniska data .............................................................................................................................Sidan 20
Leveransomfång ......................................................................................................................Sidan 20
Säkerhetsinformation
Allmän säkerhetsinformation .............................................................................................................Sidan 21
Säkerhetsinformation beträffande batterier ......................................................................................Sidan 22
Idrifttagande
Byte av batterier .................................................................................................................................Sidan 23
Vägning ..............................................................................................................................................Sidan 23
Vägning och tillägg ............................................................................................................................Sidan 23
Stegvis borttagning av ingredienser .................................................................................................Sidan 23
Inställning av nedräkningstimer / larm ..............................................................................................Sidan 24
Visning av omgivningstemperatur .....................................................................................................Sidan 24
Avstängning av köksvågen................................................................................................................Sidan 24
Åtgärdande av fel ..................................................................................................................Sidan 24
Rengöring ......................................................................................................................................Sidan 25
Avfallshantering ......................................................................................................................Sidan 25

20 SE
Köksvåg
Q
Ändamålsenlig användning
Denna apparat är avsedd för vägning och tarering
av för hushåll vanliga mängder av livsmedel, för
temperaturvisning och för korttidsmätning. Den
digitala köksvågen är avsedd för att fastställa vikten
på icke aggressiva, ej frätande och ej nötande vätskor
eller fasta ämnen. Den är ej avsedd för vägning av
medikament eller otillåtet material. Annan använd-
ning än den som beskrivits eller en förändring av
produkten är inte tillåten och kan förorsaka skador
på produkten. Detta kan dessutom leda till livsfarliga
situationer och personskador. Produkten är avsedd
för eget bruk, ej för medicinsk eller kommersiell an-
vändning.
Q
Beskrivning av komponenterna
1
Vågskål
2
Köksvåg
3
TILL- / FRÅN-knapp (ON / OFF)
4
Timer-knapp (T-SET)
5
LC-display
6
Knapp för viktenhet (UNIT) / timer-knapp
7
Nollställningsknapp (Z / T) / timer-knapp
8
Batterifack
9
Lock för batterifack
10
Klämma
11
Timer-display
12
Temperatur-display
13
g / oz-display
14
kg / lb-display
15
Larmindikator
Q
Tekniska data
Viktområde: 0,1 oz - 11 lb (pund) /
1 g - 5 kg (kilogram)
Noggrannhet: 0,1 oz / 1g
Temperatur: 0 °C - 40 °C
Indelning: 0,5 °C
Tolerans: ± 2 °C
Batterier: 1 x 3 V
litiumbatterier
(CR2032 litium-knappcellsbatterier)
Q
Leveransomfång
Kontrollera att leveransomfånget är fullständigt
omedelbart efter att du har packat upp produkten.
Kontrollera även att produkten och alla dess delar
är i felfritt skick.
I den här bruksanvisningen används följande piktogramsymboler :
Observera varningar och
säkerhetsanvisningarna!
5 kg
Belasta ej vågen över 5 kg.
Explosionsrisk! Livsmedelsäkta!
Likström (ström och spänningstyp)
Lämna in förpackningen och apparaten
till miljövänlig återvinning!
Använd skyddshandskar. Kasta inte batterier i hushållssoporna!
Låt inte barn leka med
förpackningsmaterial och produkt.
Sivu latautuu ...
Sivu latautuu ...
Sivu latautuu ...
Sivu latautuu ...
Sivu latautuu ...
Sivu latautuu ...
Sivu latautuu ...
Sivu latautuu ...
Sivu latautuu ...
Sivu latautuu ...
Sivu latautuu ...
Sivu latautuu ...
Sivu latautuu ...
Sivu latautuu ...
Sivu latautuu ...
Sivu latautuu ...
Sivu latautuu ...
Sivu latautuu ...
Sivu latautuu ...
Sivu latautuu ...
Sivu latautuu ...
Sivu latautuu ...
Sivu latautuu ...
Sivu latautuu ...
Sivu latautuu ...
Sivu latautuu ...
Sivu latautuu ...
Sivu latautuu ...
Sivu latautuu ...
Sivu latautuu ...
Sivu latautuu ...
Sivu latautuu ...
Sivu latautuu ...
Sivu latautuu ...
Sivu latautuu ...
Sivu latautuu ...
-
 1
1
-
 2
2
-
 3
3
-
 4
4
-
 5
5
-
 6
6
-
 7
7
-
 8
8
-
 9
9
-
 10
10
-
 11
11
-
 12
12
-
 13
13
-
 14
14
-
 15
15
-
 16
16
-
 17
17
-
 18
18
-
 19
19
-
 20
20
-
 21
21
-
 22
22
-
 23
23
-
 24
24
-
 25
25
-
 26
26
-
 27
27
-
 28
28
-
 29
29
-
 30
30
-
 31
31
-
 32
32
-
 33
33
-
 34
34
-
 35
35
-
 36
36
-
 37
37
-
 38
38
-
 39
39
-
 40
40
-
 41
41
-
 42
42
-
 43
43
-
 44
44
-
 45
45
-
 46
46
-
 47
47
-
 48
48
-
 49
49
-
 50
50
-
 51
51
-
 52
52
-
 53
53
-
 54
54
-
 55
55
-
 56
56


Silvercrest HG00409C Omistajan opas
- Kategoria
- Personal scales
- Tyyppi
- Omistajan opas
- Tämä käsikirja sopii myös
muilla kielillä
- English: Silvercrest HG00409C Owner's manual
- svenska: Silvercrest HG00409C Bruksanvisning
- Deutsch: Silvercrest HG00409C Bedienungsanleitung
- dansk: Silvercrest HG00409C Brugervejledning
- français: Silvercrest HG00409C Le manuel du propriétaire
- Nederlands: Silvercrest HG00409C de handleiding
Liittyvät paperit
-
Silvercrest H14271 Operation and Safety Notes
-
-
-
-
-
-
-
Silvercrest SKWS 5 A1 Operating Instructions Manual
-